Booting the New OpenVMS System Disk
» Table of Contents | » Glossary | » Index |
After you have successfully installed the OpenVMS operating system, the next step is to make the new system disk the default boot device. For OpenVMS Alpha systems, see “Specifying the Default Boot Device on Alpha Systems”. For OpenVMS I64 systems, this step may already have been done (see step 22 of the installation procedure in “Installing OpenVMS Using Option 1 of the Operating System Menu”), in which case you can boot the OpenVMS I64 system disk by performing the steps in “Booting the OpenVMS I64 System Disk”.
To boot the OpenVMS Alpha system disk, follow the instructions provided in “Booting the OpenVMS Alpha System Disk”.
For booting the OpenVMS Alpha system disk, first designate the new system disk as the default boot device by performing the steps in “Specifying the Default Boot Device on Alpha Systems”. Then, to boot the disk, perform the steps in “How to Boot the New System Disk”.
Before you boot the new system disk, perform the following steps:
Halt the system by pressing either Ctrl/P or the Halt button. For more information about halting your Alpha computer, see Appendix A “Booting and Shutting Down Your OpenVMS Alpha System”.
At the console prompt (>>>), enter the SET BOOTDEF_DEV command in the following format:
SET BOOTDEF_DEV target-drive
Substitute the device name of the system disk for target-drive. The SET BOOTDEF_DEV command tells the system which disk to boot from. For example, if the system disk has the device name DKA400, enter the following command and press Enter:

>>> SET BOOTDEF_DEV DKA400If the system disk is connected to a hierarchical storage device (HSx), the format for specifying that drive is different. For example, on a DEC 7000 series system connected to an HSC device, the command is similar to the following:
>>> SET BOOTDEF_DEV DUA20.14.0.2.0For more information about setting and showing the default boot device, see Appendix A “Booting and Shutting Down Your OpenVMS Alpha System” .
To boot the system disk, enter the following command and press Enter:
|
When the system starts booting, the initial informational messages displayed are similar to the following:
|
|
The following steps explain how to boot your new OpenVMS I64 system disk. For more information about this and special booting operations, see “Booting Operations”
| NOTE: Make sure you remove the DVD from the DVD/CD drive before booting the system disk. | |
Take the following actions to boot the new system disk, depending on whether you have configured your system with a boot option for your system disk (see steps 8 and 22 in “Installing OpenVMS Using Option 1 of the Operating System Menu”):
If you have configured your system with a boot option for your system disk, your system disk is displayed as a boot option in the EFI Boot Manager menu. Select your system disk and press Enter. If your system disk is the first option in the EFI Boot Manager menu, it might boot automatically after the 10-second countdown.
If you have not configured your system with a boot option for your disk, follow these steps:
Press Enter or any other key (you might see text that instructs you to "hit any key to cold reboot"). The machine displays several boot-related messages and then displays the EFI Boot Manager menu.
Go to the EFI Shell prompt by selecting the EFI Shell [Built-in] option from the EFI Boot Manager menu. (This might be selected automatically if you do not make a selection before the EFI countdown completes.) A display similar to the following is displayed. An explanation of the two types of devices shown (blk and fs) follows the example.
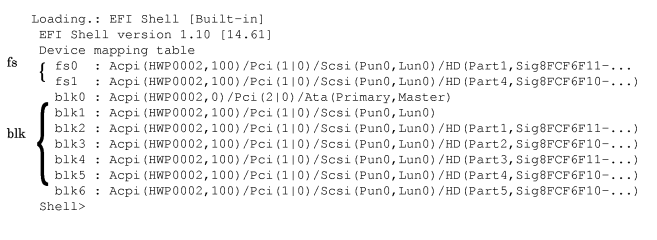
fs The fs devices are file-structured logical partitions on physical disks that are included with your Integrity server system. One or more fs device exists for each volume with a bootable partition or diagnostic partition. Generally, fs0: corresponds to the target disk on which you installed OpenVMS I64 (unless the DVD was not removed, in which case fs1: corresponds to the target disk). For example, if the target disk is DKA0, then fs0: most likely corresponds to the target disk. On the other hand, if the target disk is a DKA100 or DKB200 or similar, the corresponding EFI device depends on what partitions are configured on the target disk.
blk The blk devices are block devices. Multiple blk devices exist for each volume that has a bootable partition or diagnostic partition. These devices may include the DVD device as well as the diagnostic partitions on OpenVMS system disks. Diagnostic partitions are intended and reserved for use by HP Services. (For more information about this partition, see Appendix I “Alternative Ways to Initialize the System Disk”.)
To boot the OpenVMS I64 system disk, enter the following command at the EFI Shell prompt, where fs n: is the device associated with the system disk (probably fs0:):
Shell> fsn:\efi\vms\vms_loader.efiThe OpenVMS I64 operating system now starts booting. A display similar to the following is displayed, followed by the prompt for user name and password:
    HP OpenVMS Industry Standard 64 Operating System, Version 8.3
     (c) Copyright 1976-2006 Hewlett-Packard Development Company, L.P.
Note that HP Integrity servers maintain a system event log (SEL) within system console storage, and OpenVMS I64 automatically transfers the contents of the SEL into the OpenVMS error log. On certain machines, during a successful boot operation while using a console, you might see a message indicating that the Baseboard Management Controller (BMC) SEL is full. You can safely continue when the BMC SEL is full by following the prompts; OpenVMS processes the contents of the SEL.
When you boot OpenVMS from a new system disk, a special startup procedure runs that does the following:
Gives you the opportunity to configure the system for standalone or OpenVMS Cluster operation (see “Joining an OpenVMS Cluster”).
Runs AUTOGEN to evaluate your hardware configuration, estimate typical workloads, and set system parameters (see “Running AUTOGEN”).
Reboots your system with the new parameters (see “Rebooting after AUTOGEN”)
After the system is rebooted with the new parameters, you can log into your SYSTEM account, as explained in “Logging In to the SYSTEM Account”. On Integrity servers, if you did not allow the OpenVMS installation procedure to create a boot option for your system disk, you can set up such an option now, as explained in “Configuring and Managing OpenVMS Booting on Integrity Servers ”. Appendix B “Configuring OpenVMS I64 Hardware Operation and Boot Operations, and Booting and Shutting Down Your System” includes additional information regarding setting up and booting HP Integrity servers.