| Previous | Contents | Index |
Before you start this chapter, be sure to read the explanation of data collections, events, thresholds, and occurrences, as well as background and foreground data collection in Chapter 1. |
This chapter provides the following information:
For information about installing the HP Availability Manager on OpenVMS or Windows systems, see the HP Availability Manager Installation Instructions. You can access these instructions from the documentation link at the Availability Manager web page at the following URL:
http://www.hp.com/products/openvms/availabilitymanager |
The Installation Instructions also include an explanation of how to
install and use both DECamds and the Availability Manager on the same
system.
2.1 Configuring and Starting the Data Collector
Configuration tasks include defining logical names and protecting
passwords. After you complete these tasks, you can start the Data
Collector. The following sections describe all of these operations.
2.1.1 Defining Logical Names
OpenVMS kits for DECamds Version 7.3-2B and Availability Manager Versions 2.5 and 2.6 provide a template file that system managers can modify to define the logical names used by the Data Collector. You can copy the file SYS$MANAGER:AMDS$SYSTARTUP.TEMPLATE to SYS$MANAGER:AMDS$SYSTARTUP.COM and edit it to change the default logicals that are used to start the Data Collector and to find its configuration files.
The most common logicals, especially in a mixed-environment cluster configuration, are the ones shown in Table 2-1:
| Logical | Description |
|---|---|
| AMDS$GROUP_NAME | Specifies the group that this node will be associated with when it is monitored. |
| AMDS$DEVICE | For nodes with more than one network adapter, allows you to specify which adapter the Availability Manager should use. |
| AMDS$RM_DEFAULT_INTERVAL |
The number of seconds between multicast "Hello" messages from
the Data Provider to the Data Analyzer node when the Data Collector is
inactive or minimally active.
The minimum value is 5. The maximum value is 300. |
| AMDS$RM_SECONDARY_INTERVAL |
The number of seconds between multicast "Hello" messages from
the Data Collector to the Data Analyzer node when the Data Collector is
active.
The minimum value is 5. The maximum value is 1800. |
Multicast "Hello" messages are notifications from OpenVMS nodes that use the Data Collector. |
The Data Collector transmits multicast "Hello" messages for the node that any Data Analyzer on the local network receives. The rate at which these messages are transmitted is regulated by the settings of the following logicals:
AMDS$RM_DEFAULT_INTERVAL
AMDS$RM_SECONDARY_INTERVAL
Files containing these logicals are in SYS$MANAGER:AMDS$LOGICALS.COM.
The shorter the time interval, the faster the node is found and
configured, (although the result is slightly more network traffic).
2.1.2 Protecting Passwords
To change passwords to allow a Data Analyzer to monitor a node, edit the following file:
SYS$MANAGER:AMDS$DRIVER_ACCESS.DAT |
The passwords section of the file is close to the end of the file,
after the Password documentation section. The passwords in this file
correspond to the passwords in the Security page shown in Section 7.9.1.
Note that you can specify a list of passwords in this file. See the
comments in the file for details.
2.1.3 Starting the Data Collector
Starting with OpenVMS Version 7.2, the files needed to run the Data Collector on OpenVMS nodes are shipped with the OpenVMS operating system. However, if you want the latest Data Collector software, you need to install it from the Availability Manager Data Collector kit. Once the Data Collector is running on a node, you can monitor that node using DECamds or the Availability Manager.
For the Data Collector to access requests to collect data and to support the Data Analyzer, you must start the Data Collector by entering the START command:
$ @SYS$STARTUP:AMDS$STARTUP START
|
To start the Data Collector when the system boots, add the following command to the SYS$MANAGER:SYSTARTUP_VMS.COM file:
$ @SYS$STARTUP:AMDS$STARTUP START
|
If you make changes to either the AMDS$DRIVER_ACCESS.DAT or AMDS$LOGICALS.COM, you must restart the driver to load the changes. Enter the following command:
$ @SYS$STARTUP:AMDS$STARTUP RESTART
|
You can start the Data Collector on all the nodes in a cluster by using the following SYSMAN command:
|
This section describes what you need to do after the Availability Manager Data Analyzer is installed. Starting the Data Analyzer is somewhat different on OpenVMS than on Windows systems. However, on both systems, starting the Data Analyzer automatically starts the Java graphical user interface (GUI), which allows you to view information that is collected from the Data Collector nodes.
The following sections contain the sequence of steps required to start
the Data Analyzer on an OpenVMS node and a Windows node.
2.2.1 How to Start the Data Analyzer on an OpenVMS Alpha or I64 Node
To start a Data Analyzer on an OpenVMS Alpha or I64 node, make sure the Data Analyzer has been installed on the node from which you wish to monitor other nodes.
To start the Data Analyzer, enter the following command:
$ avail/avail |
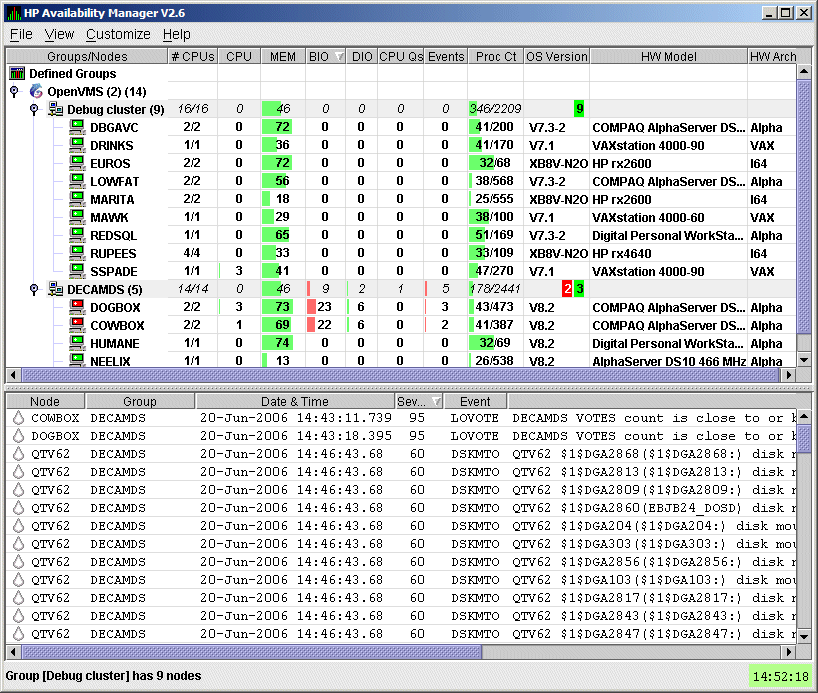
The Availability Manager then displays the main System Overview window, which is shown in Figure 2-1.
For a list of qualifiers you can use with the $ AVAIL/AVAIL command, see the HP Availability Manager Installation Instructions. |
Make sure the Data Analyzer has been installed on the Windows node from which you want to monitor other nodes. Installation instructions are at the the documentation link at the following Web site:
http://www.hp.com/products/openvms/availabilitymanager |
To start the Data Analyzer, follow these steps:
The Availability Manager then displays the main System Overview window, which
is shown in Figure 2-1.
2.3 Using the System Overview Window
Once it starts, the Availability Manager watches for multicast "Hello" messages from nodes running the Data Collector. It follows these steps:
The colors of the icons preceding each node name in Figure 2-1 indicate the state of the node.
Figure 2-1 System Overview Window
The color code of each node state is explained in Table 2-2.
| Color | Description |
|---|---|
| Brown | Attempts to configure nodes have failed---for example, because the nodes are in a connection failed state. A tooltip, which is described in Section 2.3.2.1, explains the reason for the failure. |
| Yellow | Nodes are in the attempting collection state; that is, the security check of the nodes is in progress. Nodes that remain in this state more than several seconds indicate network connectivity problems with the Data Analyzer. |
| Black | Nodes are in a path lost state; that is, the network path to the node has been lost or the node is not running. |
| Red | Nodes are in the data collection state---that is, they are collecting data---but the nodes have exceeded a threshold, causing events to be posted. Note that if an event causes the output of any message besides an informational one, a node is displayed in red. |
| Green | Nodes are in the data collection state; that is, the security check was successful, and the nodes are collecting data. |
The System Overview window is divided into two segments, or
panes: the Group/Node pane and the Event pane.
2.3.1 Using the Group/Node Pane
When you start the Availability Manager, the Group/Node pane, at the
top of the System Overview window (see Figure 2-1), displays OpenVMS
groups and nodes that the Data Analyzer has found. By default, within
each group, the Availability Manager displays the nodes with which it
can establish a connection. (If the Data Analyzer finds Windows nodes,
those are also displayed.)
2.3.1.1 Setting Up Groups
Groups are set up during installation on Data Collector nodes and are user-definable. Be sure to define groups by cluster membership. If a node is not a member of a cluster, then you can define a group by function, type of hardware, or geographical location.
If you want to change the groups being monitored, you need to use a customization option to make changes. See Section 7.4.1 for instructions.
HP recommends that you define a cluster as its own group. This is necessary for the Lock Contention, Disk Summary, Disk Volume, and Cluster data collections to function correctly. |
Groups---and the nodes in each group with which the Availability Manager is able to establish a connection---are displayed in the Group/Node pane of the System Overview window (see Figure 2-1).
To display only groups in the Group/Node pane, click the handle in front of a group name to a horizontal position, and the nodes in that group are removed, as shown for both groups in Figure 2-2. (Clicking the handle into a vertical position displays nodes again.)
Figure 2-2 Group Overview Pane

The numbers in parentheses after "OpenVMS" (in the Group/Node pane of the System Overview window) are the following:
On each group name row, following the name of the group, the number in parentheses is the number of nodes in that group with which the Availability Manager has established a connection.
On a group name row under the OS Version heading are color-coded numbers indicating the number of nodes in that group that are one of five color-coded states. These states are explained in Table 2-2.
Additional summary information about the entire group is on the group line. CPU, MEM, BIO, and DIO numbers are averages. The rest of the number are totals for all of the nodes in the group.
Notice the small triangle in the BIO heading in Figure 2-2. The direction of the triangle indicates that the nodes are sorted in descending order of BIO rates. Click on the triangle to reserve the sort order, or click on another column header to select a new item on which to sort data.
In the Group/Node pane, only nodes within a group are sorted. The
groups remain in alphabetical order. You can sort groups in the Group
Overview window by changing the sort order of one of the data column
headings (see Figure 2-2).
2.3.2 Displaying Node Information
The Group/Node pane of the System Overview window allows you to focus
on resource usage activity at a high level and to display more specific
data whenever you want. This section explains the basic use of the
Group/Node pane. For more information, see Chapter 3.
2.3.2.1 Displaying Summary Node Information
Even when nodes are not displayed on the System Overview window or the Group/Node pane, you can display important node information by placing the cursor over a group name or icon. By holding the cursor over the DECAMDS group name, for example, the tooltip similar to the one shown in Figure 2-3 is displayed, containing summary node information.
Figure 2-3 Tooltip Example: Summary Node Information
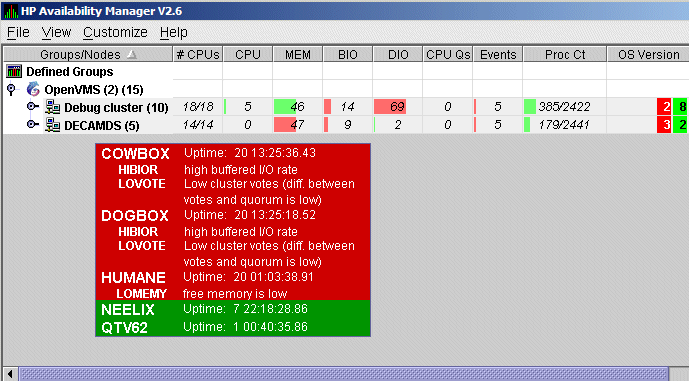
Possible tooltip colors and their meanings are in Table 2-3.
| Color | Meaning | ||||
|---|---|---|---|---|---|
| Brown | Indicates why the configuration of the node failed. | ||||
| Yellow | Shows number of RM Driver multicast "Hello" messages received and the number of attempts to configure the node ("Configuration packets sent"). Nodes that remain in this state more than several seconds indicate network connectivity problems with the Data Analyzer. | ||||
| Black |
Shows the following:
|
||||
| Red | Nodes have exceeded a threshold, causing events to be posted for the node. If an event causes the output of any message besides an informational one, a node is displayed in red. | ||||
| Green | The security check was successful, and the nodes are collecting data; node uptime is shown. |
The Group/Node pane is designed to display monitored nodes in a single pane. This format works well for sites that have relatively few nodes to monitor. However, for large sites that have many groups and nodes, scrolling through the display can be time-consuming. To help those with large sites, two additional windows are available:
The first window to help you view large sites is the Group Overview window. To view all the group name row data easily, click on the View menu at the top of the page and select "Group Overview." The Group Overview window that is displayed (Figure 2-4) is similar to the Group Overview pane in Figure 2-2.
Figure 2-4 Group Overview Window

This display is designed to provide an overview of all the groups being monitored. If you want more information about a group, place the cursor over the group name or icon. A tooltip is displayed with additional information about nodes in the group similar to the one displayed in Figure 2-3.
You can also double-click a group name to display a Single-Group
window, as explained in Section 2.3.2.3.
2.3.2.3 Displaying a Single-Group Window
The second window to help you view large sites is the Single-Group window. This display shows the nodes in one group (see Figure 2-5).
To obtain this display, you can also right-click the group name in the Group/Node pane and select the "Display" option. A separate window appears with only the nodes in the group you have selected (see Figure 2-5). This window is useful in simultaneously displaying groups that are not adjacent in the list in the Group/Node pane.
Figure 2-5 OpenVMS Single-Group Window
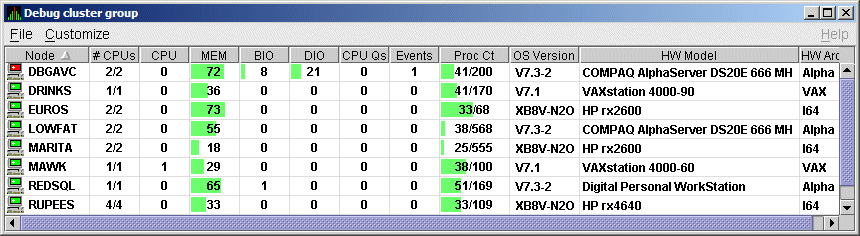
Within each group of nodes displayed, the Availability Manager displays all the nodes with which it can communicate. If some nodes in the group are not displayed, it is because the Availability Manager has not received a multicast "Hello" message from the Data Collector on that node.
The display includes the following items:
More information about node data is in Chapter 3.
Somewhat different information is displayed for a group of Windows
nodes. For more information, see Section 3.1.2.
2.3.2.4 Focusing On a Specific Node
To display more information about an individual node, double-click a node name or in the Single-Group window or the Group/Node pane. You can also right-click a node name and select the "Display..." option. The Availability Manager displays the Node Summary page shown in Figure 2-6. (The data on this page is explained in more detail in Chapter 3.)
Figure 2-6 OpenVMS Node Summary
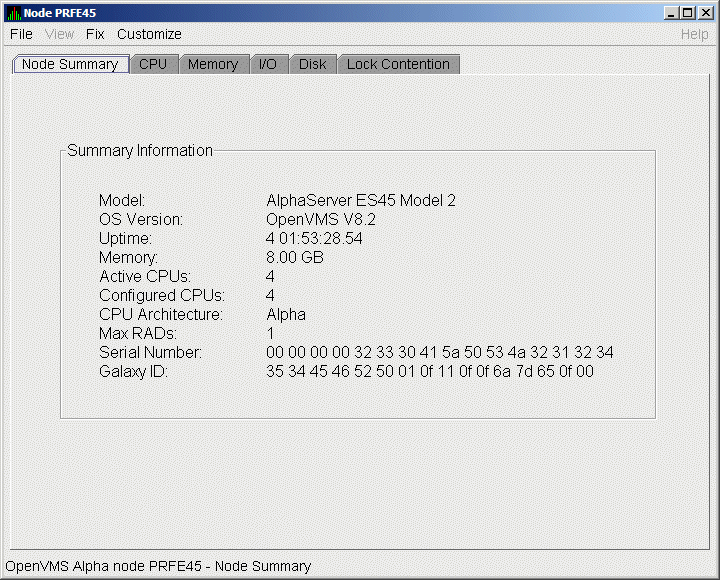
At the top of the Node Summary page are tabs that correspond to types
of node data displayed in the Group/Node pane. If you double-click a
field under a column heading in the Group/Node pane,
the Availability Manager displays a page that provides more information about
that field. For example, if you click a value under "CPU",
the Availability Manager displays a page similar to the one shown in
Figure 3-6.
2.3.2.5 Specifying Data to Be Collected
By default, the only data collected for a node is the data displayed in the Node pane (Figure 2-5). This data is called a node summary data collection. The events in the Event pane of the System Overview window (see Figure 2-1) are produced when node summary data is processed. See Appendix C for a list of events associated with node summary data.
If you want to signal additional events that are listed in Appendix C, you must collect the data associated with those events. To collect this data by default, you must enable background data collection for the data. Background and foreground data collections are explained in more detail in Section 1.4.1.2.
For OpenVMS nodes, if you want background data collection (and the associated event detection), you must turn on data collection for each type of data you want to collect. On Windows nodes, background data collection is always enabled and cannot be turned off.
To turn on various types of data to be collected, follow these steps:
The Availability Manager then displays the Data Collection Customization page (Figure 2-7).
Figure 2-7 Data Collection Customization
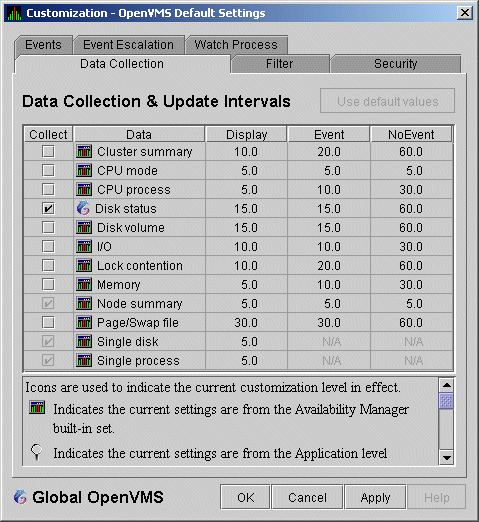
The following types of data are collected by default:
To turn on a type of data collection, select the checkbox for that type of data collection in the "Collect" column. For example, to collect CPU process data, check the checkbox for "CPU process" in the Collect column. Clicking the checkbox again clears it.
When you click a data collection name, the Explanation section at the bottom of the page tells where the data for a particular data collection is displayed. Table 7-3 summarizes this information.
You cannot turn off the collection of single disk and single process data. These types of data are collected by default when you open a Single Disk Summary page or a Process Information page, respectively.
On the Data Collection Customization page, you can change the intervals at which data is collected. Collection intervals are explained in Chapter 7.
| Previous | Next | Contents | Index |