| Previous | Contents | Index |
If a process is waiting for a resource, you can use a Process Limits fix to increase the resource limit so that the process can continue. The increased limit is in effect only for the life of the process, however; any new process is assigned the quota that was set in the UAF.
When you click the Process Limits tab, you can select any of the following options:
Direct I/O
Buffered I/O
AST
Open File
Lock
Timer
Subprocess
I/O Byte
Pagefile Quota
These fix options are described in the following sections.
6.3.3.1 Direct I/O Count Limit
You can use this fix to adjust the direct I/O count limit of a process. When you select the Direct I/O option, the Availability Manager displays the page shown in Figure 6-11.
Figure 6-11 Direct I/O Count Limit
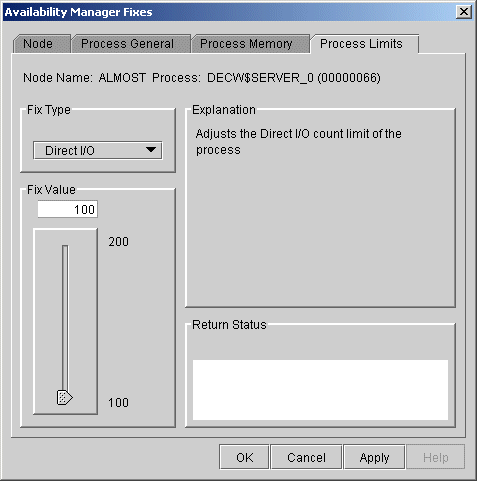
To perform this fix, use the slider to adjust the direct I/O count to the limit you want. You can also click the line above or below the slider to adjust the number by 1.
When you are satisfied with the new direct I/O count limit, click Apply at the bottom of the page to apply the fix. A message displayed on the page indicates that the fix has been successful.
6.3.3.2 Buffered I/O Count Limit
You can use this fix to adjust the buffered I/O count limit of a
process. When you select the Buffered I/O option, the Availability Manager
displays the page shown in Figure 6-12.
Figure 6-12 Buffered I/O Count Limit
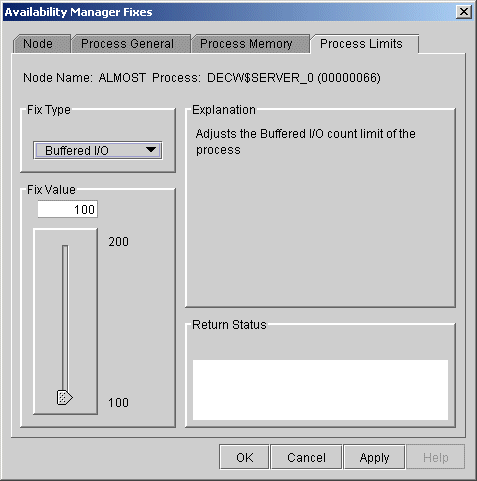
To perform this fix, use the slider to adjust the buffered I/O count to the limit you want. You can also click the line above or below the slider to adjust the number by 1.
When you are satisfied with the new buffered I/O count limit, click Apply at the bottom of the page to apply the fix. A message displayed on the page indicates that the fix has been successful.
6.3.3.3 AST Queue Limit
You can use this fix to adjust the AST queue limit of a process. When
you select the AST option, the Availability Manager displays a page similar to
the one shown in Figure 6-13.
Figure 6-13 AST Queue Limit
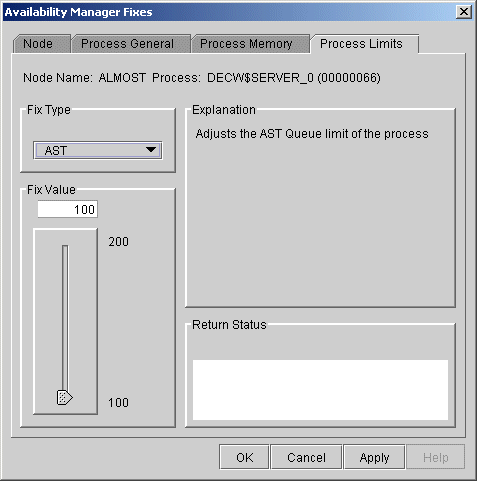
To perform this fix, use the slider to adjust the AST queue limit to the number you want. You can also click the line above or below the slider to adjust the number by 1.
When you are satisfied with the new AST queue limit, click Apply at the bottom of the page to apply the fix. A message displayed on the page indicates that the fix has been successful.
6.3.3.4 Open File Limit
You can use this fix to adjust the open file limit of a process. When
you select the Open File option, the Availability Manager displays a page
similar to the one shown in Figure 6-14.
Figure 6-14 Open File Limit
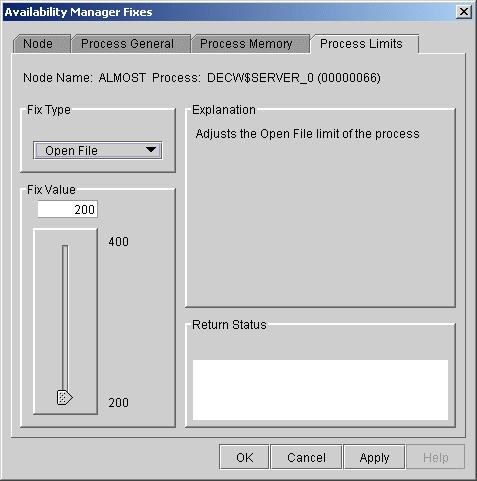
To perform this fix, use the slider to adjust the open file limit to the number you want. You can also click the line above or below the slider to adjust the number by 1.
When you are satisfied with the new open file limit, click Apply at the bottom of the page to apply the fix. A message displayed on the page indicates that the fix has been successful.
6.3.3.5 Lock Queue Limit
You can use this fix to adjust the lock queue limit of a process. When
you select the Lock option, the Availability Manager displays a page similar
to the one shown in Figure 6-15.
Figure 6-15 Lock Queue Limit

To perform this fix, use the slider to adjust the lock queue limit to the number you want. You can also click the line above or below the slider to adjust the number by 1.
When you are satisfied with the new lock queue limit, click Apply at the bottom of the page to apply the fix. A message displayed on the page indicates that the fix has been successful.
6.3.3.6 Timer Queue Entry Limit
You can use this fix to adjust the timer queue entry limit of a
process. When you select the Timer option, the Availability Manager displays
the page shown in Figure 6-16.
Figure 6-16 Timer Queue Entry Limit
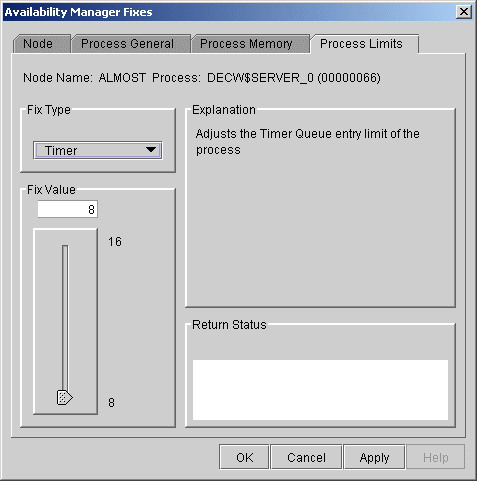
To perform this fix, use the slider to adjust the timer queue entry limit to the number you want. You can also click the line above or below the slider to adjust the number by 1.
When you are satisfied with the new timer queue entry limit, click Apply at the bottom of the page to apply the fix. A message displayed on the page indicates that the fix has been successful.
6.3.3.7 Subprocess Creation Limit
You can use this fix to adjust the creation limit of the subprocess of
a process. When you select the Subprocess option, the Availability Manager
displays the page shown in Figure 6-17.
Figure 6-17 Subprocess Creation Limit
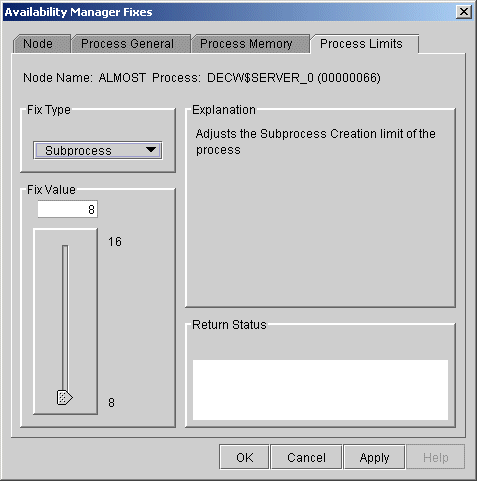
To perform this fix, use the slider to adjust the subprocess creation limit of a process to the number you want. You can also click the line above or below the slider to adjust the number by 1.
When you are satisfied with the new subprocess creation limit, click Apply at the bottom of the page to apply the fix. A message displayed on the page indicates that the fix has been successful.
6.3.3.8 I/O Byte
You can use this fix to adjust the I/O byte limit of a process. When
you select the I/O Byte option on the movable bar, the Availability Manager
displays a page similar to the one shown in Figure 6-18.
Figure 6-18 I/O Byte
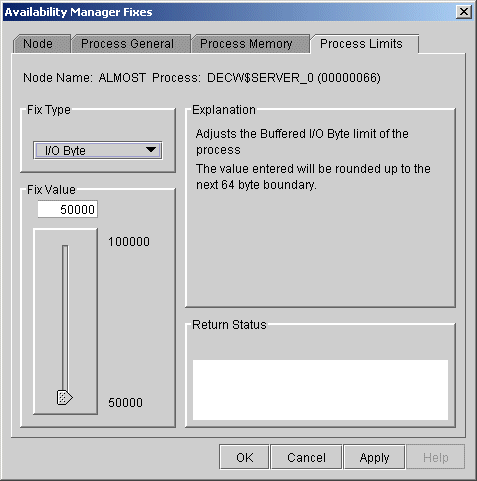
To perform this fix, use the slider to adjust the I/O byte limit to the number you want. You can also click the line above or below the slider to adjust the number by 1.
When you are satisfied with the new I/O byte limit, click Apply at the bottom of the page to apply the fix. A message displayed on the page indicates that the fix has been successful.
6.3.3.9 Pagefile Quota
You can use this fix to adjust the pagefile quota limit of a process.
This quota is share among all the processes in a job. When you select
the Pagefile Quota option, the Availability Manager displays the page shown in
Figure 6-19.
Figure 6-19 Pagefile Quota
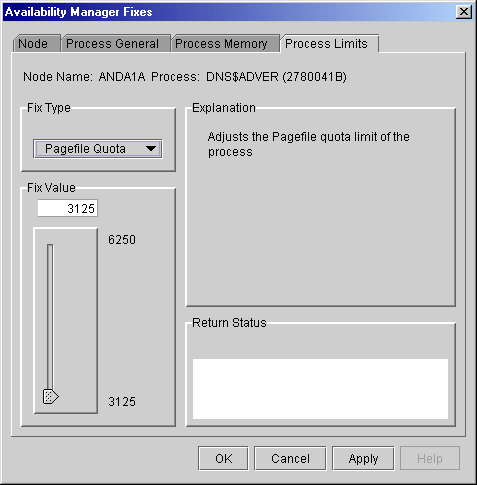
To perform this fix, use the slider to adjust the pagefile quota limit to the number you want. You can also click above or below the slider to adjust the fix value by 1.
When you are satisfied with the new pagefile quota limit, click Apply at the bottom of the page to apply the fix. A message displayed on the page indicates that the fix has been successful.
6.4 Performing Cluster Interconnect Fixes
All cluster interconnect fixes require that managed objects be enabled. |
The following are categories of cluster interconnect fixes:
The following sections describe these types of fixes. The descriptions also indicate whether or not the fix is currently available.
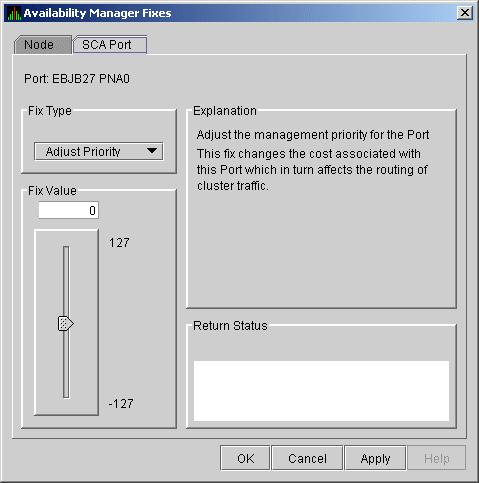
6.4.1 Port Adjust Priority Fix
To access the Port Adjust Priority fix, right-click a data item in the
Local Port Data display line (see Figure 4-3). The Availability Manager
displays a shortcut menu with the Port Fix option.
This page (Figure 6-20) allows you to change the cost associated with this port, which, in turn, affects the routing of cluster traffic.
Figure 6-20 Port Adjust Priority
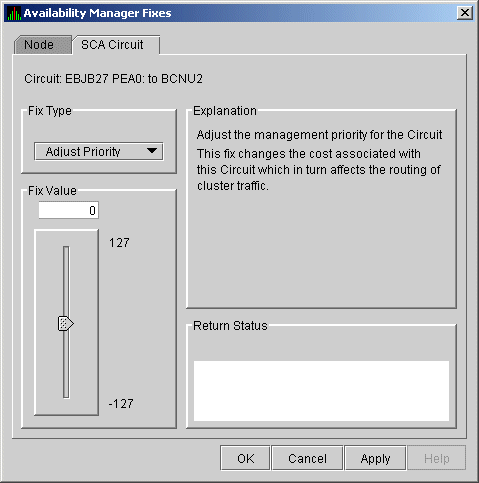
6.4.2 Circuit Adjust Priority Fix
To access the Circuit Adjust Priority fix, right-click a data item in
the circuits data display line (see Figure 4-4). The Availability Manager
displays a shortcut menu with the Circuit Fix option.
This page (Figure 6-21) allows you to change the cost associated with this circuit, which, in turn, affects the routing of cluster traffic.
Figure 6-21 Circuit Adjust Priority
6.4.3 LAN Virtual Circuit Fixes
To access LAN virtual circuit fixes, right-click a data item in the LAN
Virtual Circuit Summary category (see Figure 4-6), or use the Fix
menu on the LAN Device Details... page.
The Availability Manager displays a shortcut menu with the following options:
When you select VC LAN Fix..., the Availability Manager displays the first of several fix pages. Use the Fix Type box to select one of the following LAN VC fixes:
These fixes are described in the following sections.
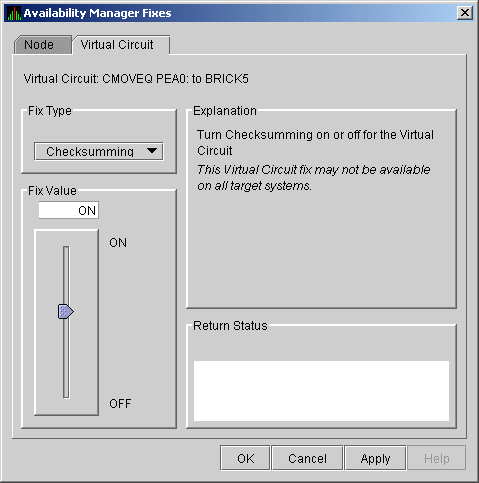
6.4.3.1 LAN VC Checksumming Fix
The LAN VC Checksumming fix (Figure 6-22) allows you to turn checksumming on or off for the virtual circuit.
Figure 6-22 LAN VC Checksumming
6.4.3.2 LAN VC Maximum Transmit Window Size Fix
The LAN VC Transmit Window Size fix (Figure 6-23) allows you to
adjust the maximum transmit window size for the virtual circuit.
Figure 6-23 LAN VC Maximum Transmit Window Size
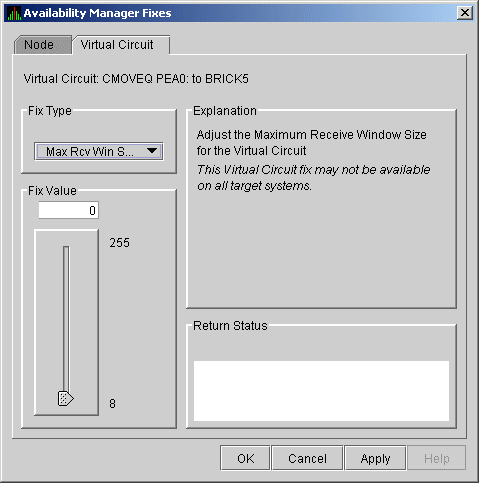
6.4.3.3 LAN VC Maximum Receive Window Size Fix
The LAN VC Maximum Receive Window Size fix (Figure 6-24) allows you
to adjust the maximum receive window size for the virtual circuit.
Figure 6-24 LAN VC Maximum Receive Window Size
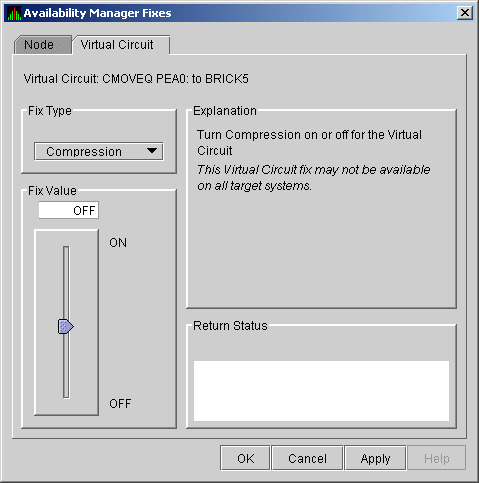
6.4.3.4 LAN VC Compression Fix
The LAN VC Compression fix (Figure 6-25) allows you to turn
compression on or off for the virtual circuit. This fix, however, might
not be available on all target systems.
Figure 6-25 LAN VC Compression
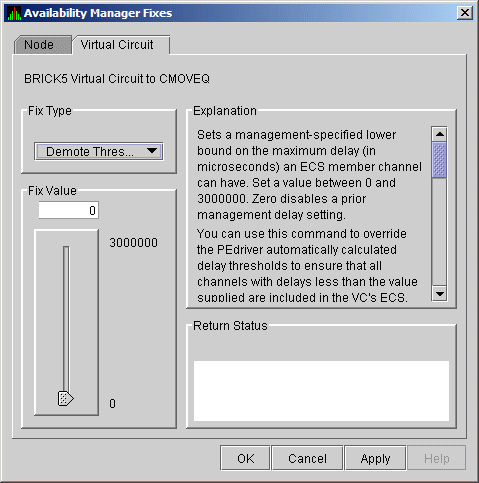
6.4.3.5 LAN VC ECS Maximum Delay Fix
The LAN VC ECS Maximum Delay fix (Figure 6-26) sets a
management-specific limit on the maximum delay (in microseconds) an ECS
member channel can have. You can set a value between 0 and 3000000.
Zero disables a prior management delay setting.
You can use this fix to override PEdriver automatically calculated delay thresholds. This ensures that all channels with delays less than the value supplied are included in the VC's ECS.
Figure 6-26 LAN VC ECS Maximum Delay
On the sample page shown in Figure 6-26, you cannot read the following text (which is displayed when you move the slider down): "The fix operates as follows: Whenever at least none tight peer channel has a delay of less than the management-supplied value, all tight peer channels with delays less than the management-supplied value are automatically included in the ECS. When all tight peer channels have delays equal to or greater than the management setting, the ECS membership delay thresholds are automatically calculated and used.
You must determine an appropriate value for your configuration by experimentation. An initial value of 2000 (2ms) to 5000 (5ms) is suggested."
On this page, the following note of caution is also displayed:
By overriding the automatic delay calculations, you can include a channel in the ECS whose average delay is consistently greater than 1.5 to 2 times the average delay of the fastest channels. When this occurs, the overall VC throughput becomes the speed of the slowest ECS member channel. An extreme example is when the management delay permits a 10Mb/sec Ethernet channel to be included with multiple 1Gb/sec channels. The resultant VC throughput drops to 10Mb/sec. |
To access LAN path fixes, right-click an item on a LAN Path (Channel) Summary line (see Figure 4-6). The Availability Manager displays a shortcut menu with the following options:
Click Fixes... or use the Fix menu on the Channel Details page. The Availability Manager displays a page with the following Fix Types:
These fixes are described in the following sections.
6.4.4.1 LAN Path (Channel) Adjust Priority Fix
The LAN Path (Channel) Adjust Priority fix (Figure 6-27) allows you
to change the cost associated with this channel by adjusting its
priority. This, in turn, affects the routing of cluster traffic.
Figure 6-27 LAN Path (Channel) Adjust Priority
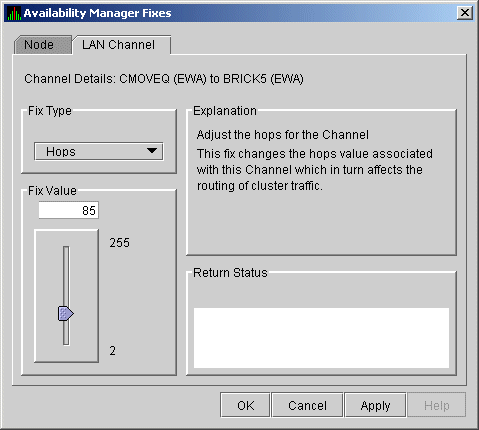
6.4.4.2 LAN Path (Channel) Hops Fix
LAN Path (Channel) Hops fix (Figure 6-28) allows you to change the
hops for the channel. This change, in turn, affects the routing of
cluster traffic.
Figure 6-28 LAN Path (Channel) Hops
6.4.5 LAN Device Fixes
To access LAN device fixes, right-click an item in the LAN Path
(Channel) Summary category (see Figure 4-6). The Availability Manager
displays a shortcut menu with the following options:
Select LAN Device Details to display the LAN Device Details window. From the Device Details window, select Fix... from the Fix menu. (These fixes are also accessible from the LAN Device Summary page.)
The Availability Manager displays the first of several pages, each of which contains a fix option:
Adjust Priority
Set Max Buffer Size
Start LAN Device
Stop LAN Device
These fixes are described in the following sections.
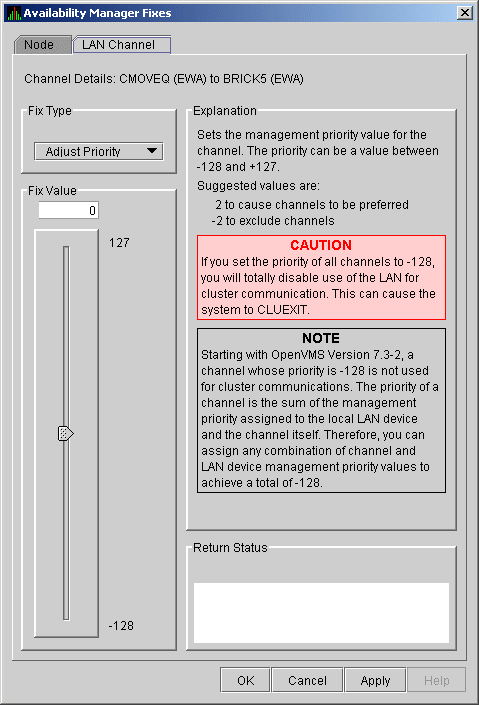
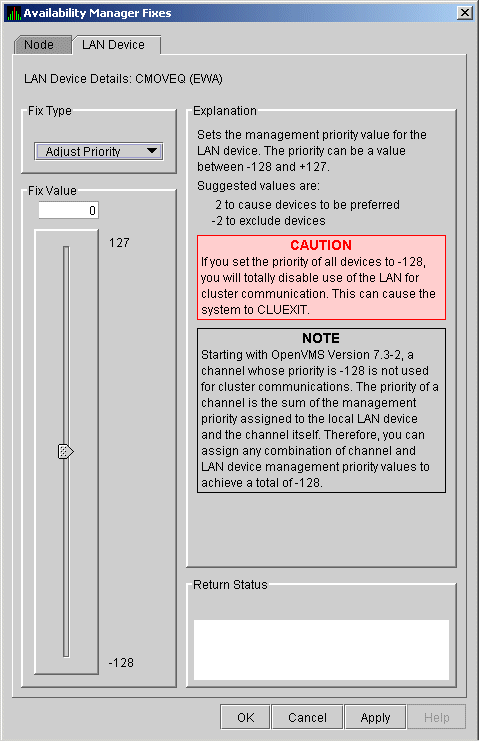
6.4.5.1 LAN Device Adjust Priority Fix
The LAN Device Adjust Priority fix (Figure 6-29) allows you to adjust
the management priority for the device. This fix changes the cost
associated with this device, which, in turn, affects the routing of
cluster traffic.
Starting with OpenVMS Version 7.3-2, a channel whose priority is -128 is not used for cluster communications. The priority of a channel is the sum of the management priority assigned to the local LAN device and the channel itself. Therefore, you can assign any combination of channel and LAN device management priority values to arrive at a total of -128.
Figure 6-29 LAN Device Adjust Priority
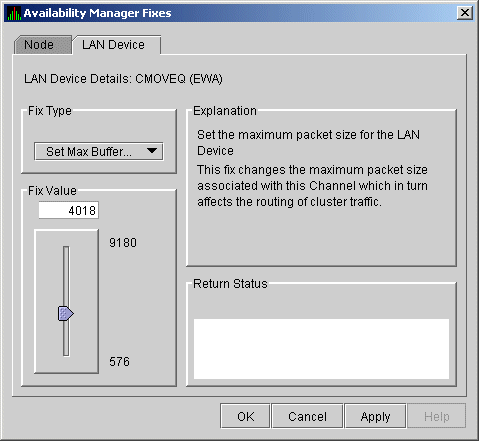
6.4.5.2 LAN Device Set Maximum Buffer Fix
The LAN Device Set Maximum Buffer fix (Figure 6-30) allows you to set
the maximum packet size for the device, which changes the maximum
packet size associated with this channel. This change, in turn, affects
the routing of cluster traffic.
Figure 6-30 LAN Device Set Maximum Buffer Size
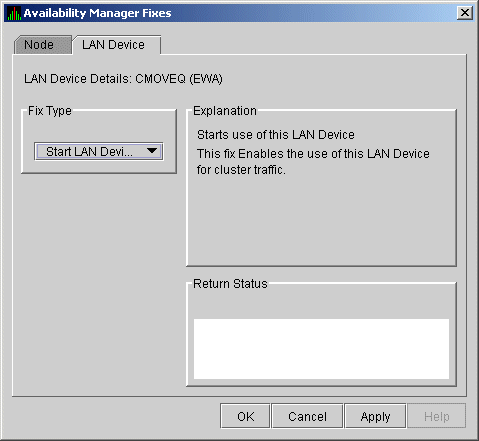
6.4.5.3 LAN Device Start Fix
The LAN Device Start fix (Figure 6-31) starts the use of this
particular LAN device. This fix allows you, at the same time, to enable
this device for cluster traffic.
Figure 6-31 LAN Device Start
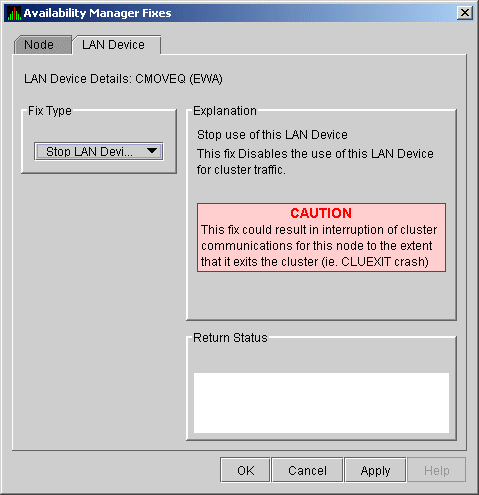
6.4.5.4 LAN Device Stop Fix
The LAN Device Stop fix (Figure 6-32) stops the use of this
particular LAN device. At the same time, this fix disables this device
for cluster traffic.
This fix could result in interruption of cluster communications for this node. The node might exit the cluster (CLUEXIT crash). |
Figure 6-32 LAN Device Stop
This chapter explains how to customize the following Availability Manager features:
| Feature | Description |
|---|---|
| Nodes or node groups | You can select one or more groups or individual nodes to monitor. |
| Data collection | For OpenVMS nodes, you can choose the types of data you want to collect as well as set several types of collection intervals. (On Windows nodes, specific types of data are collected by default.) |
| Data filters | For OpenVMS nodes, you can specify a number of parameters and values that limit the amount of data that is collected. |
| Event escalation | You can customize the way events are displayed in the Event pane of the System Overview window (Figure 2-1), and you can configure events to be signaled to OPCOM and OpenView. |
| Event filters | You can specify the severity of events that are displayed as well as several other filter settings for events. |
| Security | On Data Analyzer and Data Collector nodes, you can change passwords. On OpenVMS Data Collector nodes, you can edit a file that contains security triplets. |
| Watch process | You can specify up to eight processes for the Availability Manager to monitor and report on if they exit and also if they subsequently are created. |
In addition, you can change the group membership of nodes, as explained in Section 7.4.1 and Section 7.4.2.
Table 7-1 shows the levels of customization the Availability Manager provides. At each level, you can customize specific features. The table shows the features that can be customized at each level.
| Customizable Features | Application | Operating System | Group | Node |
|---|---|---|---|---|
| Nodes or node groups | X | |||
| Data collection | X | X | X | |
| Data filters | X | X | X | |
| Event escalation | X | X | X | X |
| Event filters | X | X | X | |
| Security | X | X | X | |
| Watch process | X | X | X |
You can customize each feature at one or more of the following levels, as shown in Table 7-1:
In addition to the four levels of customization are Availability Manager Defaults (AM Defaults), which are top-level, built-in values that are preset (hardcoded) within the Availability Manager. Users cannot change these settings themselves. If no customizations are made at any of the four levels, the AM Default values are used.
The following list describes the four levels of customization.
Any of these four levels of customization overrides AM Defaults. Also, customizing values at any successive level overrides the value set at the previous level. For example, customizing values for Data filters at the Group level overrides values for Data filters set at the Operating System level. Similarly, customizing values for Data filters at the Node level overrides values for Data filters set at the Group level.
| Previous | Next | Contents | Index |