|
|
HP OpenVMS systems documentation |
| Previous | Contents | Index |
The Call Stack menu, between the source view and the push button view,
shows the name of the routine whose source code is displayed in the
source view. This menu lists the sequence of routine calls currently on
the stack and lets you set the scope of source code display and symbol
searches to any routine on the stack (see Section 10.6.2).
8.2.2.5 Push Button View
Figure 8-3 and Table 8-3 describe the default push buttons in the main window. You can modify, add, remove, and resequence buttons and their associated commands as explained in Section 10.10.3.
Figure 8-3 Default Buttons in the Push Button View

| Button | Description |
|---|---|
| Stop | Interrupt program execution or a debugger operation without ending the debugging session. |
| Go | Start or resume execution from the current program location. |
| STEP | Execute the program one step unit of execution. By default, this is one executable line of source code. |
| S/in | When execution is suspended at a routine call statement, move execution into the called routine just past the start of the routine. This is the same behavior as STEP if not at a routine call statement. |
| S/ret | Execute the program directly to the end of the current routine. |
| S/call | Execute the program directly to the next Call or Return instruction. |
| EX | Display, in the command view, the current value of a variable whose name you have selected in a window. |
| E/az | Display, in the command view, the current value of a variable whose name you have selected in a window. The variable is interpreted as a zero-terminated ASCII string. |
| E/ac | Display, in the command view, the current value of a variable whose name you have selected in a window. The variable is interpreted as a counted ASCII string preceded by a one-byte count field that contains the length of the string. |
| EVAL | Display, in the command view, the value of a language expression in the current language (by default, the language of the module containing the main program). |
| MON | Display, in the monitor view, a variable name that you have selected in a window and the current value of that variable. Whenever the debugger regains control from your program, it automatically checks the value and updates the displayed value accordingly. |
The command view, located directly under the push button view in the main window, accepts typed command input on the command line (see Section 8.3), and displays debugger output other than that displayed in the optional views. Examples of such output are:
You can clear the entire command view, leaving only the current command-line prompt, by choosing Clear Command Window from the pop-up menu.
You can clear the current command line by choosing Clear Command Line
from the pop-up menu.
8.2.3 Optional Views Window
Table 8-4 lists the optional views. They are accessible by choosing Views... from the Options menu on the main window.
| View | Description |
|---|---|
| Breakpoint view | List all breakpoints that are currently set and identify those which are activated, deactivated, or qualified as conditional breakpoints. The breakpoint view also allows you to modify the state of each breakpoint. |
| Monitor view | List variables whose values you want to monitor as your program executes. The debugger updates the values whenever it regains control from your program (for example, after a step or at a breakpoint). Alternatively, you can set a watchpoint, causing execution to stop whenever a particular variable has been modified. You can also change the values of variables. |
| Instruction view | Display the decoded instruction stream of your program and allow you to set breakpoints on instructions. By default, the debugger displays the corresponding memory addresses and source-code line numbers to the left of the instructions. You can choose to suppress these. |
| Register view | Display the current contents of all machine registers. The debugger updates the values whenever it regains control from your program. The register view also lets you change the values in registers. |
| Tasking view | List all the existing (nonterminated) tasks of a tasking program. Provides information about each task and allows you to modify the state of each task. |
Figure 8-5 shows a possible configuration of the breakpoint view, monitor view, and register view, as a result of the selections in the View menu in Figure 8-4.
Figure 8-6 shows the instruction view, which is a separate window so that you can position it where most convenient. Figure 8-7 shows the tasking view.
Note that the registers and instructions displayed are system-specific. Figure 8-5 and Figure 8-6 show VAX-specific registers and instructions.
You can move and resize all windows. You can also save a particular configuration of the windows and views so that it is set up automatically when you restart the debugger (see Section 10.10.1).
Figure 8-4 Debugger Main Window
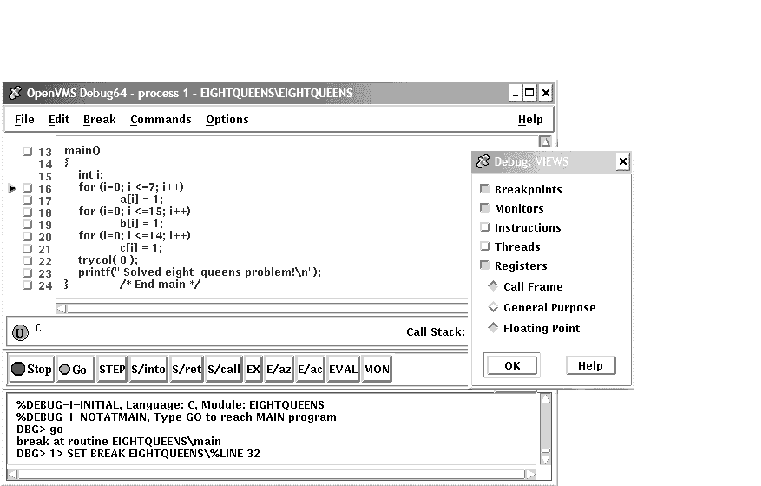
Figure 8-5 Breakpoint, Monitor, and Register Views
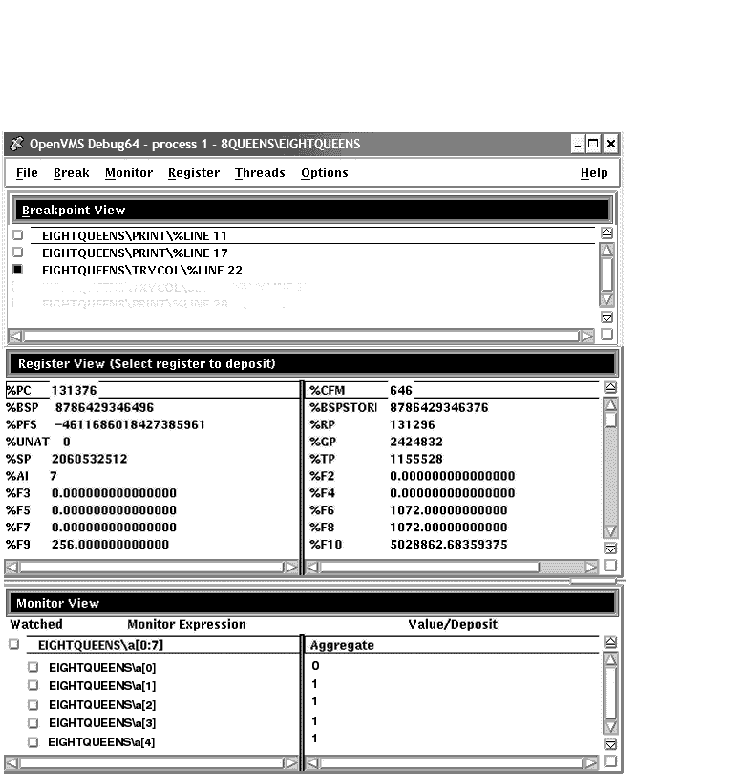
Figure 8-6 Instruction View
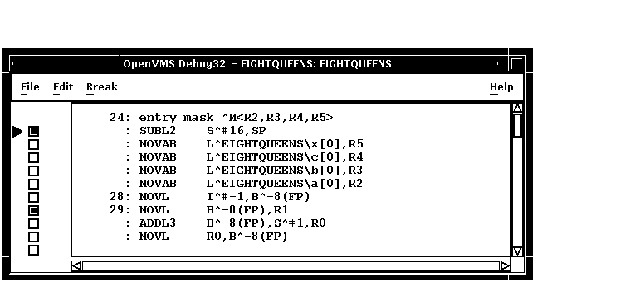
Figure 8-7 Tasking View
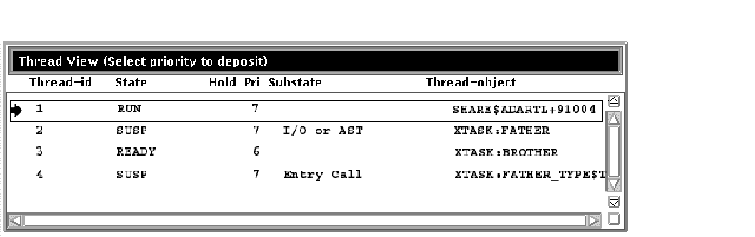
Figure 8-8 and Table 8-5 describe the menus on the optional views window.
Figure 8-8 Menus on Optional Views Window
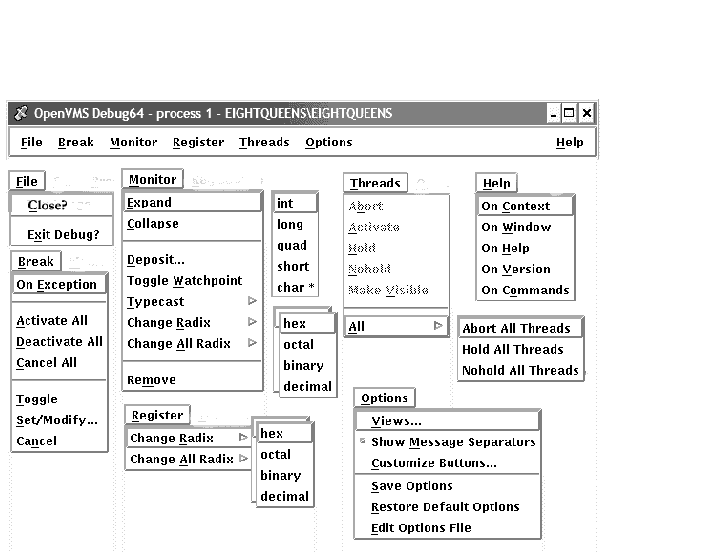
| Menu | Item | Description |
|---|---|---|
| File | Close | Close the optional views window. |
| Exit Debug? | End the debugging session, terminating the debugger. | |
| Break | On Exception | Break on any exception signaled during program execution. |
| Activate All | Activate any previously set breakpoints. | |
| Deactivate All | Deactivate any previously set breakpoints. | |
| Cancel All | Remove all breakpoints from the debugger's breakpoint list and from the breakpoint view. | |
| Toggle | Toggle a breakpoint. | |
| Set/Modify... | Set a new breakpoint, optionally associated with a particular condition or action, at a specified location. | |
| Cancel | Cancel (delete) an individual breakpoint. | |
| Monitor | Expand | Expand monitor view output to include the values of component parts of a selected item as well as the aggregate value. |
| Collapse | Collapse the monitor view output to show only the aggregate value of a selected item, instead of the values of each component part. | |
| Deposit... | Change the value of a monitored element. | |
| Toggle Watchpoint | Toggle a selected watchpoint. | |
| Typecast | Use the submenu to typecast output for a selected variable to int, long, quad, short, or char*. | |
| Change Radix | Use the submenu to change the output radix for a selected variable to hex, octal, binary, or decimal. | |
| Change All Radix | Use the submenu to change the output radix for all subsequent monitored elements to hex, octal, binary, or decimal. | |
| Remove | Remove an element from the monitor view. | |
| Register | Change Radix | Use the submenu to change radix for selected register to hex, octal, binary, or decimal. |
| Change All Radix | Use the submenu to change radix for all registers to hex, octal, binary, or decimal. | |
| Tasks | Abort | Request that the selected task be terminated at the next allowed opportunity. |
| Activate | Make the selected task the active task. | |
| Hold | Place the selected task on hold. | |
| Nohold | Release the selected task from hold. | |
| Make Visible | Make the selected task the visible task. | |
| All | Use the submenu to abort all tasks or release all tasks from hold. | |
| Options | Views... |
Display one or more of the following:
Breakpoint view |
| Customize Buttons... | Modify, add, remove, or resequence a push button in the push button view and the associated debugger command. | |
| Save Options | Save the current settings of all HP DECwindows Motif for OpenVMS features of the debugger that you can customize interactively, such as the configuration of windows and views, and push button definitions. This preserves your current debugger configuration for the next time you run the debugger. | |
| Restore Default Options | Copy the system default debugger resource file DECW$SYSTEM_DEFAULTS:VMSDEBUG.DAT to the user-specific resource file DECW$USER_DEFAULTS:VMSDEBUG.DAT. The default options take effect when you next start the debugger. | |
| Edit Options File | Load and display the user-specific resource file DECW$USER_DEFAULTS:VMSDEBUG.DAT in the debug editor for review and modification. | |
| Help | On Context | Enable the display of context-sensitive online help. |
| On Window | Display information about the debugger. | |
| On Help | Display information about the online help system. | |
| On Version | Display information about this version of the debugger. | |
| On Commands | Display information about debugger commands. |
The debugger's HP DECwindows Motif for OpenVMS GUI is layered on the command interface. The command line, the last line in the command view and identified by the command-entry prompt (DBG�), lets you enter debugger commands for the following purposes:
Figure 8-9 shows the RUN command in the command view.
Figure 8-9 Entering Commands at the Prompt
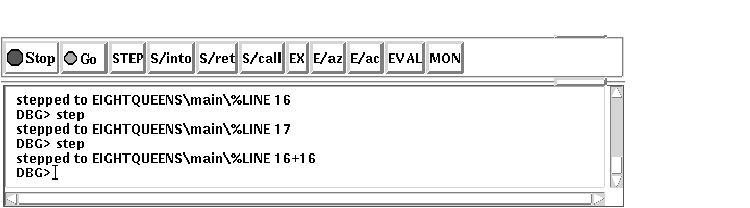
When you use the HP DECwindows Motif for OpenVMS interface pull-down menus and push buttons, the debugger translates your input into debugger commands and echoes these commands on the command line so that you have a record of your commands. Echoed commands are visually indistinguishable from commands that you enter explicitly on the command line.
For information about the debugger's command interface, see Part 2. For online help about the commands, see Section 8.4.3.
In addition to entering debugger commands interactively at the prompt, you can also place them in debugger initialization files and command files for execution within the HP DECwindows Motif for OpenVMS environment.
You can also take advantage of the keypad support available at the command-entry prompt. (This support is a subset of the more extensive keypad support provided for the command interface, which is described in Appendix A.) The commands in Table 8-6 are mapped to individual keys on your computer keypad.
| Command | Corresponding Key |
|---|---|
| Step/Line | KP0 |
| Step/Into | GOLD-KP0 |
| Step/Over | BLUE-KP0 |
| Examine | KP1 |
| Examine^ | GOLD-KP1 |
| Go | KP, |
| Show Calls | KP5 |
| Show Calls 3 | GOLD-KP5 |
To enter one of these commands, press the key or keys indicated, followed by the Enter key on the keypad. (The GOLD key is PF1; the BLUE key is PF4.)
For information on changing these key bindings, or binding commands to
unassigned keys on the keypad, see Section 10.10.4.4.
8.3.1 Debugger Commands That Are Not Available in the HP DECwindows Motif for OpenVMS Interface
Table 8-7 lists the debugger commands that are disabled in the debugger's HP DECwindows Motif for OpenVMS interface. Many of them are relevant only to the debugger's screen mode.
| ATTACH | SELECT |
| CANCEL MODE | (SET,SHOW) ABORT_KEY |
| CANCEL WINDOW | (SET,SHOW) KEY |
| DEFINE/KEY | (SET,SHOW) MARGINS |
| DELETE/KEY | SET MODE [NO]KEYPAD |
| DISPLAY | SET MODE [NO]SCREEN |
| EXAMINE/SOURCE | SET MODE [NO]SCROLL |
| EXPAND | SET OUTPUT [NO]TERMINAL |
| EXTRACT | (SET,SHOW) TERMINAL |
| HELP 1 | (SET,SHOW) WINDOW |
| MOVE | (SET,CANCEL) DISPLAY |
| SAVE | SHOW SELECT |
| SCROLL | SPAWN |
The debugger issues an error message if you enter any of these commands
on the command line, or if the debugger encounters one of these
commands while executing a command procedure.
8.4 Displaying Online Help About the Debugger
The following types of online help about the debugger and debugging are available during a debugging session:
Task-oriented topics related to context-sensitive topics are connected
through the list of additional topics in the help windows.
8.4.1 Displaying Context-Sensitive Help
Context-sensitive help is information about an area or object in a window or a dialog box.
To display context-sensitive help:
To display context-sensitive help for a dialog box, you can also click on the Help button in the dialog box.
Chapter 12, which is organized by task, explains how to use the debugger's Heap Analyzer. You cannot obtain true context-sensitive help about any push button other than Stop. This is because all other buttons can be modified or removed. |
The Overview help topic (Overview of the Debugger) and its subtopics provide task-oriented information about the debugger and debugging.
To display the Overview topic, use either of these techniques:
To display information about a particular topic, choose it from the
list of additional topics.
8.4.3 Displaying Help on Debugger Commands
To display help on debugger commands:
Note that the Help command is not available through the command line interface in the command view.
| Previous | Next | Contents | Index |