|
|
HP OpenVMS systems documentation |
| Previous | Contents | Index |
This part introduces the debugger's PC client interface.
For information about the debugger's command interface, see Part 2.
For information about the debugger's Decwindows Motif interface, see Part 3.
This chapter describes the PC client interface to the debugger.
Note that the OpenVMS Version 7.3 debugger does not support previous versions of the PC client. You must install the Version 1.1 PC client that is found in the kit on the OpenVMS Version 7.3 distribution media, as identified in Section 11.2.
The Version 1.1 PC client is compatible with Version 7.3 and prior
debug servers.
11.1 Introduction
The OpenVMS Debugger Version 7.2 and later features an optional client/server interface that separates the debugger into two components: the debug client and the debug server. The debug server runs on an OpenVMS system. There is a debug client that runs on OpenVMS systems, and a client that runs on Microsoft Windows and Microsoft Windows NT. The interface is identical for both Windows environments. !@#$
The PC client interface offers essentially the same features as the DECwindows Motif client interface (see Section 9.9).
The client and server communicate using DCE RPC over one of the following transports:
If you are running TCP/IP Services for OpenVMS (UCX) Version 4.1, you must have ECO2 installed. You can also run a later version of UCX. |
See Section 9.9.1 for the description of the software required to run
the PC Client/Server interface.
11.2 Installation
There is no special installation procedure for the components that run on OpenVMS. This section describes the procedure for installing the debug client on a PC.
The system administrator should move the OpenVMS debug client kits from the OpenVMS distribution media to a place accessible to PC users, such as a PATHWORKS share or FTP server. The client kits can be found on the distribution media in the following directories:
| CPU | Operating System | Client Kit |
|---|---|---|
| Intel | Microsoft Windows 95, 98 | [DEBUG_CLIENTS011.KIT]DEBUGX86010.EXE |
| Intel | Microsoft Windows NT | [DEBUG_CLIENTS011.KIT]DEBUGX86010.EXE |
| Alpha | Microsoft Windows NT | [DEBUG_CLIENTS011.KIT]DEBUGALPHA010.EXE |
These client kits are self-extracting .EXE files.
Once the appropriate executable file has been transferred to the PC, you can run the file to install the debug client on the PC. The INSTALLSHIELD installation procedure guides you through the installation.
By default, the debug client is installed in the \Program Files\OpenVMS Debugger folder. You can also click Browse to select an alternate location.
You can choose one of the following options:
| Install Option | Details |
|---|---|
| Typical | Debug client and HP OpenVMS Debugger Manual in HTML format |
| Compact | Debug client only |
| Custom | Choice of Debug client and/or HP OpenVMS Debugger Manual in HTML format |
The Typical installation option creates an OpenVMS Debugger program folder that contains shortcuts to the following items:
The primary client is the first client to connect to the server. A secondary client is an additional client that has connected to the same server. The primary client controls whether or not any secondary clients can connect to the server.
See Section 11.5 for details about specifying the number of secondary
clients allowed to connect to a debugging session.
11.4 The PC Client Workspace
The PC client workspace is analogous to the workspace of the Motif client (see Chapter 8). The client workspace contains views to display dynamic information and toolbars to contain shortcuts to debugger commands. You can configure the views and toolbars to suit your personal requirements, create your own shortcuts, and save your personal configurations.
These topics are discussed at length in the PC client Help file. You can access the PC client Help directly from the OpenVMS Debugger folder that you created during PC client installation (see Section 11.2), or from the Help menu within the client. See the following topics:
You can start the debug server after logging in directly to the OpenVMS system, or you may find it more convenient to log in remotely with a product such as eXcursion, or a terminal emulator such as Telnet.
You must hold the DBG$ENABLE_SERVER identifier in the rights database to be able to run the debug server. Exercise care when using the debug server. Once a debug server is running, anyone on the network has the ability to connect to the debug server. |
Before granting the DBG$ENABLE_SERVER identifier, the system manager must create it by entering the command DEBUG/SERVER from an account with write access to the rights database. The system manager needs to do this only once. The system manager can then run the Authorize utility to grant the DBG$ENABLE_SERVER identifier to the user.
To start the debug server, enter the following command:
$ DEBUG/SERVER |
The server displays its network binding strings. The server port number is enclosed in square brackets ([]). For example:
$ DEBUG/SERVER %DEBUG-I-SPEAK: TCP/IP: YES, DECnet: YES, UDP: YES %DEBUG-I-WATCH: Network Binding: ncacn_ip_tcp:16.32.16.138[1034] %DEBUG-I-WATCH: Network Binding: ncacn_dnet_nsp:19.10[RPC224002690001] %DEBUG-I-WATCH: Network Binding: ncadg_ip_udp:16.32.16.138[1045] %DEBUG-I-AWAIT: Ready for client connection... |
Use one of the network binding strings to identify this server when you connect from the client (see Section 9.9.4).
You can usually identify the server using only the node name and the port number. For example, nodnam[1034] . |
To establish a connection from the PC client, invoke the Connection dialog, either from the File pull-down menu, or by selecting the C/S button on the Main toolbar. The dialog displays the servers already known to this client, and the sessions currently active by this client.
You can specify a server for a new connection, or select a particular session for use.
From the buttons at the bottom of the dialog, you can
In addition, the Advanced button allows you to select the network protocol to be used (see Section 11.5.1), and to select the number of secondary clients (0-30) allowed for the client/server connection to be established (see Section 11.5.2).
11.5.1 Choosing a Transport
From the Connection dialog, select the network protocol to be used for
the client/server connection from the following:
From the Connection dialog, you can enable up to 30 secondary clients to connect to the server. You must be the primary client (the first client to connect to this server), and perform the following steps:
The debugger dismisses the Connection dialog, makes the connection, and
indicates success (or failure) in the Command view. You can now begin
your debugging procedures.
11.6 Terminating a Server Connection
You can stop a server by entering Ctrl-Y on the node on which the server is running. If you do so, then enter the DCL STOP command.
To stop the server from the client, perform the following steps:
An alternative way to stop the server is to perform the following steps:
To stop both the server and the client, perform the following steps:
To stop only the client, perform the following steps:
To stop only the server, perform the following steps:
In addition to the PC client Help file, the HP OpenVMS Debugger Manual is online in HTML format. To access the manual from within the client, do the following:
The Heap Analyzer, available on OpenVMS I64, Alpha, and VAX systems, is a feature of the debugger that provides a graphical representation of memory use in real time. By studying this representation, you can identify areas in your application where memory usage and performance can be improved. For example, you might notice allocations that are made too often, memory blocks that are too large, evidence of fragmentation, or memory leaks.
After you locate an area of interest, you can request an enlarged, more detailed, or altered view. You can also request additional information on the size, contents, or address of the allocations shown.
After you narrow your interest to an individual allocation, you can request traceback information. The analyzer allows you to correlate the traceback entry for an allocation with source code in your application program. By scrolling through the source code display, you can then identify problematic code and decide how to correct it.
This chapter describes the following:
The following sections describe how to invoke the Heap Analyzer and run
your application.
12.1.1 Invoking the Heap Analyzer
You can invoke the Heap Analyzer during a debugging session in one of the following ways:
$ DEFINE/USER/NAME=CONFINE LIBRTL SYS$LIBRARY:LIBRTL_INSTRUMENTED |
$ DEFINE/EXEC/NAME=CONFINE LIBRTL SYS$LIBRARY:LIBRTL_INSTRUMENTED |
$ INSTALL ADD imagename/PROTECTED |
On OpenVMS Alpha systems, the Heap Analyzer does not work on programs linked with the /NODEBUG qualifier. On OpenVMS I64 and VAX systems, the Heap Analyzer does work on programs linked with the /NODEBUG qualifier, although the traceback information displayed is minimal. |
After you successfully invoke the Heap Analyzer, the Heap Analyzer
startup screen appears.
12.1.2 Viewing Heap Analyzer Windows
The Heap Analyzer contains a main window, six subsidiary windows, and a control panel (see Figure 12-1.)
The Memory Map, the most important window, displays a representation of your application's dynamic memory use. At startup, the Memory Map shows the images that comprise your application. As your application executes, you can see the relative location and size of individual memory blocks, images, program regions, memory zones, and dynamic strings as they are allocated and deallocated in memory space.
The Message window displays information on your Heap Analyzer session. At startup, the Message window contains the message "Heap Analyzer initialization complete. Press Start button to begin program." As your application executes, informational and error messages appear in this window.
The Push Button Control Panel contains buttons that allow you to control the speed of the Memory Map display. At startup, you click on the Start button to begin executing your application. As your application executes, you can click on other buttons in the panel to pause, slow, or otherwise affect the continuous display.
The Information window displays information on Memory Map segments. As your application executes, you can pause execution at any time to request specific information.
The Source window displays the application source code associated with a segment in the Memory Map.
The Do-not-use Type List allows you to adjust the Memory Map display by redetermining a segment's type, or group name.
The Views-and-Types Display allows you to adjust the Memory Map display by selectively viewing certain segment types.
The Type Histogram displays summary and statistical information on segment types.
As you use the Heap Analyzer, you may need to increase or decrease the size of the window in which you are working. To do this, pull the window pane sashes between windows or resize the screen as a whole.
Figure 12-1 Heap Analyzer Windows
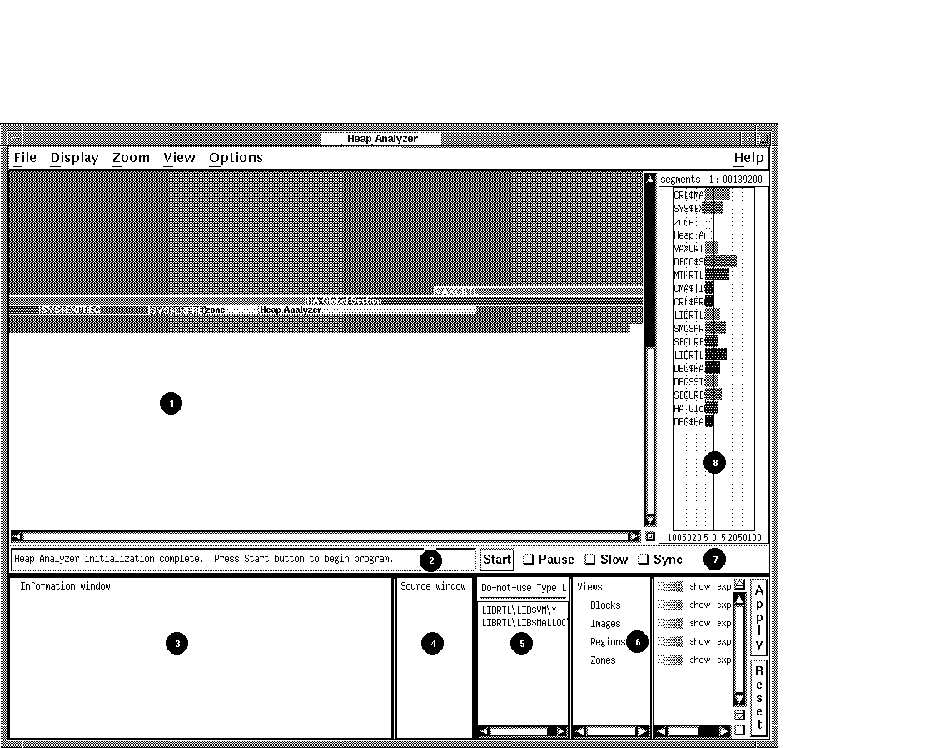
| 1. Memory Map | Shows the graphical representation of memory, that is, the part of P0-space that is in use. Each allocation appears as a colored strip, or segment. |
| 2. Message Window | Displays Heap Analyzer informational and error messages and one-line segment descriptions. |
| 3. Information Window | Shows additional information on segments and segment types that appear in the Memory Map. |
| 4. Source Window | Shows application source code. |
| 5. Do-not-use Type List | Lists routines not used as segment types, the name that characterizes segments. |
| 6. Views-and-Types Display | Lists all segment types known to the Heap Analyzer and allows you to alter the segment display. |
| 7. Push Button Control Panel | Provides Start/Step, Pause, Slow, and Sync buttons that allow you to control the speed of Memory Map display. |
| 8. Type Histogram | Shows statistics on segment size and use. |
12.1.3 Viewing Heap Analyzer Pull-Down Menus
The Heap Analyzer provides pull-down menus that are grouped over the
Memory Map (see Figure 12-2). This figure is adjusted slightly so
that all menu items can be seen.
Figure 12-2 Heap Analyzer Pull-Down Menus
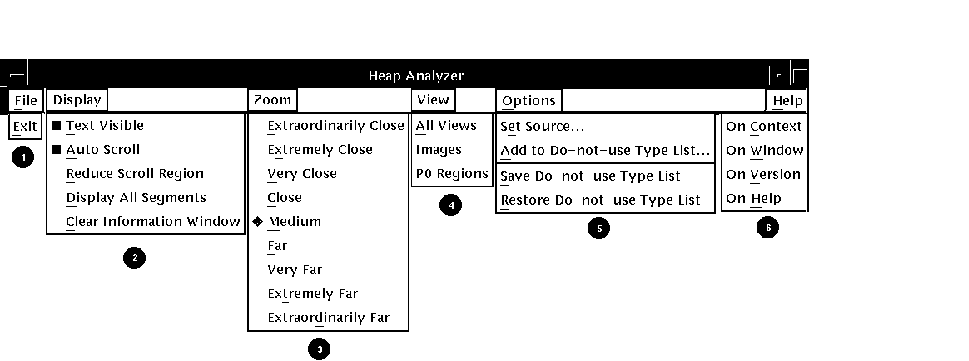
| 1. File Menu | Allows you to exit from the Heap Analyzer |
| 2. Display Menu | Allows you to adjust the Memory Map display and to clear the Information window |
| 3. Zoom Menu | Provides a closer or further view of the Memory Map |
| 4. View Menu | Lets you select the granularity of the display |
| 5. Options Menu | Allows you to indicate a search directory list or to adjust the Do-not-use Type List |
| 6. Help Menu | Provides context-sensitive or task-oriented online help |
12.1.4 Viewing Heap Analyzer Context-Sensitive Menus
Most operations in the Heap Analyzer, however, are accomplished through
context-sensitive pop-up menus. Most Heap Analyzer windows contain a
pop-up menu listing available tasks (see Figure 12-3). To access a
window's pop-up menu, position your mouse pointer in the window and
click MB3.
Figure 12-3 Heap Analyzer Context-Sensitive Pop-Up Menus
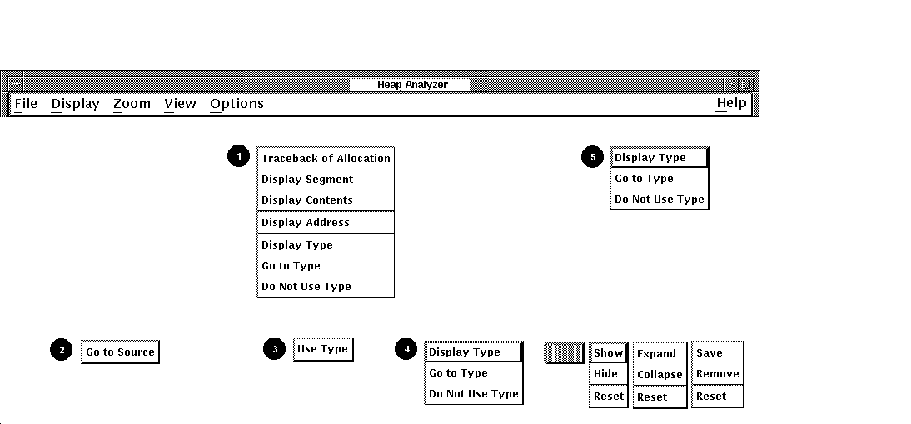
| 1. Memory Map Pop-Up | Provides additional information on segments displayed in the Memory Map, allows you to jump to a segment's type in the Views-and-Types Display, or adds a segment's type to the Do-not-Use Type List. |
| 2. Information Window Pop-Up | Allows you to jump from a line of traceback displayed in the Information window to the related source code in the Source window. |
| 3. Do-not-use Type List Pop-Up | Deletes a segment's type from the Do-not-Use Type List. |
| 4. Views-and-Types Display Pop-Up |
Left side: Provides additional information on segment types listed,
highlights a segment type within the Views-and-Types Display, or adds a
segment type to the Do-not-Use Type List.
Right side: Allows you to adjust display characteristics for the segment type highlighted in the left side of the Views-and-Types Display. |
| 5. Type Histogram Pop-Up | Provides additional information on segment types listed, highlights a segment type in the Type Histogram, or adds the segment type to the Do-not-Use Type List. |
12.1.5 Setting a Source Directory
If you are invoking the Heap Analyzer from a directory other than the
one that stores your application source code, you can set a source
directory for the Heap Analyzer as soon as the startup screen appears.
To set a source directory:
The Heap Analyzer can now access your application.
12.1.6 Starting Your Application
If you invoked the Heap Analyzer from within a debugging session, start your application by performing the following steps:
If you invoked the Heap Analyzer outside a debugging session, start your application by performing only step 1 above.
After your application is running, the Memory Map (and other parts of the Heap Analyzer display) are continuously updated to reflect the state of your application.
Unless you intervene (see Section 12.1.7), this updating continues until an occurrence causes memory events to stop. For example, your application might prompt for input, the debugger might prompt for input, or your application might finish execution.
| Previous | Next | Contents | Index |