|
|
HP OpenVMS systems documentation |
| Previous | Contents | Index |
After installing TCP/IP Services, you can configure your system to communicate in an IPv6 network environment by performing the tasks described in this chapter.
You can configure your node as either an IPv6 host or IPv6 router. You
make this choice while running the TCPIP$IP6_SETUP configuration
utility. After you run the configuration utility and restart TCP/IP
Services, IPv6 processes associated with your choices are started on
your system.
2.1 IPv6 Processes
Your selection of configuring your node as either a host or a router starts one of the following processes during TCP/IP startup:
Do not run the TCPIP$ND6HOST and TCPIP$IP6RTRD processes on the same node, since doing so might produce unpredictable results. |
The TCPIP$ND6HOST process receives and processes IPv6 router advertisement (RA) packets of the neighbor discovery protocol. This enables a system to autoconfigure itself without manual intervention.
The TCPIP$ND6HOST process performs the following functions, based on the contents of IPv6 router advertisements it receives:
After you configure the system as an IPv6 router, the TCPIP$IP6RTRD process sends out periodic router advertisements for the following reasons:
At startup, the TCPIP$IP6RTRD process reads its configuration file for
startup information. See Section 2.6.2 for more information on the
router configuration file.
2.2 Preparing for Configuration
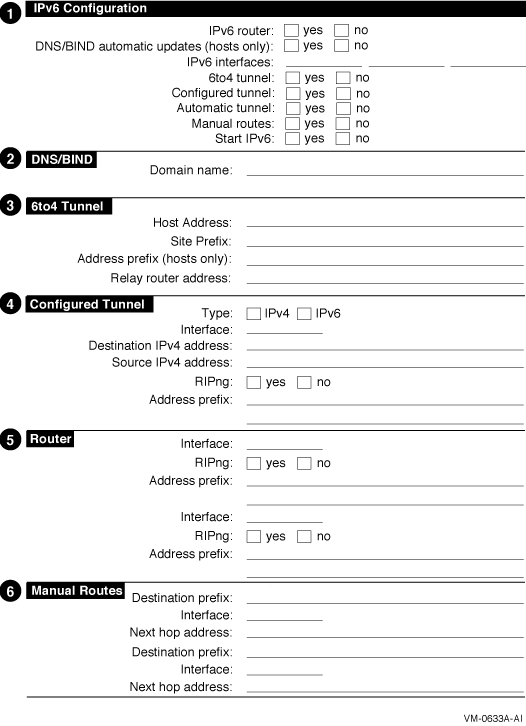
Before you configure the network software, you must gather information about your system and network environment. The Configuration Worksheet shown in Figure 2-1 can help you assemble this information in an orderly fashion. The following sections describe the information that you need to record on the worksheet.
Figure 2-1 Configuration Worksheet
Do not use automatic tunnels in production environments. Their use might be deprecated in the future. |
When you run the TCPIP$IP6_SETUP command procedure, it gathers
information from the system and prompts you for additional
configuration information. See Section 2.4 for more information on
running the TCPIP$IP6_SETUP command procedure.
2.3 IPv6 System Configuration Examples
This section shows how to use the configuration worksheet to assemble information for selected configurations. Each example shows how individual systems are configured. In some cases, additional options for you to consider are provided.
OpenVMS interface names must be in uppercase. |
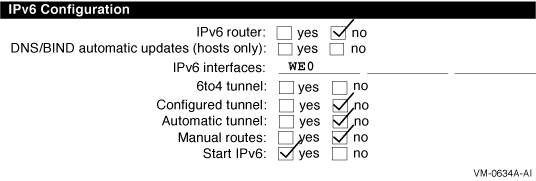
In a simple host-to-host configuration (shown in Figure 1-11), host A and host B use IPv6 link-local addresses. By default, the TCPIP$IP6_SETUP command procedure configures the hosts automatically with a link-local address for your system. Figure 2-2 shows the completed worksheet for host A.
Figure 2-2 Simple Host-to-Host Configuration
After you configure IPv6 on host A, add a link-local address for host B to the TCPIP$ETC:IPNODES.DAT file. The configuration process for host B in this configuration is similar to that for host A.
In this configuration, no global address prefix is advertised on the LAN. If you want to advertise a global address prefix, you can either configure one of the hosts as a router by using TCPIP$IP6_SETUP or add an IPv6 router to the LAN configuration. An IPv6 router advertises a global prefix on the link.
You can use the netstat -in command to view a local node's link-local and global addresses.
The following TELNET command connects host A to host B using host B's link-local address:
$ TELNET fe80::0a00:2bff:fee2:1e11 |
Alternately, you can place the address and node name in the
TCPIP$ETC:IPNODES.DAT file. Then use the node name as the argument to
the
TELNET
command.
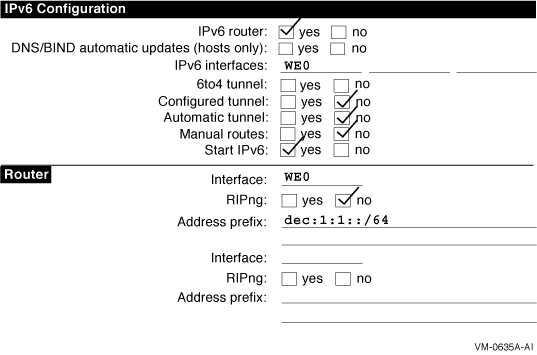
2.3.2 Host-to-Host with Router Configuration
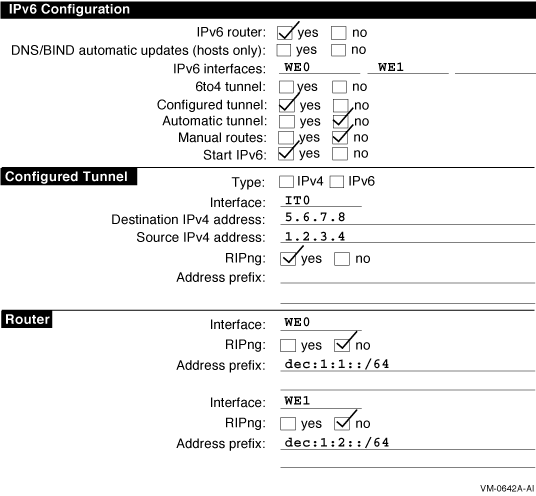
In a host-to-host with router configuration (shown in Figure 1-12), host A and host B are on a LAN with router A. In this case, router A advertises the global address prefix dec:1:1::/64 on the LAN. Host A and host B use this address prefix to create global IPv6 addresses. (See Chapter 1 for information about obtaining experimental testing addresses.) Figure 2-3 shows the completed worksheet for router A.
Figure 2-3 Host-to-Host with Router Configuration
After you configure IPv6 on router A, add the global addresses for the other hosts to the TCPIP$ETC:IPNODES.DAT file. Repeat this step on host A and host B. Alternatively, you could establish DNS/BIND in your network using the global addresses.
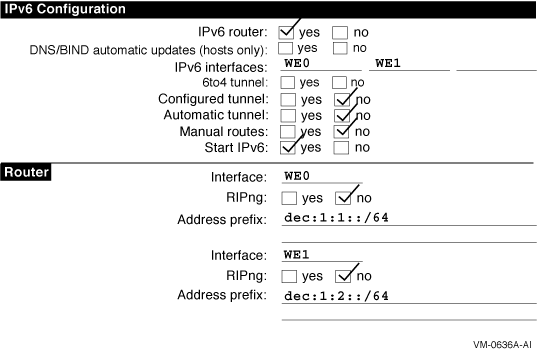
2.3.3 IPv6 Network-to-IPv6 Network with Router Configuration
In an IPv6 network-to-IPv6 network with router configuration (shown in
Figure 1-13), two IPv6 networks are connected to each other through
router A and its two interfaces. Figure 2-4 shows the completed
worksheet for router A.
Figure 2-4 IPv6 Network-to-IPv6 Network with Router Configuration
In this example configuration (shown in Figure 1-14), four IPv6 networks are connected to each other using three routers. In this configuration, the routers must exchange routing information in order to learn the routes to other subnets in the network. To accomplish this, each router must run the RIPng protocol. Figure 2-5 shows the completed worksheet for router A.
Figure 2-5 Multiple IPv6 Networks and Multiple Routers Configuration

The completed worksheets for router B and C would be similar.
2.3.5 Host-to-Host over IPv4 Configured Tunnel Configuration
In a host-to-host over tunnel configuration (shown in Figure 1-15), two IPv6 systems communicate with each other over a configured tunnel through an IPv4 network and use IPv6 link-local addresses. Figure 2-6 shows the completed worksheet for host A.
Figure 2-6 Host-to-Host over IPv4 Configured Tunnel Configuration
After you configure IPv6 on host A, add the link-local address for host B to the TCPIP$ETC:IPNODES.DAT file. The configuration process for host B in this configuration is similar to that for host A.
With this configuration, no global address prefix is advertised on the tunnel. If you want to advertise a global address prefix, you can configure one of the hosts as a router by using TCPIP$IP6_SETUP. An IPv6 router advertises a global prefix on the link.
To view a local node's link-local and global addresses, use the netstat -in command.
The following TELNET command connects host A to host B:
$ telnet fe80::5.6.7.8 |
Alternately, you can place the address and node name in the
TCPIP$ETC:IPNODES.DAT file. Then use the Node name as the argument to
the
TELNET
command.
2.3.6 Host-to-Router over IPv4 Configured Tunnel Configuration
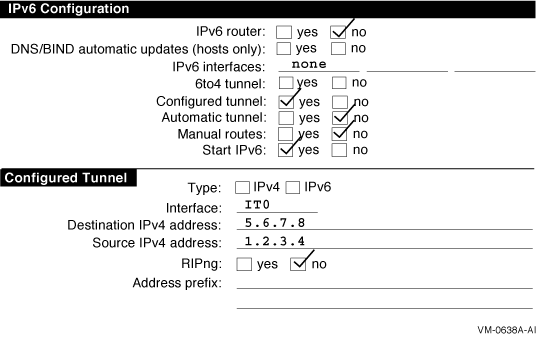
In a host-to-router over tunnel configuration (shown in Figure 1-16), host X communicates with host B over a configured tunnel through an IPv4 network; both nodes use IPv6 addresses. The tunnel in this case is between host X and router A. Figure 2-7 shows the completed worksheet for host X when router A is advertising itself as the default router for the tunnel link and is advertising a global address prefix on the tunnel link.
Figure 2-7 Host-to-Router over IPv4 Configured Tunnel Configuration
If router A is not advertising a global address prefix on the tunnel link, the value dec:3:1::/64 would be in the Address prefix field in the Configured Tunnel section of the host X worksheet. If router A is not advertising itself as the default router for the tunnel link, the information shown in Figure 2-8 would also be on the host X worksheet:
Figure 2-8 Router Not Advertising a Global Address Prefix
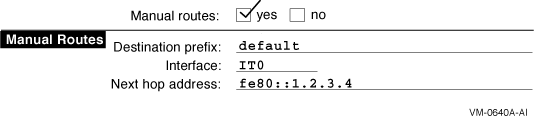
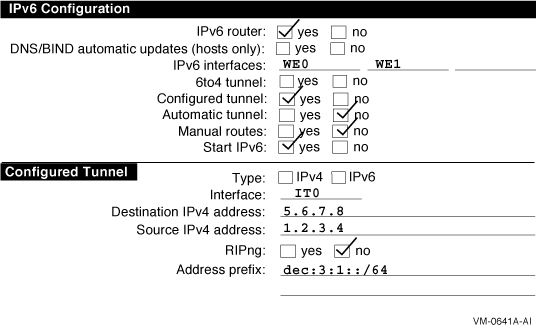
Figure 2-9 shows the completed worksheet for router A when router A is advertising a global address prefix on the tunnel link.
Figure 2-9 Router Advertising a Global Address Prefix
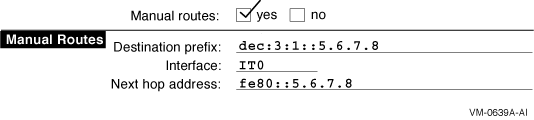
If router A is not advertising a global prefix on the tunnel link, the information shown in Figure 2-10 would be on the router A worksheet. Note the manual route to host X. Instead of specifying a destination network prefix, you specify the host route, dec:3:1::5.6.7.8 , to host X. The next hop is the link-local IPv6 address of host X's tunnel interface, fe80::5.6.7.8 .
Figure 2-10 Router A Not Advertising a Global Prefix on the Tunnel Link
In an IPv6 to IPv6 network over tunnel configuration (shown in Figure 1-17), host A communicates with host F over a configured tunnel through an IPv4 network. The host configuration is similar to that of host A Section 2.3.1. All hosts automatically use their default router in order to communicate with hosts on other networks. Figure 2-11 shows the worksheet for router A.
Figure 2-11 IPv6 Network to IPv6 Network over IPv4 Configured Tunnel Configuration
You do not have to run RIPng on the WE0 and WE1 interfaces because no routers are attached to the interfaces.
The configuration of router B is similar, except that the source and destination addresses for the configured tunnel would be switched and the address prefixes advertised on WE0 and WE1 would be dec:2:1::/64 and dec:2:2::/64 , respectively.
If the routers were not configured to use RIPng over the tunnel interface, each router would need to specify a manual route to the other. |
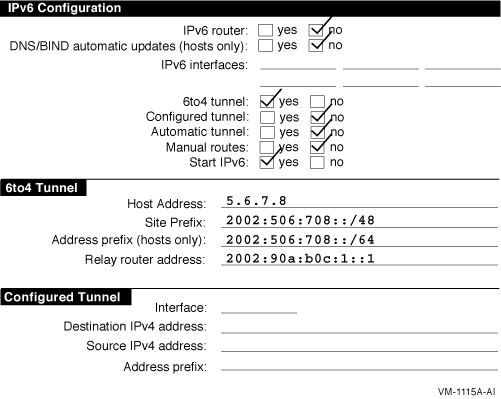
In a 6to4 tunnel configuration (shown in Figure 1-18), host E is the only node in a 6to4 site. It communicates with host B over a 6to4 tunnel through an IPv4 network: both nodes use IPv6 6to4 addresses. The tunnel in this case is betwen host E and router B. IPv6 is not configured on the host E physical interface because it is connected to an IPv4 network. IPv6, however, is configured on the 6to4 tunnel. Figure 2-12 shows the worksheet for host E.
Figure 2-12 6to4 Tunnel Host E Configuration
Router B is the border router for another 6to4 site, and is also the IPv6 router for that site. Router B is advertising a 6to4 prefix on each subnet. The upper 48 bits of each 6to4 prefix are identical to the 6to4 site prefix. Figure 2-13 shows the worksheet for router B.
Figure 2-13 6to4 Tunnel Router Configuration
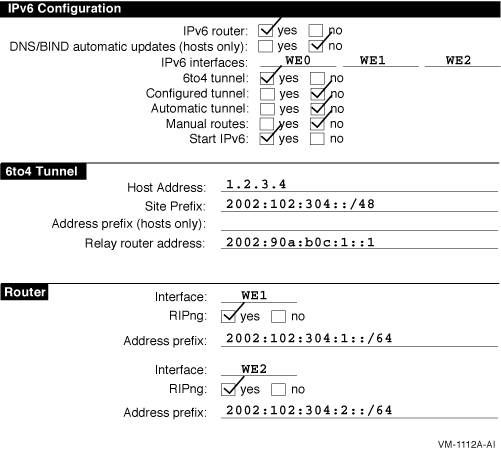
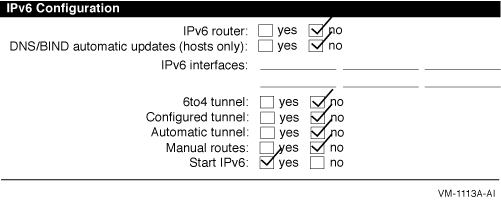
Figure 2-14 shows the worksheet for host B. Because router B is advertising a 6to4 address prefix on the subnet, host B autoconfigures its own 6to4 address as part of its participation in the site; it does not need to configure any 6to4 tunnel interfaces.
Figure 2-14 6to4 Tunnel Host B Configuration
You can configure your system as either an IPv6 host or an IPv6 router. In either case, you perform the following steps:
Add the following line to your LOGIN.COM file:
This command procedure defines the UNIX management utilities as foreign commands. Rerun your LOGIN.COM to make the definitions effective for the current process. |
Once you have completed configuring your system as either an IPv6 host or router, you can optionally configure your system as a BIND server (described in Chapter 3) or as a correspondent node to support mobile IPv6, described in Chapter 5.
You may want to make other changes to your IPv6 configuration after
initial setup. Chapter 4 describes how to make further changes.
2.5 Configuring an IPv6 Host
Before running the TCPIP$IP6_SETUP command procedure, make sure that
you have configured your system for IPv4 by running TCPIP$CONFIG.
2.5.1 Run TCPIP$IP6_SETUP to Configure Host
To configure your system as an IPv6 host, do the following:
$ @SYS$MANAGER:TCPIP$IP6_SETUP |
Configure this system as an IPv6 router? [NO]: |
Configure a 6to4 interface? [NO]: |
Enter this node's IPv4 address: |
Enter the address prefix to use on TNn: |
Connectivity to native IPv6 sites? [NO]: |
Enter 6to4 address of a 6to4 Relay Router [2002:C058:6301::]: |
     Do you want to enable IPv6 on this interface?

Enable IPv6 on interface WE0? [YES]:
|
Configure an IPv6 over IPv4 automatic tunnel interface? [NO]: |
Create a configured tunnel? [NO]: |
Source IPv4 address of tunnel IT0?: |
| Previous | Next | Contents | Index |