![[Compaq]](../../images/compaq.gif)
![[Go to the documentation home page]](../../images/buttons/bn_site_home.gif)
![[How to order documentation]](../../images/buttons/bn_order_docs.gif)
![[Help on this site]](../../images/buttons/bn_site_help.gif)
![[How to contact us]](../../images/buttons/bn_comments.gif)
![[OpenVMS documentation]](../../images/ovmsdoc_sec_head.gif)
| Document revision date: 30 March 2001 | |
|
|
|
|
|
|
| Previous | Contents | Index |
You can improve responsiveness on an individual CPU in an OpenVMS Cluster by shifting some of the work load to another, less used processor. You can do this by setting up generic batch queues or by assigning terminal lines to such a processor. Some terminal server products perform automatic load balancing by assigning users to the least heavily used processor.
Do not attempt to load balance among CPUs in an OpenVMS Cluster until you are sure that other resources are not blocking (and thus not inflating idle time artificially) on a processor that is responding poorly---and until you have already done all you can to improve responsiveness on each processor in the cluster. |
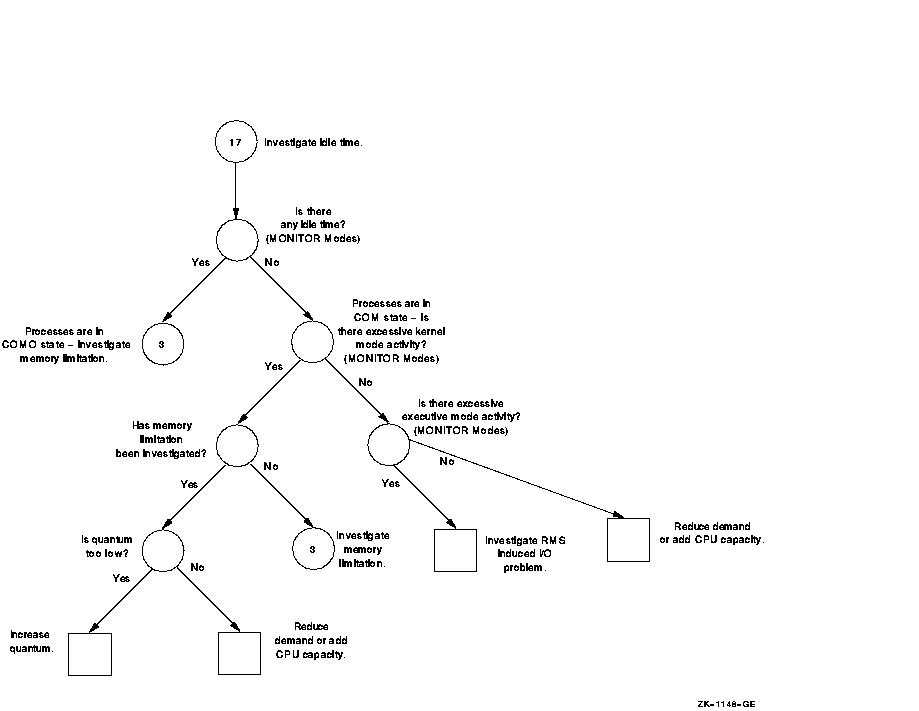
Your principal tool in assessing the relative load on each CPU is the MODES class in the MONITOR multifile summary. Compare the Idle Time figures for all the processors. The processor with the most idle time might be a good candidate for offloading the one with the least idle time.
On an OpenVMS Cluster member system where low-priority batch work is being executed, there may be little or no idle time. However, such a system can still be a good candidate for receiving more of the OpenVMS Cluster work load. The interactive work load on that system might be very light, so it would have the capacity to handle more default-priority work at the expense of the low-priority work.
There are several ways to tell whether a seemingly 100% busy processor is executing mostly low-priority batch work:
$ MONITOR /INPUT=SYS$MONITOR:file-spec /VIEWING_TIME=1 PROCESSES /TOPCPU |
The following are some techniques for OpenVMS Cluster load balancing. Once you have determined the relative CPU capacities of individual member systems, you can do any of the following:
There are only two ways to apply software tuning controls to alleviate performance problems related to CPU limitations:
The other options, reducing demand or adding CPU capacity, are really
not tuning solutions.
13.2 Dedicated CPU Lock Manager (Alpha)
The Dedicated CPU Lock Manager is a new feature that improves performance on large SMP systems that have heavy lock manager activity. The feature dedicates a CPU to performing lock manager operations.
Dedicating a CPU to performing locking operations can improve overall system performance as follows:
For the Dedicated CPU Lock Manager to be effective, systems must have a high CPU count and a high amount of MP_SYNCH due to the lock manager. Use the MONITOR utility and the MONITOR MODE command to see the amount of MP_SYNCH. If your system has more than five CPUs and if MP_SYNCH is higher than 200%, your system may be able to take advantage of the Dedicated CPU Lock Manager. You can also use the spinlock trace feature in the System Dump Analyzer (SDA) to help determine if the lock manager is contributing to the high amount of MP_SYNCH time.
You implement the Dedicated CPU Lock Manager by starting a LCKMGR_SERVER process. This process runs at priority 63. When the Dedicated CPU Lock Manager is turned on, this process runs in a compute bound loop looking for lock manager work to perform. Because this process polls for work, it is always computable; and with a priority of 63 the process will never give up the CPU, thus consuming a whole CPU.
If the Dedicated CPU Lock Manager is running when a program calls either the $ENQ or $DEQ system services, a lock manager request is placed on a work queue for the Dedicated CPU Lock Manager. A process waiting for a lock request to be processed, the process spins in kernel mode at IPL 2. After the dedicated CPU processes the request, the status for the system service is returned to the process.
The Dedicated CPU Lock Manager is dynamic and can be turned off if
there are no perceived benefits. When the Dedicated CPU Lock Manager is
turned off, the LCKMGR_SERVER process is in a HIB (hibernate) state.
The process may not be deleted once started.
13.2.2 Enabling the Dedicated CPU Lock Manager
To use the Dedicated CPU Lock Manager, set the LCKMGR_MODE system parameter. Note the following about the LCKMGR_MODE system parameter:
Setting LCKMGR_MODE to a number greater than zero (0) triggers the lock manager server process. The lock manager server process then creates a detached process called LCKMGR_SERVER. When this process is created, it starts running if the number of active CPUs equals the number set by the LCKMGR_MODE system parameter.
In addition, if the number of active CPUs should ever be reduced below
the required threshold by either a STOP/CPU command or by CPU
reassignment in a Galaxy configuration, the Dedicated CPU Lock Manager
automatically turns off within one second, and the LCKMGR_SERVER
process goes into a hibernate state. If the CPU is restarted, the
LCKMGR_SERVER process again resumes operations.
13.2.3 Using the Dedicated CPU Lock Manager with Affinity
The LCKMGR_SERVER process uses the affinity mechanism to set the process to the lowest CPU ID other than the primary. You can change this by indicating another CPU ID with the LOCKMGR_CPU system parameter. The Dedicated CPU Lock Manager then attempts to use this CPU. If this CPU is not available, it reverts back to the lowest CPU other than the primary.
The following shows how to change the CPU used by the LCKMGR_SERVER process:
$RUN SYS$SYSTEM:SYSGEN SYSGEN>USE ACTIVE SYSGEN>SET LOCKMGR_CPU 2 SYSGEN>WRITE ACTIVE SYSGEN>EXIT |
This change applies to the currently running system. A reboot reverts back to the lowest CPU other than the primary. To permanently change the CPU used by the LCKMGR_SERVER process, set LOCKMGR_CPU in your MODPARAMS.DAT file.
To verify the CPU dedicated to the lock manager, use the SHOW SYSTEM command, as follows:
$ SHOW SYSTEM/PROCESS=LCKMGR_SERVER OpenVMS V7.3 on node JYGAL 24-OCT-2000 10:10:11.31 Uptime 3 20:16:56 Pid Process Name State Pri I/O CPU Page flts Pages 4CE0021C LCKMGR_SERVER CUR 2 63 9 3 20:15:47.78 70 84 |
Note that the State field shows the process is currently running on CPU 2.
Compaq highly recommends that a process not be given hard affinity to
the CPU used by the Dedicated CPU Lock Manager. With hard affinity when
such a process becomes computable, it cannot obtain any CPU time,
because the LCKMGR_SERVER process is running at the highest possible
real-time priority of 63. However, the LCKMGR_SERVER detects once per
second if there are any computable processes that are set by the
affinity mechanism to the dedicated lock manager CPU. If so, the
LCKMGR_SERVER switches to a different CPU for one second to allow the
waiting process to run.
13.2.4 Using the Dedicated CPU Lock Manager with Fast Path Devices
OpenVMS Version 7.3 introduces Fast Path for SCSI and Fibre Channel Controllers along with the existing support of CIPCA adapters. The Dedicated CPU Lock Manager supports both the LCKMGR_SERVER process and Fast Path devices on the same CPU. However, this might not produce optimal performance.
By default the LCKMGR_SERVER process runs on the first available nonprimary CPU. Compaq recommends that the CPU used by the LCKMGR_SERVER process not have any Fast Path devices. This can be accomplished in either of the following ways:
The AlphaServer GS Series Systems (GS80, GS160, and the GS320) have NUMA memory characteristics. When using the Dedicated CPU Lock Manager on one of these systems, you can obtain the best performance by using a CPU and memory from within a single Quad Building Block (QBB).
The Dedicated CPU Lock Manager does not have the ability to decide where to obtain QBB memory. However, there is a method to preallocate lock manager memory from the low QBB. You can do this with the LOCKIDTBL system parameter which indicates the:
To preallocate the proper amount of memory, set the LOCKIDTBL system parameter to the highest number of locks and resources on the system. The MONITOR LOCK command can provide this information. If MONITOR indicates the system has 100,000 locks and 50,000 resources, then setting LOCKIDTBL to the sum of these two values ensures that enough memory is initially allocated. Adding some additional overhead might also be beneficial. In this example, setting LOCKIDTBL to 200,000 might be appropriate.
If necessary, use the LOCKMGR_CPU system parameter to ensure that the
LCKMGR_SERVER runs on a CPU in the low QBB.
13.3 Adjust Priorities
When a given process or class of processes receives inadequate CPU service, the surest technique for improving the situation is to raise the priority of the associated processes. To avoid undesirable side effects that can result when a process's base priority is raised permanently, it is often better to simply change the application code to raise the priority only temporarily. You should adopt this practice for critical pieces of work.
You establish priorities for processes using the UAF value. Users with appropriate privileges (ALTPRI, GROUP, or WORLD) can modify their own priority or those of other processes with the DCL command SET PROCESS/PRIORITY. You can also set and modify process priorities during execution using the system service $SETPRI. For information on process priorities, see Section 3.9.
You can assign priorities to subprocesses and detached processes using the DCL command RUN/PRIORITY or with the $CREPRC system service at process creation. The appropriately privileged subprocess or detached process can modify its priority while running with the $SETPRI system service.
Batch queues are assigned priorities when they are initialized
(INITIALIZE/QUEUE/PRIORITY) or started (START/QUEUE/PRIORITY). While
you can adjust the priorities on a batch queue by stopping the queue
and restarting it (STOP/QUEUE and START/QUEUE/PRIORITY), the only way
to adjust the priority on a process while it is running is through the
system service $SETPRI.
13.4 Adjust QUANTUM
By reducing QUANTUM, you can reduce the maximum delay a process will ever experience waiting for the CPU. The trade-off here is that, as QUANTUM is decreased, the rate of time-based context switching will increase, and therefore the percentage of the CPU used to support CPU scheduling will also increase. When this overhead becomes excessive, performance will suffer.
Do not adjust QUANTUM unless you know exactly what you expect to accomplish and are aware of all the ramifications of your decision. |
The OpenVMS class scheduler allows you to tailor scheduling for particular applications. The class scheduler replaces the OpenVMS scheduler for specific processes. The program SYS$EXAMPLES:CLASS.C allows applications to do class scheduling.
With OpenVMS Version 7.3, the System Management Utiltiy (SYSMAN)
provides a class scheduler that gives you the ability to designate the
amount of CPU time that a system's users may receive by placing the
users into scheduling classes. Each class is assigned a percentage of
the overall system's CPU time. As the system runs, the combined set of
users in a class is limited to the percentage of CPU execution time
allocated to its class. For more information, see the OpenVMS System Management Utilities Reference Manual.
13.6 Establish Processor Affinity
You can associate a process with a particular processor by using the
command SET PROCESS/AFFINITY. This allows you to dedicate a processor
to specific activities.
13.7 Reduce Demand or Add CPU Capacity
You need to explore ways to schedule the work load so that there are fewer compute-bound processes running concurrently. Section 1.4.2 includes a number of suggestions for accomplishing this goal.
You may find it possible to redesign some applications with improved algorithms to perform the same work with less processing. When the programs selected for redesign are those that run frequently, the reduction in CPU demand can be significant.
You also want to control the concurrent demand for terminal I/O.
If you find that none of the previous suggestions or workload management techniques satisfactorily resolve the CPU limitation, you need to add capacity. It is most important to determine which type of CPU capacity you need, because there are two different types that apply to very different needs.
Work loads that consist of independent jobs and data structures lend themselves to operation on multiple CPUs. If your work load has such characteristics, you can add a processor to gain CPU capacity. The processor you choose may be of the same speed or faster, but it can also be slower. It takes over some portion of the work of the first processor. (Separating the parts of the work load in optimal fashion is not necessarily a trivial task.)
Other work loads must run in a single-stream environment, because many pieces of work depend heavily on the completion of some previous piece of work. These work loads demand that CPU capacity be increased by increasing the CPU speed with a faster model of processor. Typically, the faster processor performs the work of the old processor, which is replaced rather than supplemented.
To make the correct choice, you must analyze the interrelationships of the jobs and the data structures.
This appendix lists decision trees you can use to conduct the evaluations described in this manual. A decision tree consists of nodes that describe steps in your performance evaluation. Numbered nodes indicate that you should proceed to the next diagram that contains that number.
Figure A-1 Verifying the Validity of a Performance Complaint
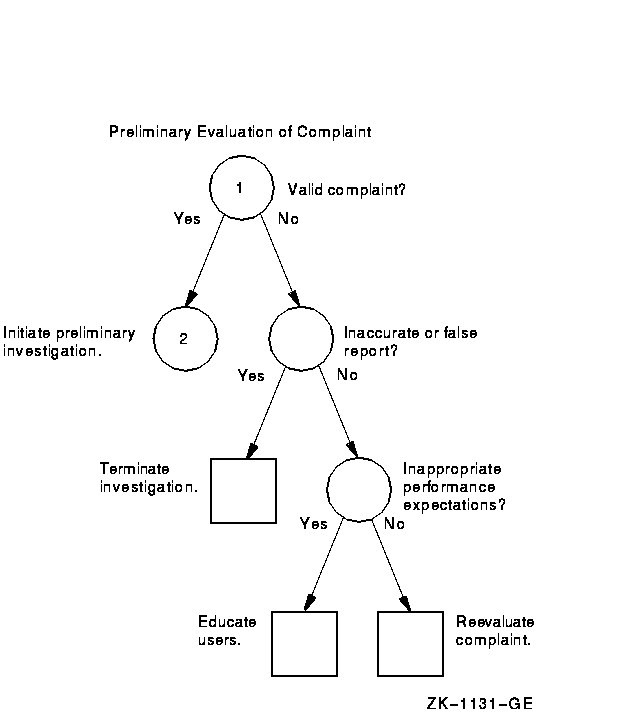
Figure A-2 Steps in the Preliminary Investigation Process
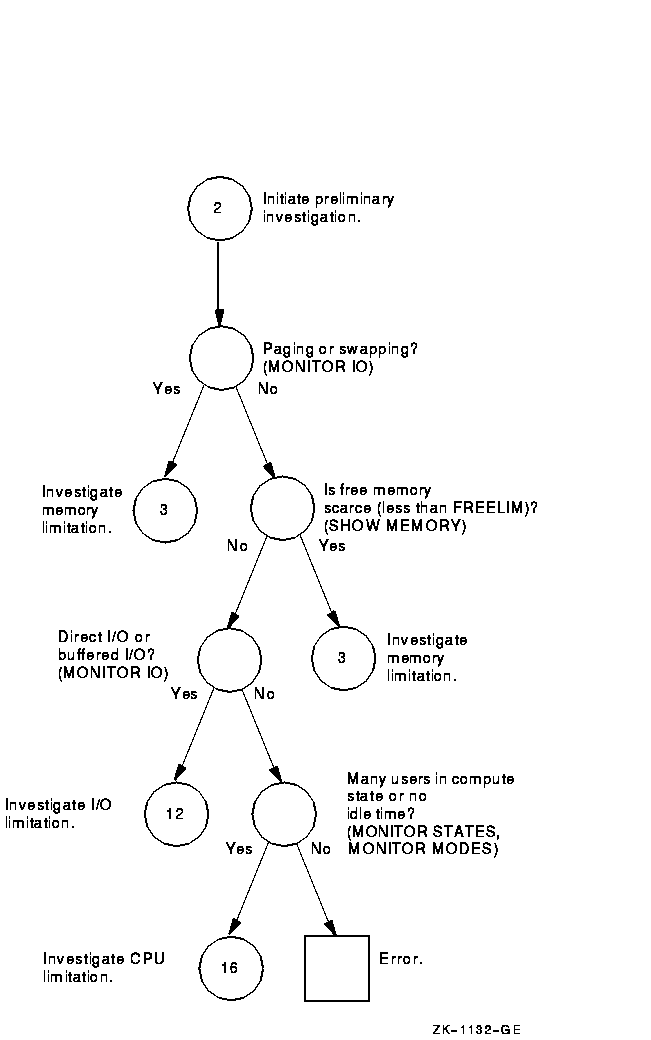
Figure A-3 Investigating Excessive Paging---Phase I
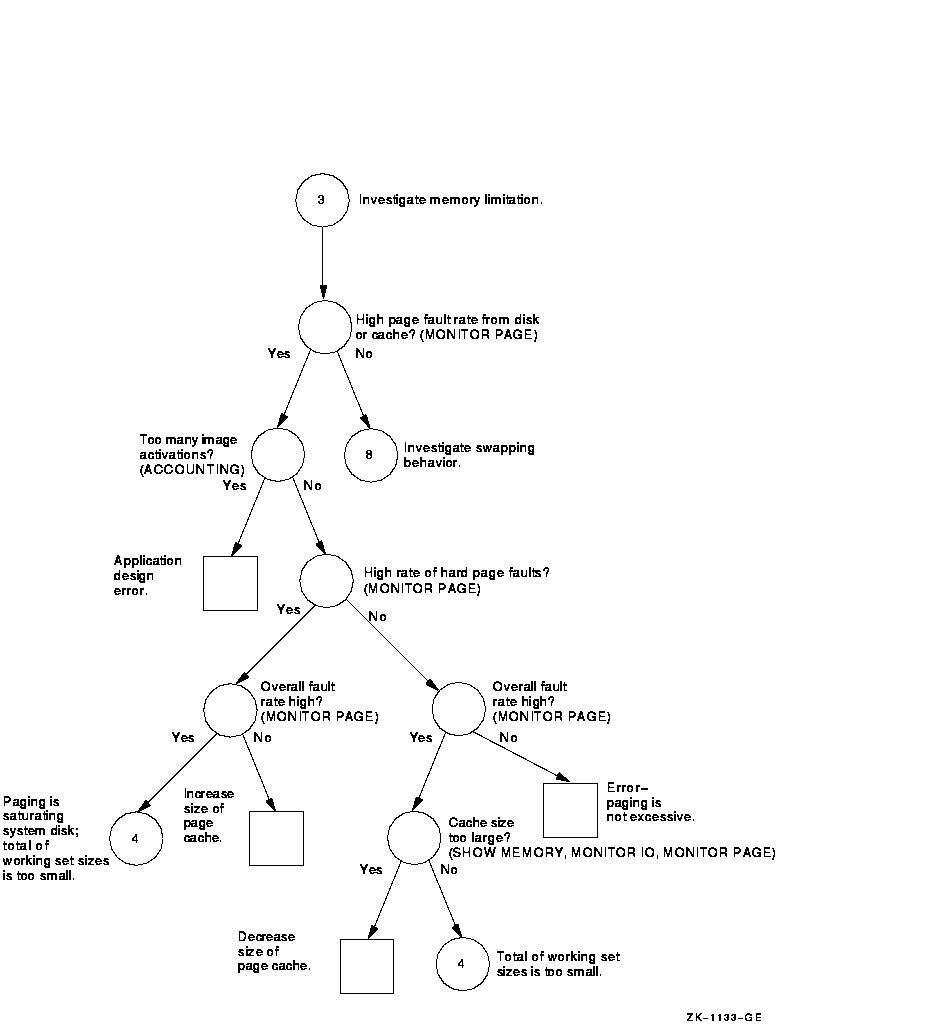
Figure A-4 Investigating Excessive Paging---Phase II
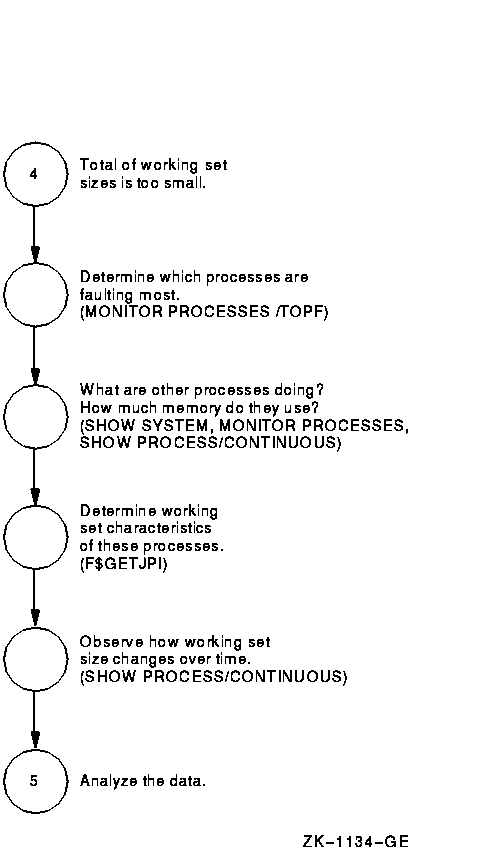
Figure A-5 Investigating Excessive Paging---Phase III
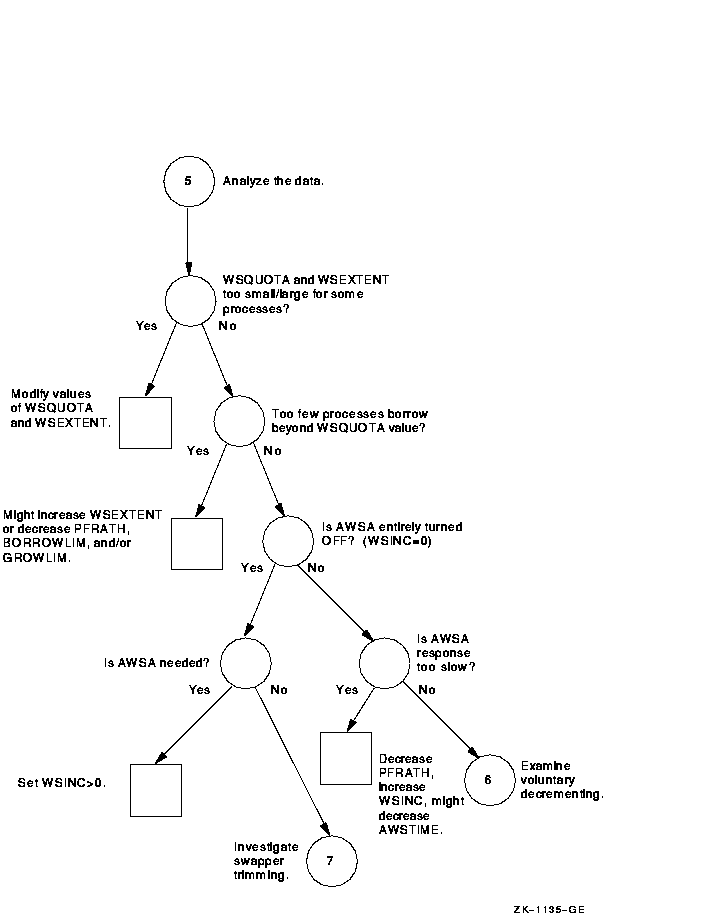
Figure A-6 Investigating Excessive Paging---Phase IV
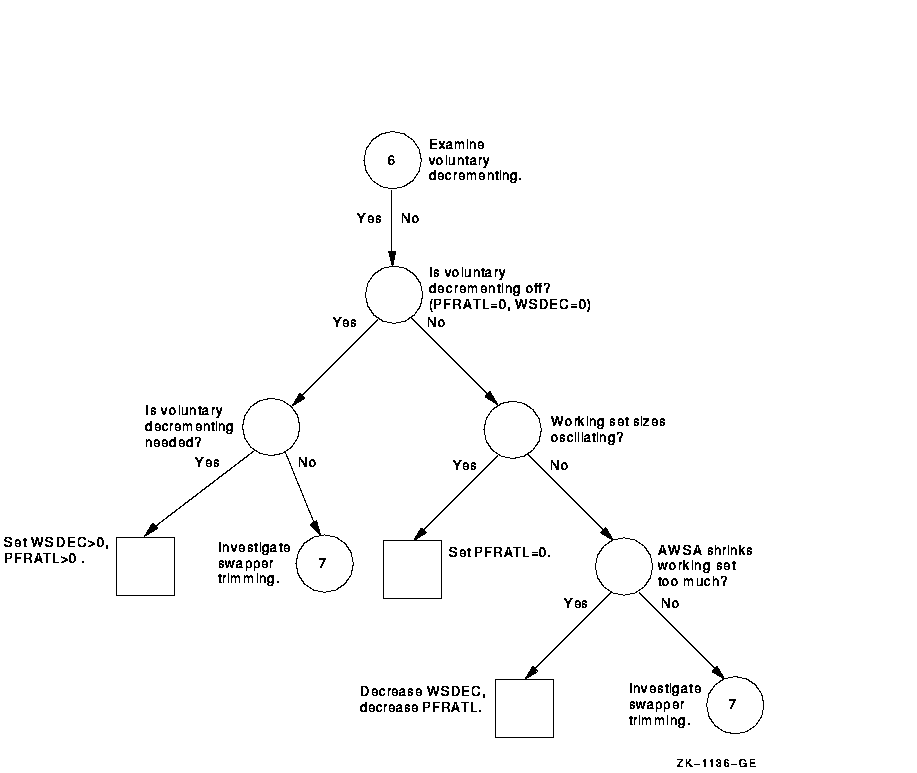
Figure A-7 Investigating Excessive Paging---Phase V
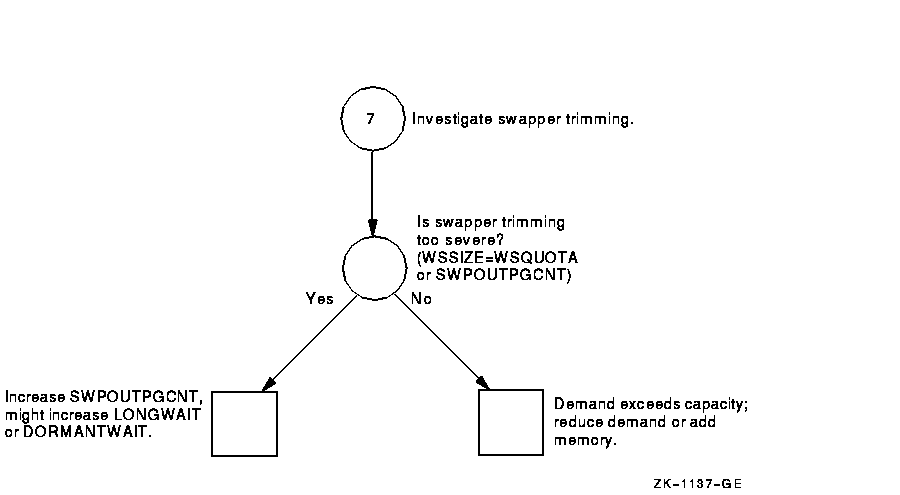
Figure A-8 Investigating Swapping---Phase I
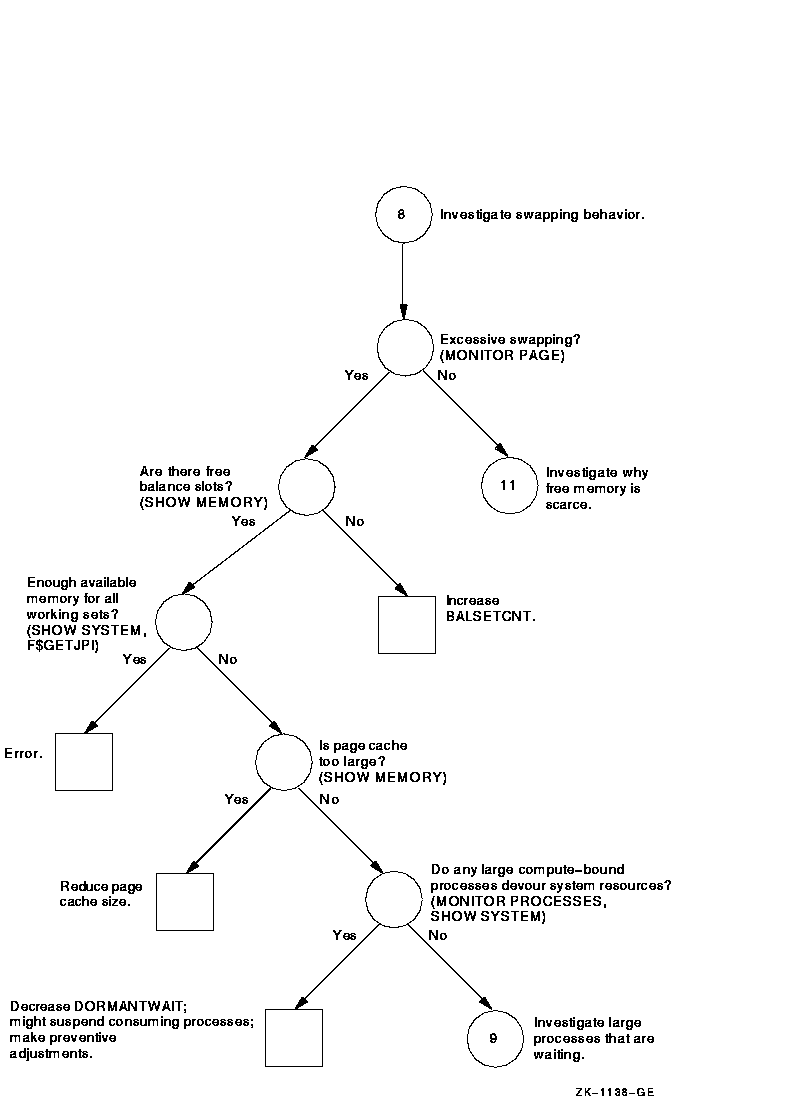
Figure A-9 Investigating Swapping---Phase II
Figure A-10 Investigating Swapping---Phase III
Figure A-11 Investigating Limited Free Memory---Phase I
Figure A-12 Investigating Disk I/O Limitations---Phase I
Figure A-13 Investigating Disk I/O Limitations---Phase II
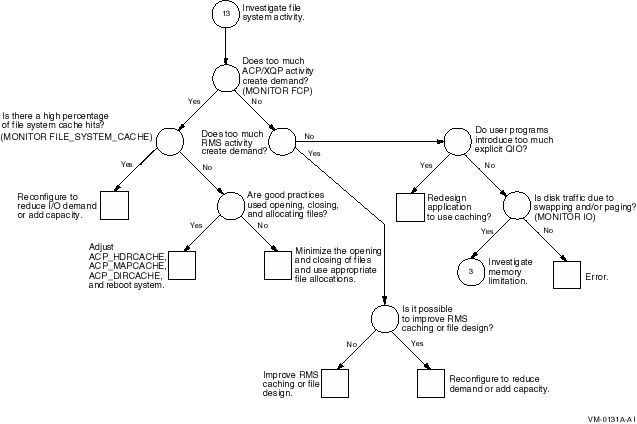
Figure A-14 Investigating Terminal I/O Limitations---Phase I
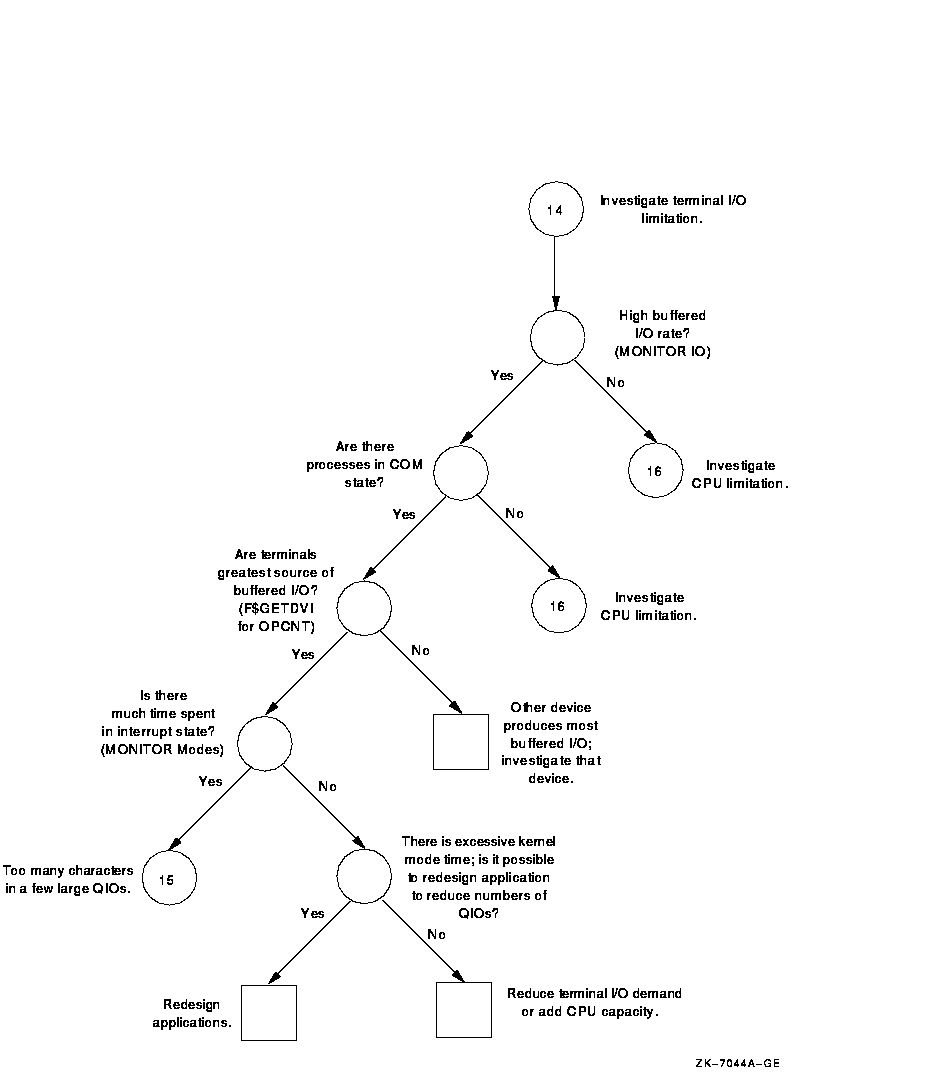
Figure A-15 Investigating Terminal I/O Limitations---Phase II

Figure A-16 Investigating Specific CPU Limitations---Phase I
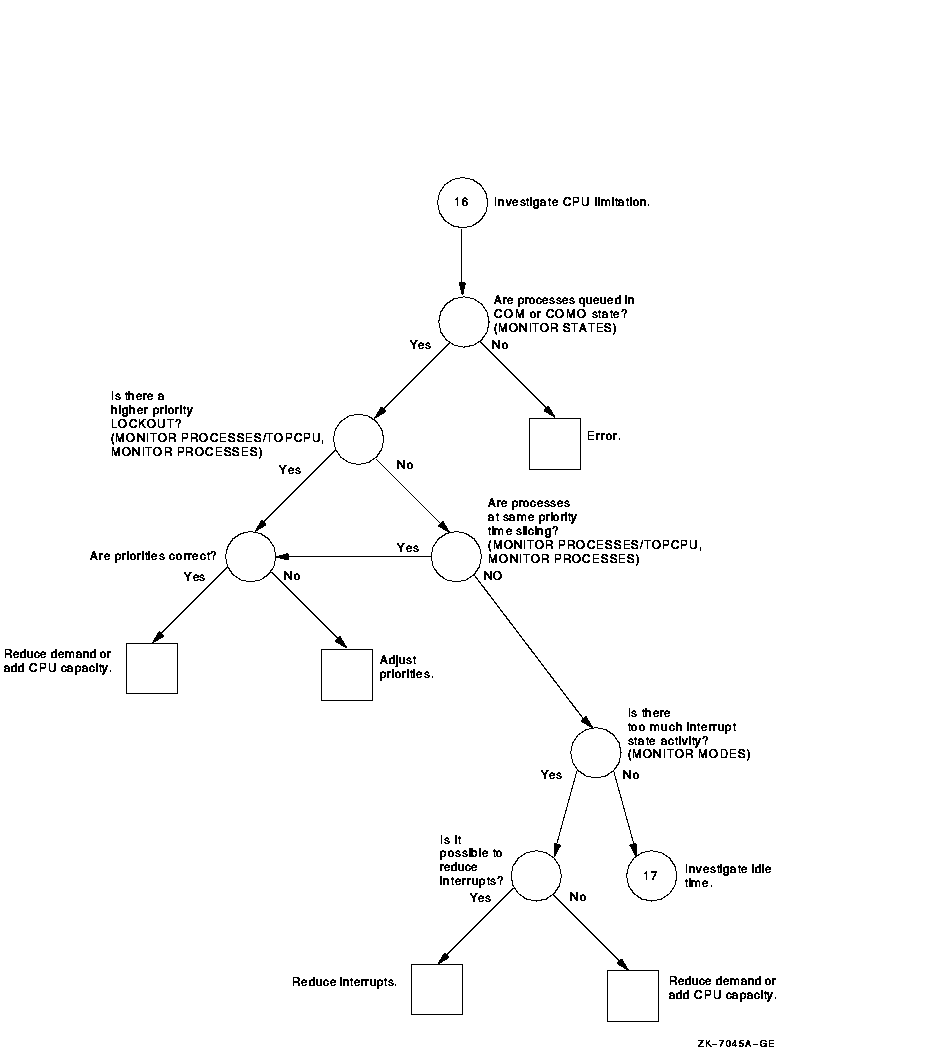
Figure A-17 Investigating Specific CPU Limitations---Phase II
| Previous | Next | Contents | Index |
|
|
| privacy and legal statement | ||
| 6491PRO_015.HTML | ||