![[Compaq]](../../images/compaq.gif)
![[Go to the documentation home page]](../../images/buttons/bn_site_home.gif)
![[How to order documentation]](../../images/buttons/bn_order_docs.gif)
![[Help on this site]](../../images/buttons/bn_site_help.gif)
![[How to contact us]](../../images/buttons/bn_comments.gif)
![[OpenVMS documentation]](../../images/ovmsdoc_sec_head.gif)
| Document revision date: 30 March 2001 | |
|
|
|
|
|
|
| Previous | Contents | Index |
A procedure is also considered AST reentrant if AST interrupts are disabled while critical sections of code execute. However, Compaq does not recommend this method of maintaining AST reentrancy.
Sometimes the only way to avoid race conditions is to disable AST interrupts during the access to static storage, and restore the state of the AST enable once the critical section of code has finished executing. However, this technique could adversely affect performance of real-time programs using AST interrupts. The $SETAST system service, which is used to enable and disable AST interrupts, is time consuming. Therefore, you should avoid disabling AST interrupts whenever you can by using the techniques described in Section 3.3.4.1 to Section 3.3.4.3.
Try to minimize the number of instructions during which the AST interrupts are disabled. Before disabling AST interrupts, establish a condition handler to restore the AST level in case an exception or stack unwind occurs.
Example 3-7 shows how you can use $SETAST to disable ASTs and then restore the previous state of the enable.
| Example 3-7 FORTRAN Program Disabling and Restoring ASTs | |||
|---|---|---|---|
!+
! This program demonstrates using the System
! Service SYS$SETAST to disable and then
! reenable AST interrupts.
!-
        INCLUDE '($SSDEF)'
        INTEGER*4 SYS$SETAST
!+
! Turn off ASTs and remember the previous setting.
!-
        ISTAT = SYS$SETAST (%VAL(0))
!+
! The statements in the program during whose
! execution you want ASTs disabled.
!
! If ASTs were previously enabled,
! reenable them.
!-
        IF (ISTAT .EQ. SS$_WASSET) CALL SYS$SETAST( %VAL(1))
        END
|
If your procedure performs I/O using OpenVMS RMS (RMS), you must use the following coding techniques for your procedure to be AST reentrant:
You should not allow an exception to propagate out of an AST handler because the exception might be caught by any procedure that is active at the time of the AST. Condition handlers for other active procedures might react as if the exception was caused by a procedure that they had called.
Another reason for not allowing exceptions to propagate out of an AST handler is that, for run-time environments that use multiple threads in a process such as Ada, it cannot be determined which stack of the threads of execution is used to deliver the AST. (The AST is delivered on the stack of whichever thread is active at the time of the AST interrupt.)
It is best to catch all exceptions in the AST handler and not allow them to propagate.
A successful test system is one that uncovers errors. To ensure successful testing, plan how to test your procedures while you are designing them, and begin testing while you are coding. You should test for the following:
This chapter focuses on testing procedures for modularity. Modularity is especially important to procedures that will be included in a library facility. A procedure that is not modular can adversely affect the results and performance of other procedures that call it.
To ensure modularity within procedures, perform at least the following tests:
This chapter discusses methods for designing and administering these
types of tests. It also describes reentrancy, performance analysis, and
RTL procedures for time and resource monitoring.
4.1 Unit Testing
Before you begin combining units of code (such as subprograms, subroutines, and internal procedures) to form your new procedure, it is essential to ensure that each of these units works separately. Thorough unit testing is important for the following reasons:
Unit testing includes the following steps:
You determine the goals of your procedure at the requirements or specifications stage. As mentioned earlier, this topic is not discussed in this manual because it does not have a significant effect on modularity. However, it does have a significant effect upon whether your final product can be considered successful. If your product does not perform the functions or meet the requirements decided upon at the requirements or specifications stage, it is not a successful project. You should have at least one test for each of the requirements that your procedure was designed to fulfill.
You can use the following two types of tests:
Black box tests assume that you know nothing about the internal workings of the procedure that you are testing. All that you are interested in is the output that you receive for given sets of input.
White box tests (also called clear box tests) are more complicated
because they are designed to step through particular sections of code
or algorithms internal to the procedure. They assume that you know, in
great detail, the internal workings of the procedure being tested.
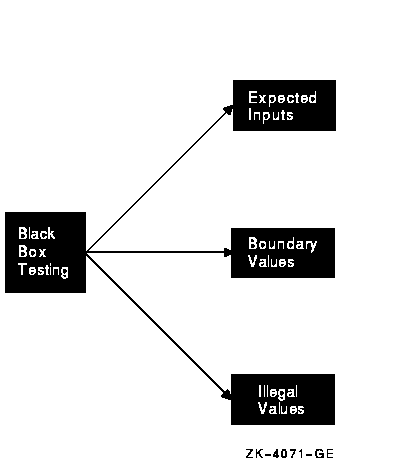
4.1.1 Black Box Testing
When you perform black box testing, you are interested only in the output you receive for particular input values. Execute the procedure repetitively using input from different classes. The best way to do this is to write a command procedure or test driver program to execute the procedure a given number of times using test data that you supply. (For information about writing command procedures, see the OpenVMS User's Manual.)
You should execute your procedure with test cases from each of the following categories:
Figure 4-1 summarizes the methods of black box testing.
Figure 4-1 Black Box Testing Methods
When performing white box testing, unlike black box testing, you must understand the internal workings of the procedure. Keep in mind that you are testing internal workings---the specific lines of code.
To perform white box testing, do the following:
Figure 4-2 summarizes white box testing.
Figure 4-2 White Box Tests
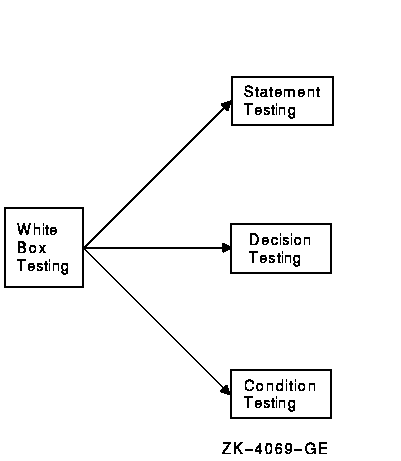
Note that each white box test finds a specific type of error. For
example, statement testing does not find an error on a negative value
for a condition if the statement is given a positive input the only
time it is executed. Therefore, you must perform all three white box
tests.
4.2 Language-Independence Testing
For your procedures to be as useful as possible, they must be able to be called by programs in any language. Providing for language independence is essential to producing a useful procedure.
Testing for language independence is a specific type of unit testing. It ensures that your program executes correctly, regardless of the language from which it is called.
To test your procedures for language independence, write several driver programs in languages you have chosen randomly. The driver program need only contain a call to the procedure being tested.
If you do find that your procedures are not language independent, make sure that they conform to the following rules:
Integration testing is the next logical step following unit testing. Unit testing is designed to test each separate component. Depending on your procedure, that component might be a module, a subprogram, a subroutine, an internal procedure (fac_ <double_uscore> name), or an intrinsic piece of code. Once you have determined that each unit works separately, you need to determine that the units also work together to form the complete procedure.
Integration testing can be completed by either of the two methods
described in Section 4.3.1 and Section 4.3.2.
4.3.1 All-at-Once Approach to Integration Testing
One method of integration testing is the all-at-once approach. In this method, you finish all the units, link them, and test the completed structure all at once. Compaq strongly discourages use of this method, because it makes it difficult to find the location of errors. For example, look at the organization of the units in the sample procedure shown in Figure 4-3. Assume that this procedure used the all-at-once approach and found an error; the procedure did not work. There is no way of knowing whether the error was in unit A, unit B, unit C, or unit D.
Figure 4-3 Sample Procedure for Integration Testing

The recommended approach to integration testing is called incremental testing. Incremental testing involves testing the procedure by starting with one unit and building on it one unit at a time. Each unit should always be subjected to thorough unit testing before it is included in the integration tests.
Incremental integration testing is especially useful for finding the following types of error:
Using the sample procedure in Figure 4-3, complete the test of unit A on level 1 before proceeding to level 2, where you test units A and B in combination. At each level, you correct any errors before proceeding to the next level. When you have completed the last step, you know that the entire procedure works correctly.
Because you started at the top of the sample procedure and added units incrementally from lower levels, you were using the top-down approach to integration testing. You could just as easily have started at Level 3 and used the bottom-up approach.
As you can see from the example, there are several distinct advantages to incremental integration testing:
It is important to test your procedures for reentrancy before placing them into a library facility. Because ASTs can occur at any time, procedures that are not AST reentrant may exhibit unexpected behavior. In particular, an AST occurring during storage modification in a procedure that is not AST reentrant can corrupt the contents of the procedure's storage. (For further information about AST reentrancy, see Section 3.3.)
Full reentrancy is important to multithread tasking environments, such as the environment used by Ada.
To avoid problems with reentrancy, carefully read and follow the coding
guidelines described in Section 3.3.
4.4.1 Checking for AST Reentrancy
There are two methods of checking a procedure for AST reentrancy. You
can use the OpenVMS Debugger or perform a manual desk check.
4.4.1.1 Using the Debugger to Check for AST Reentrancy
When using the debugger to check for AST reentrancy, do the following:
For more information about the debugger, refer to the OpenVMS Debugger Manual.
4.4.1.2 Using Desk Checking to Check for AST Reentrancy
Desk checking is the term for tracing through a procedure's execution manually. Performing a desk check for AST reentrancy consists of the following four steps:
What you are actually doing in the process is testing between the
execution of every two statements in the procedure. The most rigorous
method of applying this type of desk checking for AST reentrancy is to
step through the procedure at the assembly language level and test
between each assembly language instruction.
4.4.2 Checking for Full Reentrancy
Full reentrancy differs from AST reentrancy in the number of threads of execution. An AST-reentrant environment can support only two threads of execution: the AST-level thread and the non-AST-level thread. Full reentrancy is important in environments that can support many threads of execution, such as Ada.
A procedure is fully reentrant if any number of threads of execution can execute to completion without affecting any of the other threads of execution.
Typically, a procedure that is AST reentrant is also fully reentrant.
For further information on full reentrancy and environments supporting
multiple threads of execution, refer to the documentation for Compaq
Ada.
4.5 Performance Analysis
All timer and resource allocation procedures should make statistics available for performance evaluation and debugging. You should code timer and resource allocation procedures with the following two entry points:
|
LIB_SHOW_name LIB_STAT_name |
A SHOW entry point provides formatted strings containing the information you need. The calling sequence for a SHOW entry point is as follows:
|
LIB_SHOW_name [code [,action-routine [,user-arg]]] |
code
An optional code (in the form LIB_K_code) designating the statistic you need. Define a separate code for each statistic available; the codes should be the same for the SHOW and STAT entry points. The values associated with the codes start at one for each procedure. The functional specification in the procedure's documentation should list the codes used. If the code is omitted, or zero, the procedure provides all statistics.action-routine
The address of an action routine. This is an optional argument. If omitted, statistics are written to SYS$OUTPUT.user-arg
An optional user argument to be passed to the action routine. If omitted, a shortened list is passed to the action routine. The user-arg argument, if present, is copied to the argument list passed to the action routine. That is, the argument list entry passed by the calling program is copied to the argument list entry passed to the action routine. The access type, data type, argument form, and passing mechanism can be arbitrary, as agreed between the calling program and the action routine.
The optional-action routine should have the following form:
|
ACTION-ROUTINE (string [,user-arg]) |
See Section 3.1.4 for an example of the code to invoke a user-action
routine.
4.5.2 STAT Entry Point
A STAT procedure returns the information you want as binary results. The calling sequence is as follows:
|
LIB_STAT_name (code ,value) |
code
A code designating the statistic you want. A separate code is defined for each statistic available; the codes are the same for the SHOW and STAT entry points. Codes start at one.value
The value of the returned statistic.
| Previous | Next | Contents | Index |
|
|
| privacy and legal statement | ||
| 4518PRO_005.HTML | ||