![[Compaq]](../../images/hp.gif)
![[Go to the documentation home page]](../../images/buttons/hp_bn_site_home.gif)
![[How to order documentation]](../../images/buttons/hp_bn_order_docs.gif)
![[Help on this site]](../../images/buttons/hp_bn_site_help.gif)
![[How to contact us]](../../images/buttons/hp_bn_comments.gif)
![[OpenVMS documentation]](../../images/hp_ovmsdoc_sec_head.gif)
| Document revision date: 15 July 2002 | |
|
|
|
|
|
|
| Previous | Contents | Index |
Setting bit 2 to serve the system disk is important when other nodes in the cluster rely on this system being able to serve its system disk. This setting prevents obscure contention problems that can occur when a system attempts to complete I/O to a remote system disk whose system has failed.
The following sequence of events describes how a contention problem can occur if serving the system disk is disabled (that is, if bit 2 is not set):
Use either of the following methods to set these system parameters:
With either method, the served devices become accessible when the serving computer reboots. Further, the servers automatically serve any suitable device that is added to the system later. For example, if new drives are attached to an HSC subsystem, the devices are dynamically configured.
Note: The SCSI retention command modifier is not
supported by the TMSCP server. Retention operations should be performed
from the node serving the tape.
6.4 MSCP I/O Load Balancing
MSCP I/O load balancing offers the following advantages:
Two types of MSCP I/O load balancing are provided by OpenVMS Cluster
software: static and dynamic. Static load balancing occurs on both VAX
and Alpha systems; dynamic load balancing occurs only on VAX systems.
Both types of load balancing are based on the load capacity ratings of
the server systems.
6.4.1 Load Capacity
The load capacity ratings for the VAX and Alpha systems are predetermined by Compaq. These ratings are used in the calculation of the available serving capacity for MSCP static and dynamic load balancing. You can override these default settings by specifying a different load capacity with the MSCP_LOAD parameter.
Note that the MSCP server load-capacity values (either the default value or the value you specify with MSCP_LOAD) are estimates used by the load-balancing feature. They cannot change the actual MSCP serving capacity of a system.
A system's MSCP serving capacity depends on many factors including its
power, the performance of its LAN adapter, and the impact of other
processing loads. The available serving capacity, which is calculated
by each MSCP server as described in Section 6.4.3, is used solely to
bias the selection process when a client system (for example, a
satellite) chooses which server system to use when accessing a served
disk.
6.4.2 Increasing the Load Capacity When FDDI is Used
When FDDI is used instead of Ethernet, the throughput is far greater.
To take advantage of this greater throughput, Compaq recommends that
you change the server's load-capacity default setting with the
MSCP_LOAD parameter. Start with a multiplier of four. For example, the
load-capacity rating of any Alpha system connected by FDDI to a disk
can be set to 1360 I/O per second (4x340). Depending on your
configuration and the software you are running, you may want to
increase or decrease this value.
6.4.3 Available Serving Capacity
The load-capacity ratings are used by each MSCP server to calculate its available serving capacity.
The available serving capacity is calculated in the following way:
| Step | Calculation |
|---|---|
| 1 | Each MSCP server counts the read and write requests sent to it and periodically converts this value to requests per second. |
| 2 | Each MSCP server subtracts its requests per second from its load capacity to compute its available serving capacity. |
MSCP servers periodically send their available serving capacities to
the MSCP class driver (DUDRIVER). When a disk is mounted or one fails
over, DUDRIVER assigns the server with the highest available serving
capacity to it. (TMSCP servers do not perform this monitoring
function.) This initial assignment is called static load balancing.
6.4.5 Dynamic Load Balancing (VAX Only)
Dynamic load balancing occurs only on VAX systems. MSCP server activity
is checked every 5 seconds. If activity to any server is excessive, the
serving load automatically shifts to other servers in the cluster.
6.4.6 Overriding MSCP I/O Load Balancing for Special Purposes
In some configurations, you may want to designate one or more systems
in your cluster as the primary I/O servers and restrict I/O traffic on
other systems. You can accomplish these goals by overriding the default
load-capacity ratings used by the MSCP server. For example, if your
cluster consists of two Alpha systems and one VAX 6000-400 system and
you want to reduce the MSCP served I/O traffic to the VAX, you can
assign a low MSCP_LOAD value, such as 50, to the VAX. Because the two
Alpha systems each start with a load-capacity rating of 340 and the VAX
now starts with a load-capacity rating of 50, the MSCP served
satellites will direct most of the I/O traffic to the Alpha systems.
6.5 Managing Cluster Disks With the Mount Utility
For locally connected disks to be accessible to other nodes in the cluster, the MSCP server software must be loaded on the computer to which the disks are connected (see Section 6.3.1). Further, each disk must be mounted with the Mount utility, using the appropriate qualifier: /CLUSTER, /SYSTEM, or /GROUP. Mounting multiple disks can be automated with command procedures; a sample command procedure, MSCPMOUNT.COM, is provided in the SYS$EXAMPLES directory on your system.
The Mount utility also provides other qualifiers that determine whether a disk is automatically rebuilt during a remount operation. Different rebuilding techniques are recommended for data and system disks.
This section describes how to use the Mount utility for these purposes.
6.5.1 Mounting Cluster Disks
To mount disks that are to be shared among all computers, specify the MOUNT command as shown in the following table.
| IF... | THEN... |
|---|---|
| At system startup | |
| The disk is attached to a single system and is to be made available to all other nodes in the cluster. | Use MOUNT/CLUSTER device-name on the computer to which the disk is to be mounted. The disk is mounted on every computer that is active in the cluster at the time the command executes. First, the disk is mounted locally. Then, if the mount operation succeeds, the disk is mounted on other nodes in the cluster. |
| The computer has no disks directly attached to it. | Use MOUNT/SYSTEM device-name on the computer for each disk the computer needs to access. The disks can be attached to a single system or shared disks that are accessed by an HS x controller. Then, if the mount operation succeeds, the disk is mounted on the computer joining the cluster. |
| When the system is running | |
| You want to add a disk. | Use MOUNT/CLUSTER device-name on the computer to which the disk is to be mounted. The disk is mounted on every computer that is active in the cluster at the time the command executes. First, the disk is mounted locally. Then, if the mount operation succeeds, the disk is mounted on other nodes in the cluster. |
To ensure disks are mounted whenever possible, regardless of the sequence that systems in the cluster boot (or shut down), startup command procedures should use MOUNT/CLUSTER and MOUNT/SYSTEM as described in the preceding table.
Note: Only system or group disks can be mounted across
the cluster or on a subset of the cluster members. If you specify
MOUNT/CLUSTER without the /SYSTEM or /GROUP qualifier, /SYSTEM is
assumed. Also note that each cluster disk mounted with the /SYSTEM or
/GROUP qualifier must have a unique volume label.
6.5.2 Examples of Mounting Shared Disks
Suppose you want all the computers in a three-member cluster to share a disk named COMPANYDOCS. To share the disk, one of the three computers can mount COMPANYDOCS using the MOUNT/CLUSTER command, as follows:
$ MOUNT/CLUSTER/NOASSIST $1$DUA4: COMPANYDOCS |
If you want just two of the three computers to share the disk, those two computers must both mount the disk with the same MOUNT command, as follows:
$ MOUNT/SYSTEM/NOASSIST $1$DUA4: COMPANYDOCS |
To mount the disk at startup time, include the MOUNT command either in a common command procedure that is invoked at startup time or in the computer-specific startup command file.
Note: The /NOASSIST qualifier is used in command
procedures that are designed to make several attempts to mount disks.
The disks may be temporarily offline or otherwise not available for
mounting. If, after several attempts, the disk cannot be mounted, the
procedure continues. The /ASSIST qualifier, which is the default,
causes a command procedure to stop and query the operator if a disk
cannot be mounted immediately.
6.5.3 Mounting Cluster Disks With Command Procedures
To configure cluster disks, you can create command procedures to mount them. You may want to include commands that mount cluster disks in a separate command procedure file that is invoked by a site-specific SYSTARTUP procedure. Depending on your cluster environment, you can set up your command procedure in either of the following ways:
With either method, each computer can invoke the common procedure from the site-specific SYSTARTUP procedure.
Example:
The MSCPMOUNT.COM file in the SYS$EXAMPLES directory on your system is
a sample command procedure that contains commands typically used to
mount cluster disks. The example includes comments explaining each
phase of the procedure.
6.5.4 Disk Rebuild Operation
To minimize disk I/O operations (and thus improve performance) when files are created or extended, the OpenVMS file system maintains a cache of preallocated file headers and disk blocks.
If a disk is dismounted improperly---for example, if a system fails or
is removed from a cluster without running
SYS$SYSTEM:SHUTDOWN.COM---this preallocated space becomes temporarily
unavailable. When the disk is remounted, MOUNT scans the disk to
recover the space. This is called a disk rebuild
operation.
6.5.5 Rebuilding Cluster Disks
On a nonclustered computer, the MOUNT scan operation for recovering preallocated space merely prolongs the boot process. In an OpenVMS Cluster system, however, this operation can degrade response time for all user processes in the cluster. While the scan is in progress on a particular disk, most activity on that disk is blocked.
Note: User processes that attempt to read or write to files on the disk can experience delays of several minutes or longer, especially if the disk contains a large number of files or has many users.
Because the rebuild operation can delay access to disks during the startup of any OpenVMS Cluster computer, Compaq recommends that procedures for mounting cluster disks use the /NOREBUILD qualifier. When MOUNT/NOREBUILD is specified, disks are not scanned to recover lost space, and users experience minimal delays while computers are mounting disks.
Reference: Section 6.5.6 provides information about
rebuilding system disks. Section 9.5.1 provides more information about
disk rebuilds and system-disk throughput techniques.
6.5.6 Rebuilding System Disks
Rebuilding system disks is especially critical because most system activity requires access to a system disk. When a system disk rebuild is in progress, very little activity is possible on any computer that uses that disk.
Unlike other disks, the system disk is automatically mounted early in the boot sequence. If a rebuild is necessary, and if the value of the system parameter ACP_REBLDSYSD is 1, the system disk is rebuilt during the boot sequence. (The default setting of 1 for the ACP_REBLDSYSD system parameter specifies that the system disk should be rebuilt.) Exceptions are as follows:
| Setting | Comments |
|---|---|
| ACP_REBLDSYSD parameter should be set to 0 on satellites. | This setting prevents satellites from rebuilding a system disk when it is mounted early in the boot sequence and eliminates delays caused by such a rebuild when satellites join the cluster. |
| ACP_REBLDSYSD should be set to the default value of 1 on boot servers, and procedures that mount disks on the boot servers should use the /REBUILD qualifier. | While these measures can make boot server rebooting more noticeable, they ensure that system disk space is available after an unexpected shutdown. |
Once the cluster is up and running, system managers can submit a batch procedure that executes SET VOLUME/REBUILD commands to recover lost disk space. Such procedures can run at a time when users would not be inconvenienced by the blocked access to disks (for example, between midnight and 6 a.m. each day). Because the SET VOLUME/REBUILD command determines whether a rebuild is needed, the procedures can execute the command for each disk that is usually mounted.
Suggestion: The procedures run more quickly and cause less delay in disk access if they are executed on:
Moreover, several such procedures, each of which rebuilds a different set of disks, can be executed simultaneously.
Caution: If either or both of the following conditions are true when mounting disks, it is essential to run a procedure with SET VOLUME/REBUILD commands on a regular basis to rebuild the disks:
Failure to rebuild disk volumes can result in a loss of free space and
in subsequent failures of applications to create or extend files.
6.6 Shadowing Disks Across an OpenVMS Cluster
Volume shadowing (sometimes referred to as disk mirroring) achieves
high data availability by duplicating data on multiple disks. If one
disk fails, the remaining disk or disks can continue to service
application and user I/O requests.
6.6.1 Purpose
Volume Shadowing for OpenVMS software provides data availability across the full range of OpenVMS configurations---from single nodes to large OpenVMS Cluster systems---so you can provide data availabililty where you need it most.
Volume Shadowing for OpenVMS software is an implementation of RAID 1
(redundant arrays of independent disks) technology. Volume Shadowing
for OpenVMS prevents a disk device failure from interrupting system and
application operations. By duplicating data on multiple disks, volume
shadowing transparently prevents your storage subsystems from becoming
a single point of failure because of media deterioration, communication
path failure, or controller or device failure.
6.6.2 Shadow Sets
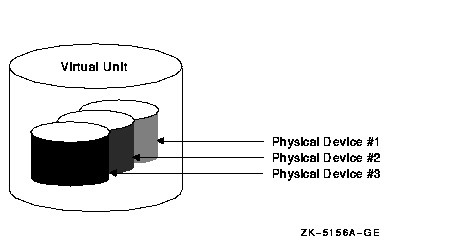
You can mount one, two, or three compatible disk volumes to form a shadow set, as shown in Figure 6-9. Each disk in the shadow set is known as a shadow set member. Volume Shadowing for OpenVMS logically binds the shadow set devices together and represents them as a single virtual device called a virtual unit. This means that the multiple members of the shadow set, represented by the virtual unit, appear to operating systems and users as a single, highly available disk.
Figure 6-9 Shadow Set With Three Members
Applications and users read and write data to and from a shadow set using the same commands and program language syntax and semantics that are used for nonshadowed I/O operations. System managers manage and monitor shadow sets using the same commands and utilities they use for nonshadowed disks. The only difference is that access is through the virtual unit, not to individual devices.
Reference: Volume Shadowing for OpenVMS describes the shadowing
product capabilities in detail.
6.6.4 Supported Devices
For a single workstation or a large data center, valid shadowing configurations include:
You can shadow data disks and system disks. Thus, a system disk need not be a single point of failure for any system that boots from that disk. System disk shadowing becomes especially important for OpenVMS Cluster systems that use a common system disk from which multiple computers boot.
Volume Shadowing for OpenVMS does not support the shadowing of quorum disks. This is because volume shadowing makes use of the OpenVMS distributed lock manager, and the quorum disk must be utilized before locking is enabled.
There are no restrictions on the location of shadow set members beyond
the valid disk configurations defined in the Volume Shadowing for
OpenVMS Software Product Description (SPD 27.29.xx).
6.6.5 Shadow Set Limits
You can mount a maximum of 500 shadow sets (each having one, two, or three members) in a standalone or OpenVMS Cluster system. The number of shadow sets supported is independent of controller and device types. The shadow sets can be mounted as public or private volumes.
For any changes to these limits, consult the Volume Shadowing for
OpenVMS Software Product Description (SPD 27.29.xx).
6.6.6 Distributing Shadowed Disks
The controller-independent design of shadowing allows you to manage shadow sets regardless of their controller connection or location in the OpenVMS Cluster system and helps provide improved data availability and very flexible configurations.
For clusterwide shadowing, members can be located anywhere in an OpenVMS Cluster system and served by MSCP servers across any supported OpenVMS Cluster interconnect, including the CI, Ethernet, DSSI, and FDDI. For example, OpenVMS Cluster systems using FDDI can be up to 40 kilometers apart, which further increases the availability and disaster tolerance of a system.
Figure 6-10 shows how shadow set member units are on line to local controllers located on different nodes. In the figure, a disk volume is local to each of the nodes ATABOY and ATAGRL. The MSCP server provides access to the shadow set members over the Ethernet. Even though the disk volumes are local to different nodes, the disks are members of the same shadow set. A member unit that is local to one node can be accessed by the remote node over the MSCP server.
Figure 6-10 Shadow Sets Accessed Through the MSCP Server

For shadow sets that are mounted on an OpenVMS Cluster system, mounting or dismounting a shadow set on one node in the cluster does not affect applications or user functions executing on other nodes in the system. For example, you can dismount the virtual unit from one node in an OpenVMS Cluster system and leave the shadow set operational on the remaining nodes on which it is mounted.
| Previous | Next | Contents | Index |
|
|
| privacy and legal statement | ||
| 4477PRO_011.HTML | ||