C Single Sign On
Single Sign On (SSO) is an optional
client/server software that uses Kerberos technology to provide a secure communication
when using the
ftp,
rcp,
rlogin,
rsh, and
telnet
network
commands and applications that use Kerberos.
This appendix contains the following information:
C.1 Kerberos Servers and Clients
A Kerberos server is a system on which the Kerberos server software
is installed.
Kerberos server technology is not provided with the Tru64 UNIX
operating system software.
A Kerberos server, for example a Windows 2000 Server,
must exist in the intranet.
The remainder of this appendix refers to a Kerberos
server as server.
A Kerberos client is a system on which the Kerberos client software
is installed.
The Tru64 UNIX Single Sign On (SSO) software provides the
Kerberos client software that runs on a system running the Tru64 UNIX
Version 5.1A or higher operating system software.
The Kerberos client software
provides Kerberos versions of the
ftp,
rcp,
rlogin,
rsh, and
telnet
commands
and the
rcmd
function.
The remainder of this appendix refers
to a Kerberos client as client.
C.2 Kerberos Authentication Process
A Kerberos network is divided into security domains called realms.
Each realm has a primary server, can have secondary servers, and implements
its own security policy.
Administrators populate and maintain a principal database on the server.
The principal database contains a key (entry) for each principal (user, service,
application, and host) that contains information about a principal, including
a secret value, such as a password.
The server uses the key information to
authenticate a principal.
See your Kerberos server documentation for more
information about the principal database.
Realms are hierarchical.
Each realm can have child realms, and each
realm can have a parent.
This allows organizations implementing Kerberos to
have different levels of security for different information classes within
the organization and allows realms that have no direct contact to share authentication
information.
All principal names in a realm must be unique.
The information
security policy is the same for all principals within a realm.
When you install the Tru64 UNIX SSO software, a Security Integration
Architecture (SIA) module is installed that directs principal authentication
requests to a Kerberos server.
On Tru64 UNIX
clients, you can populate and maintain a file called the service key table.
The service key table contains a key that you extract from the principal database
for each principal (host) that was previously authenticated to communicate
with the client.
The client reuses the key information to reauthenticate a
principal on subsequent requests.
That is, after the server initially authenticates
a principal, a client can reauthenticate a principal if the principal's key
is in its service key table.
C.3 Upgrading the SSO Software
To upgrade the SSO Version 1.0 software, you must deinstall previously
installed SSO subsets and install the new SSO software.
For example, to deinstall
the SSO Version 1.0 software (W2KSSO100), enter:
#
/usr/sbin/setld
-d
W2KSSO100
C.4 Installing and Configuring the SSO Software
You must install some SSO software on the Tru64 UNIX system
and some on the Windows 2000 Server system.
You must install the SSO software on the Windows 2000 Server system
before installing on the Tru64 UNIX system.
The SSO software that you install on the Tru64 UNIX operating system
installs a Security Integration Architecture (SIA) mechanism that directs
authentication requests to the Windows 2000 Active Directory.
The SSO software that you install on the Windows 2000 Server extends
the Active Directory to include Tru64 UNIX user account and group attributes
such as user login name, User ID (UID), Group ID (GID), a comment, a path
to a home directory, and a login shell.
See
System Administration
for more information
on Tru64 UNIX user account and group attributes.
Note the following considerations before
you install the SSO software:
The Active Directory name
is case sensitive and must have been entered in lower-case letters.
See your
Windows documentation if you need to change the case of your Active Directory
name.
You cannot install the distributed computing
environment (DCE) software and SSO on the same system, because SSO and DCE
implement different versions of Kerberos with different system setup requirements
that are not compatible with each other.
If the Tru64 UNIX system will be running
the Advanced Server for UNIX (ASU) Version 5.1A or higher software and the
SSO Version 2.0 or higher software, there will be a machine account name conflict.
To resolve the name conflict, you must configure the ASU server so that it
does not use the host name as the ASU server name (the default).
The SSO software
creates a machine account in the Active Directory that matches the host name
of the Tru64 UNIX system.
If the ASU server also uses the host name as the
ASU server name, which it does by default, it will overwrite the account created
by the SSO software and will cause SSO functionality to fail.
See the ASU
Release Notes
for information on how to configure the
ASU server so that it does not use the host name as the ASU server name.
C.4.1 Installing and Configuring the SSO Software on the Windows 2000 System
When you install the SSO software on a
Windows 2000 domain controller, the SSO software:
Extends the Active Directory schema to include Tru64 UNIX
user account and group attributes.
Because the Active Directory is replicated,
all Windows 2000 Servers in the domain will receive a copy of the extended
Active Directory.
See your Windows documentation for information about the
Active Directory.
Updates the Microsoft Management Console (MMC) to include
a Tru64 UNIX property page for users and groups.
You must install SSO software on each Windows 2000 Server from which
you want to create user accounts and groups that include Tru64 UNIX attributes.
The SSO software updates the MMC on that system to include a Tru64 UNIX
property page for users and groups.
C.4.1.1 Extending the Active Directory Schema
Follow these steps to extend the Active Directory schema on the Windows
2000 domain controller:
Insert the Tru64 UNIX base CD-ROM into the CD-ROM drive
on the Windows 2000 domain controller.
In the Windows Explorer window, expand the icon associated
with the CD-ROM drive, then expand the
Windows2000_SSO
folder, and then expand the
kit/windows_kit
folder.
Double-click on the
setup.exe
file.
The
following window is displayed:
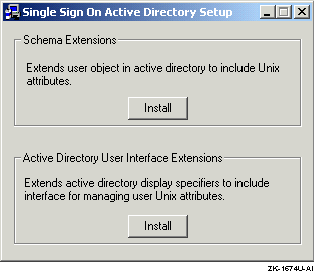
In the Schema Extensions box, click on the Install button
to extend the Active Directory to include Tru64 UNIX attributes.
In the
Active Directory User Interface Extensions box, click on the Install button
to update the MMC to include a Tru64 UNIX property page.
Informational messages about the installation are displayed in a command
prompt window.
This window automatically closes at the end of a successful
installation.
C.4.1.2 Updating the MMC
Follow these steps to update the MMC on a Windows 2000 Server to include
the Tru64 UNIX property pages:
Insert the Tru64 UNIX base CD-ROM into the CD-ROM drive
on the Windows 2000 Server.
In the Windows Explorer, expand the icon associated with the
CD-ROM drive, expand the
Windows2000_SSO
folder, then expand
the
kit/windows_kit
folder, and then the
MMC_Setup
folder.
Double-click on the
setup.exe
file and
follow the instructions on the screen.
C.4.2 Installing and Configuring the SSO Software on the Tru64 UNIX System
The SSO software is an optional subset that
is included with the base Tru64 UNIX operating system software.
The SSO subset is called
OSFSSOW2Knnn,
Single Sign On for Windows 2000 (Network-Server/Communications).
The
nnn
represents the Tru64 UNIX version number.
See the
Release Notes
for the current version number.
See
Installation Guide
and
setld(8)
for information on installing subsets.
After you install the SSO software on the Tru64 UNIX system, you
configure the SSO software and the Kerberos SIA mechanism.
You can optionally
configure the SSO software in a TruCluster Server environment
C.4.2.1 Configuring the SSO Software
You must run the
/usr/sbin/w2ksetup
script to configure
the SSO software.
The
/usr/sbin/w2ksetup
script will prompt
you for the following required information:
The name and password of a user account with administrative
privileges on the Windows 2000 domain controller.
The administrative account
must be a member of the Administrators, DnsAdmins, Domain Admins, Domain Users,
and Users groups.
The full Windows 2000 domain name, which is usually the same
name as the domain name service (DNS) name server.
This name is case sensitive
and must be in uppercase letters.
The host name of the Windows 2000 domain controller, such
as
w2khost.sso.corp.com.
This name is case sensitive and
must be in lowercase letters.
Follow these steps to configure the SSO software:
Add an entry in the
/etc/hosts
file for
the Windows 2000 Server.
See
hosts(4)
for more information.
Start the SSO setup script:
#
/usr/sbin/w2ksetup
You are prompted to run the SSO setup script.
Enter
yes
when asked if you want to run
the SSO setup script:
Do you want to run the setup script now? [y/n]? y
The following information is displayed:
Running /usr/sbin/w2ksetup...
/usr/sbin/w2ksetup[79]: 2598 Terminated
Note
If you enter
no
when asked if you want to run the
SSO setup script, you will return to the command prompt.
You can run the SSO
setup script later by entering the following command.
#
/usr/sbin/w2ksetup
You are prompted for the name of the Windows 2000 domain that the Tru64 UNIX
system will use for authentication.
Press the
Enter
key to use the default
name or enter a domain name and press the
Enter
key:
Enter the name of the Windows 2000 domain. This is in
the form domain.com - Typically the Windows 2000 domain is
the same as the DNS domain.

Domain: [SSO.CORP.COM]
You are prompted for the name of the Windows 2000 host name controller.
Press the
Enter
key to use the default
name or enter a host name and press the
Enter
key:
Enter the hostname of a Windows 2000 domain controller.
Domain Controller: w2khost.sso.corp.com
Note
If you are unable to communicate with the Windows 2000 domain controller,
check the
/etc/hosts
file for an entry with the fully
qualified domain name of the Windows 2000 domain controller.
If it is missing,
add it to the file.
Also verify that system time on the client and server
systems is the same, because a large time difference between the two systems
can cause communication problems.
To create a machine account for the Tru64 UNIX system on the Windows
2000 domain controller, you must provide the name and password of a user account
with administrative privileges on the Windows 2000 KDC.
The following information is displayed:
To create the machine account, you must be logged
in as root and have admin Kerberos credentials. For security
reasons Windows 2000 does not allow anyone to authenticate
through Kerberos using the Administrator account. Therefore
you must choose an account other than the Administrator
account that has admin privileges. The username of an account
must be in the Windows 2000 KDC
Enter the user name and password of an account in the Windows
2000 KDC with administrative privileges:
Enter Admin principal: user
Password for user@SSO.CORP.COM:
The following information is displayed:
Adding unixhost.sso.corp.com to directory...

Extracting host/unixhost.sso.corp.com key...

Updating /etc/ldapcd.conf...

The machine account has been set up.
You might need to set permissions in Windows 2000
to enable access to the UNIX information in the
user objects. Please see the Windows documentation
for further information.
You are prompted to start the Windows 2000 services.
Enter
yes
to the following question if
you want to start services immediately:
Do you want to start the Windows 2000 services now? [y/n]?: y
The following information is displayed:
LDAP caching daemon (ldapcd) started
Restart the X server:
#
/sbin/init.d/xlogin restart
C.4.2.2 Configuring the SSO Software in a TruCluster Server Environment
Follow these steps to configure the SSO software in a TruCluster Server
environment:
Run the
/usr/sbin/w2ksetup
script on each
TruCluster Server member (Section C.4.2.1).
For each cluster alias, enter the following command on the
last TruCluster Server member on which you ran the
/usr/sbin/w2ksetup
script:
# creacct -h fully_qualifed_cluster_alias_name -u
This
command adds the fully qualified cluster alias name to the Active Directory
to allow SSO log in when using the cluster alias.
C.4.2.3 Adding Other SIA Mechanisms with Kerberos (if required)
The Kerberos SIA mechanism must be the first entry in the SIA
mechanism configuration file (/etc/sia/matrix.conf).
The
SSO installation procedure complies with this restriction.
However, if you
add other SIA security mechanisms, you must use the
/usr/sbin/siacfg
command to remove the Kerberos entry, add the other entries, then
add back the Kerberos entry.
For example:
Remove the Kerberos entry:
#
siacfg
-r
Kerberos
Add the new entries:
#
siacfg
-a
sianew
/location
Add back the Kerberos entry:
#
siacfg
-a
-P
-g
sci Kerberos /usr/shlib/libcsfsiad.so
C.5 SSO Configuration Files on Tru64 UNIX
Table C-1
identifies
SSO configuration files on Tru64 UNIX.
Table C-1: SSO Configuration Files
| File |
Contains |
krb.conf |
The host computer's default realm.
Associates
known realms to their primary and secondary Kerberos servers by host name
and network location. |
krb.realms |
Server names and their associated realm names.
|
v5srvtab |
The principal keys extracted from the principal
database on the Kerberos server. |
.k5login |
A list of principals authorized to access a specific
user account. |
ldapcd.conf |
SSO caching parameters that you can tune for performance.
|
ldapusers.deny |
An entry for each local Tru64 UNIX user who
is authenticated only by Tru64 UNIX when SSO is installed.
|
C.5.1 The krb.conf File
The
/krb5/krb.conf
file is
a text file that contains Kerberos realm information.
The information defines
the system's default realm and associates known realms to their primary and
secondary Kerberos servers by host name and network location.
If you can configure the name of the Kerberos server by using default
naming conventions (that is, the ordering convention or the DNS rotary convention),
you do not need to configure and maintain a
krb.conf
file.
If the
krb.conf
file is not found, is empty, or
does not list a valid default realm, the Tru64 UNIX operating system
converts the host's domain name to uppercase letters and uses that as the
default realm name.
If the Kerberos server information is missing from the
krb.conf
file, the Tru64 UNIX operating system attempts to
locate the Kerberos server when the default naming conventions are in place.
In the
krb.conf
file, each entry must be on a separate
line, fields are separated by spaces or tabs, comments are preceded by a
number sign (#) (characters after a number sign are ignored to the end of
line), and blank lines and leading or trailing white space on a line are ignored.
The order of entries in the
krb.conf
file
is important, because it identifies the order in which Kerberos servers are
used.
Applications read the entries one at a time in the listed order when
attempting to connect to a Kerberos server.
Secondary Kerberos servers are
used when another Kerberos server is unavailable or a network timeout has
occurred (for example, during the authentication sequence when the network
connection between the client and a Kerberos server is interrupted).
Example C-1
shows a sample
krb.conf
file.
Example C-1: Sample krb.conf File
BIZ.COM  [1]
BIZ.COM shoe.biz.com admin server  [2]
BIZ.COM sneakers.biz.com  [3]
BIZ.COM boot.biz.com
FOOTWEAR.BIZ.COM leather.footwear.biz.com admin server  [4]
The entries in
Example C-1
create the following
configuration:
The first line identifies the name of the system's default
realm.
Realm names are in uppercase letters to distinguish them visually from
domain names.
You must type the correct case for the realm name if your site
does not follow the uppercase convention.
In the sample,
BIZ.COM
is the name of the system's default realm.
[Return to example]
The second line identifies the realm name and fully qualified
domain name (FQDN) of the primary Kerberos server for the realm.
In
Example C-1,
shoe.biz.com
is the FQDN
of the primary Kerberos server.
[Return to example]
The next lines identify the realm name and the FQDN of the
secondary Kerberos servers in the realm.
In
Example C-1,
sneakers.biz.com
and
boot.biz.com
are the names
of secondary Kerberos servers.
[Return to example]
The next line identifies the name of the realm where interrealm
authentication is performed.
Interrealm authentication is when a realm accepts
authentication from other realms without reauthentication.
The line also identifies
the FQDN of the Kerberos server followed by
admin server,
and optionally a
tcp/port #.
By default, UDP is the default communication protocol and does not need
to be specified.
If the Kerberos server uses TCP for its communication protocol,
you must specify
tcp
and the
port #
that TCP uses.
To specify a port value, use a numeric value or a service name
listed in the
/etc/services
file, such as
tcp/88
or
tcp/kerberos5.
In
Example C-1,
FOOTWEAR.BIZ.COM
is the realm name and
leather.footwear.biz.com
is the Kerberos server.
The server is using the default UDP communication
protocol.
[Return to example]
See
krb.conf(4)
for more information.
C.5.2 The krb.realms File
The
/krb5/krb.realms
file
is a text file that contains Kerberos server names and their associated Kerberos
realm names.
Secured applications use the
krb.realms
file to determine the realm from which to request a ticket.
By default, the Tru64 UNIX
operating system converts the server's name to uppercase letters and uses
that as the realm name.
In this case, you do not need to configure and maintain
a
krb.realms
file.
Wildcards are special characters in the
krb.realms
file that associate multiple servers to a single realm by using one entry.
There are two permitted wildcard characters:
Use an asterisk (*) before a domain name to specify all servers
that have that domain root name.
For example,
*.biz.com
specifies all servers in all domains ending in
biz.com,
such as
footwear.exec.biz.com.
Use a question mark (?) in the first field before a server
or domain name to specify any letter.
For example,
???footwear.biz.com
identifies any server in the
biz.com
domain
that has a name with any three letters preceding footwear, such as
bigfootwear.biz.com.
When secure applications search the
krb.realms
file, they check for a matching server name, then a matching domain name.
If they do not find a match, they check for a wildcard match.
If no associated
entry applies or if the
krb.realms
file does not exist,
the secure application converts the server's domain name to uppercase letters
and uses that as the default.
The order of the entries in the
krb.realms
file is not important.
Each entry must be on a separate line and
requires two fields, separated by a space or a tab and formatted as follows:
The first field specifies a server name.
You can use a domain
name to map each server in a domain to the same realm name.
You must precede
a domain name with a period.
The second field specifies the associated realm name.
By convention,
realm names are in uppercase letters to distinguish them visually from domain
names.
You must type the correct case for the realm name if your site does
not follow the uppercase convention.
To create comments in the
krb.realms
file, use
the number sign (#).
Any characters after a number sign are ignored to the
end of the line.
Blank lines and any leading or trailing white space on a
line are also ignored.
Example C-2
shows a sample
krb.realms
file.
Example C-2: Sample krb.realms File
footwear.biz.com SERIOUS.BIZ.COM  [1]
.admin.biz.com ADMIN.BIZ.COM  [2]
*.biz.com BIZ.COM  [3]
The entries in
Example C-2
create the following
associations:
Associates the server
footwear.biz.com
with
the
SERIOUS.BIZ.COM
realm.
[Return to example]
Associates all servers in the
admin.biz.com
domain with the
ADMIN.BIZ.COM
realm.
Notice the addition of a preceding period identifies the first field
as a domain name rather than a server name.
Typically, this line is not required
because the realm name is the uppercase letter equivalent of the domain name.
However, in this example, it is required to prevent mapping the servers in
the
admin.biz.com
domain to the
BIZ.COM
realm by the third line.
[Return to example]
Associates all other servers in other domains with the root
name
biz.com
with the
BIZ.COM
realm.
For example, servers in
sales.biz.com
and
support.teams.biz.com
domains are mapped to the
BIZ.COM
realm.
[Return to example]
See
krb.realms(4)
for more information.
C.5.3 The v5srvtab File
The
/krb5/v5srvtab
service
key table file is a binary file that contains the principal keys extracted
from the principal database on the Kerberos server.
A Kerberos client, such
as Tru64 UNIX, uses the key information in the service key table to reauthenticate
a principal.
That is, after the Kerberos server initially authenticates a
principal, a Kerberos client can reauthenticate a principal if its key is
in the service key table.
See
v5srvtab(4)
for more information.
See
Section C.7.4
for information on managing the
/krb5/v5srvtab
service
key table file.
C.5.4 The .k5login File
The
/krb5/.k5login
file is
a hidden text file that contains a list of principals authorized to access
a specific user account.
Unauthorized access to the
.k5login
file jeopardizes the integrity of the user's account.
If you configure the Kerberos secured daemons to use
.k5login
authorization, each user must have a private authorization list
in a
.k5login
file stored in the user's home directory.
The list determines which principals are allowed to access the user's account.
Only the user can own and have write permissions to the user's
.k5login
file.
Otherwise, authentication fails and users receive
a permission denied error message.
The
.k5login
file has one entry per line.
An entry
is a full principal name spelled exactly as it appears in the principal database.
Do not include comments or trailing spaces at the end of a line.
Example C-3
shows a sample
.k5login
file configured for a user named Jack who normally logs
in as jack@COMPANY.COM, but wants to also log in as the principal jack_hill@COMPANY.COM.
In addition, he wants to grant the principal jill@HR.COMPANY.COM access to
his account.
Example C-3: Sample .k5login File
jack@COMPANY.COM
jack_hill@COMPANY.COM
jill@HR.COMPANY.COM
To log in to the account, Jack and Jill must enter the following information:
# rlogin hostname -l username
For example, Jack would enter the following command to log in to a server
called server1:
# rlogin server1 -l jack
C.5.5 The ldapcd.conf File
The
/etc/ldapcd.conf
is a text
file that contains SSO caching parameters.
If users are waiting an unusually
long time for the Tru64 UNIX system to respond, you can tune the Windows
2000 SSO software by using a text editor to change the values of the caching
parameters in the
ldapcd.conf
text file located on the Tru64 UNIX
system.
Example C-4
shows an
ldapcd.conf
file.
Comment lines begin with a pound sign ( # ).
Table C-2
describes caching parameters.
Example C-4: Sample ldapcd.conf File
# configuration file for ldapcd
#
# format of the file is <id>: <value>
# values that contain spaces, or : or # must be quoted
# if an id listed but no value specified the id will
# use the default value
#
# max entries in cache, and number of seconds before entries
# expire in the cache
#
connections: 4
pw_cachesize:	500
pw_expirecache:	900
gr_cachesize:	100
gr_expirecache: 900

usesasl: 1

directory: server1
searchbase: "cn=users,DC=SSO,DC=CORP,DC=COM"
machine_acctname: emerald.ne.corp.com
machine_dn: "cn=emerald,cn=computers,DC=SSO,DC=CORP,DC=COM"
Table C-2: Caching Parameters
| Parameter |
Description |
connections |
The number of open connections that the caching
daemon can make to the Active Directory.
Increasing the value
of this entry opens more connections to the Active Director; however, this
consumes more file descriptors and increases the load on the Active Directory.
Typically, 4 connections are adequate for a workstation, and
15 connections are adequate for a server.
Default: 4 connections
|
pw_cachesize |
The maximum number of user entries to store in
cache.
Increase or decrease this value as the maximum number of
users increases or decreases.
Default: 500 entries |
pw_expirecache |
The maximum number of seconds to cache a user
entry.
Increasing this value increases Tru64 UNIX performance,
because a user's entry is readily available in the cache.
If you
delete a recently used user account, its entry remains in the cache for the
amount of time specified by this parameter.
Default: 900 seconds
|
gr_cachesize |
The maximum number of group IDs to cache.
Increasing this value increases Tru64 UNIX performance, because group IDs
are readily available in the cache.
Default: 100 group IDs |
gr_expirecache |
The maximum number of seconds to cache group IDs.
Default: 900 seconds |
Note
If you change the value of a cache parameter in the
/etc/ldapcd.conf
file, you must enter the following command to restart the caching
daemon:
#
/sbin/init.d/ldapcd restart
See
ldapcd.conf(4)
for more information.
C.5.6 The ldapusers.deny File
The
/etc/ldapusers.deny
file
is a text file that contains an entry for each Tru64 UNIX user who is
authenticated only by Tru64 UNIX when SSO is installed.
You must enter only one user name per line, and the user name must exactly
match a user name in the
/etc/passwd
file.
To create comments, use the number sign (#).
Any characters after a
number sign are ignored to the end of the line.
Blank lines and any leading
or trailing white space on a line are also ignored.
Example C-5
shows a sample
ldapusers.deny
file.
Example C-5: Sample /etc/ldapusers.deny File
# The following file lists account names that are not allowed to use
# the Windows 2000 authentication information when it is enabled.
# Account names must match exactly the user account name in the
# /etc/passwd file.
#
# Syntax: account_1
#            .
#            .
#            .
#         account_n
root
nobody
nobodyV
daemon
bin
uucp
uucpa
auth
cron
lp
tcb
adm
ris
wnn
pop
imap
Peter
Dave
Evan
Martha
See
ldapusers.deny(4)
for more information.
C.6 Creating Accounts and Groups
You must create user accounts, computer accounts, and groups on the
Windows 2000 Server if they are to be authenticated by the Windows 2000 Server.
User accounts and groups created on the Tru64 UNIX system are created
in accordance with the Tru64 UNIX user account and group policy on that
system and are not authenticated by a Windows 2000 Server.
This section describes how to:
C.6.1 Creating a User Account
To create user accounts on the Windows 2000
Server, you can use:
C.6.1.1 Creating a User Account Using the Tru64 UNIX creacct Command
To create a user account using the
creacct
command, enter:
#
creacct
-a
username
You are prompted for the following information:
The name and password for an administrative account on the
Windows 2000 Server.
Comments for the user account.
A Tru64 UNIX directory to be used as the user's home
directory.
Note
If you do not specify a valid home directory, the default value is set
to the
root
(/) directory.
The
.profile
file or the
.cshrc
file in the
root
directory sets the environment path to first check the
/sbin
directory when Tru64 UNIX commands are executed.
As a result, the
ls
-l
command will not work when the home directory
is set to the
root
directory.
A Tru64 UNIX shell for the user account.
A Tru64 UNIX group ID (GID) for the user account.
A Tru64 UNIX user ID (UID) for the user account.
A password for the user account.
See
creacct(1)
for more information.
C.6.1.2 Creating a User Account Using the MMC Interface
Follow these steps to use the MMC interface
to create a user account:
Display the Active Directory Users and Computers window:
Click on the Start button.
Choose Program, Administrative Tools, and then Active Directory
Users and Computers.
The Active Directory Users and Computers window is displayed.
If necessary, highlight the Users folder.
From the Action
menu, choose New, and then User.
The New Object — User Window (Figure C-1)
is displayed:
Figure C-1: New Object — User Window: Required Information

Enter the required information in the New Object — User
window, then click on the Next button.
The First name and Initial fields are
optional.
A second New Object — User window (Figure C-2)
is displayed:
Figure C-2: New Object — User Window: Password Information
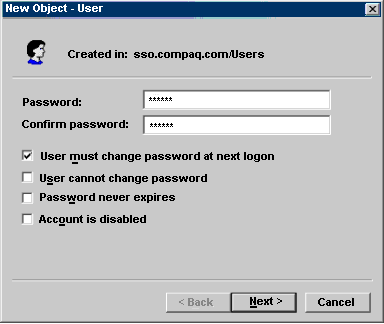
Enter a password and select password options, then click on
the Next button.
A confirmation window is displayed.
Click on the Continue button to create the user account, or
click on the Cancel button to quit without creating the user account.
If you choose to continue, the Active Directory Users and Computers
window is displayed.
Double click on the name of the account that you just created.
A properties dialog box for the user is displayed.
Click on the Tru64 UNIX tab.
The Tru64 UNIX user properties dialog box (Figure C-3)
is displayed.
Figure C-3: Tru64 UNIX User Properties Dialog Box
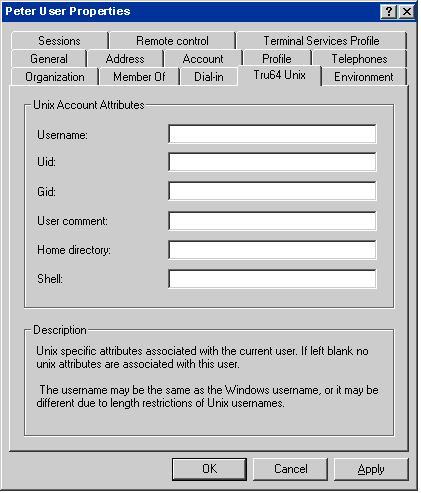
Enter Tru64 UNIX user account information.
Tru64 UNIX
user account restrictions apply; for example, the length of the Tru64 UNIX
user account name cannot exceed the maximum length determined by the Tru64 UNIX
operating system software.
See
System Administration
for more information on Tru64 UNIX
user account restrictions.
Note
If you do not specify a valid home directory, the default value is set
to the
root
(/) directory.
The
.profile
file or the
.cshrc
file in the
root
directory sets the environment path to first check the
/sbin
directory when Tru64 UNIX commands are executed.
As a result, the
ls
-l
command will not work as expected when the
home directory is set to the
root
directory.
When you move your mouse over an attribute, a description of that attribute
is displayed in the Description section of the window.
Enter Tru64 UNIX user account attribute information and
click on the OK button.
The Active Directory User and Group window is displayed.
C.6.2 Setting a Principal's Password
To set a principal's password, you can use the Microsoft
Management Console (MMC) interface or the Tru64 UNIX
creacct
command.
To use the
creacct
command to set a password, enter:
#
creacct
-s
principal
You are prompted for the name and password for an administrative account
on the Windows 2000 Server, then for the principal's password.
See
creacct(1)
for more information about the
creacct
command.
See your Windows 2000 documentation for information on using the MMC
interface to set passwords.
C.6.3 Creating a Computer Account
Creating a computer account creates the account
on the Windows 2000 Server and adds it to the key service table.
All computer
accounts are added to the current domain in the Active Directory under the
Computers group.
Follow these steps to create a computer account:
Enter the
creacct
command specifying the
fully qualified computer name:
#
creacct
-h
computer_name
[-t
keytable] [-u]
If you do not specify a fully qualified name, the
creacct
command will construct one based on the local DNS name for
the computer.
If you do not specify the
-t
option, the computer
account is created in the default service key table file (/krb5/v5srvtab).
Specify the
-u
option so that the new computer
account entry is added to the
/etc/ldapcd.conf
file.
You are prompted for the user name and password of a principal who has
administrator privileges on the Windows 2000 Server.
Enter the user name and password.
The Active Directory is searched first for the specified computer.
If
an entry is found, you are prompted to replace or modify the existing entry.
Choose:
Modify if you want to change the DNS computer name.
Replace if you want to delete an existing computer account
and replace it with a new one.
When replacing an existing computer account,
the
creacct
command searches the Active Directory for the
host name to retrieve the DNS host name.
It then prompts you to modify the
DNS host name.
You can reenter the existing DNS host name or enter a new one.
See
creacct(1)
for more information.
C.6.4 Creating a Group
You must use the MMC interface to create groups on
the Windows 2000 Server.
You can create a group of which Tru64 UNIX and
Windows 2000 users are members.
Follow these steps to create a group:
Display the Active Users and Computers window:
Click on the Start button.
Choose Program, Administrative Tools, and then Active Directory
Users and Computers.
The Active Directory Users and Computers window is displayed.
If necessary, highlight the Users folder.
From the Action
menu, choose New, and then Group.
The New Object — Group window is displayed.
Enter the name of the group and click on the OK button.
The Active Directory Users and Computers window is displayed.
Double click on the name of the group that you just created.
A properties dialog box for the group
is displayed.
Click on the Tru64 UNIX tab.
The Tru64 UNIX properties dialog box for the group (Figure C-4)
is displayed.
Figure C-4: Group Properties Dialog Box
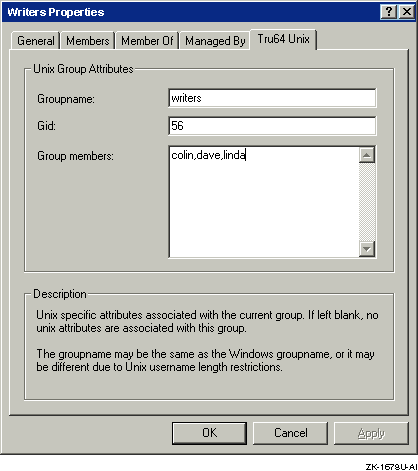
Enter Tru64 UNIX group information.
When you move your mouse over an attribute, a description of that attribute
is displayed in the Description section of the window.
Enter Tru64 UNIX group attribute information and click
on the OK button.
The Active Directory User and Group window is displayed.
C.7 Managing the SSO Software
This section describes how to:
C.7.1 Requesting Tickets
Use the
/sbin/kinit
command to
request tickets.
To request an initial ticket, enter:
# kinit [-c cachename]
For example, to request a ticket from the default credential cache,
enter:
# kinit
To request a ticket with a specific lifetime,
enter:
# kinit -l nwndnhnmns
For example, to request a ticket with a lifetime of 45 hours and 30
minutes, enter:
# kinit -l 45h30m
To request a postdated ticket, enter:
# kinit -d nwndnhnmns principal domain
For example, to request a postdated ticket to start in one hour for
a principal called mary/admin in a domain called COMPANY.COM, enter:
# kinit -d 1h mary/admin@COMPANY.COM
The syntax of lifetime and postdate options is
[nw][nd][nh][nm][ns], where w = weeks,
d = days, h = hours, m = minutes, and s = seconds.
No spaces are allowed unless
they are enclosed in quotation marks.
For example,
"1w 2d 3h 4m 5s".
The default lifetime and postdate options are in hours unless
otherwise specified.
If the requested postdate time period is less than the server's clock
skew value (typically five minutes), the ticket's start time is set to the
current time and it is issued as if the
-d
option had not
been specified.
See
kinit(1)
for more information about requesting tickets.
C.7.2 Displaying Tickets
Use the
/sbin/klist
command to
display the tickets stored in the credentials cache.
To display all the tickets stored in a specific credential
cache, enter:
# klist -a [-c cachename]
For example, to display all the tickets in a credential cache called
/var/tmp/mycache, enter:
# klist -a -c /var/tmp/mycache
To display all the tickets in the credential
cache with their flags and addresses, enter:
# klist -a -f [-c cachename]
See
klist(1)
for more information about displaying tickets.
C.7.3 Removing the Credential Cache
To destroy all the tickets in a specific
credential cache and remove the credential cache, enter:
# kdestroy [-c cachename]
For example, to destroy all the tickets in a credential cache called
/var/tmp/mycache, enter:
# kdestroy -c /var/tmp/mycache
See
kdestroy(1)
for more information about removing tickets.
C.7.4 Managing the Service Key Table
Use the
/sbin/ktutil
command
to display and delete entries in the service key table file, destroy the service
key table, and merge service key tables.
Use the
/usr/sbin/creacct
command to extract keys from the Windows 2000 Server and add them to the service
key table.
When using the
/usr/sbin/creacct
command, you
are prompted for the user name and password of a principal who has administrative
privileges on the Windows 2000 Server.
The default service key table file is
/krb5/v5srvtab.
This file is owned by the root user account.
To display all the tickets in the service
key table, enter:
# ktutil [-t keytable]
For example, to display all the tickets in the default service key table,
enter:
# ktutil
To extract a key for
a Tru64 UNIX host from the Windows 2000 Server and add it to the service key
table, enter:
# creacct [-t keytable] -x host/fully_qualified_host_name
For example, to extract a key for a Tru64 UNIX host called server1.company.com
and place it in the default service key table, enter:
# creacct -x host/server1.company.com
To extract a key
for a principal from the Windows 2000 Server and add it to the service key
table, enter:
# creacct [-t keytable] -x principal/fully_qualified_host_name
For example, to extract a key for a user account called user1 on a system
called w2kserverhost.company.com and add it to the default service key table,
enter:
# creacct -x user1/w2kserverhost.company.com
To delete a ticket from the service
key table for a specific principal, enter:
# ktutil -t keytable -d principal
For example, to delete a ticket in the default service key table for
a principal called mary/admin in a domain called COMPANY.COM, enter:
# ktutil -t WFILE:/krb5/v5srvtab -d mary/admin@COMPANY.COM
To destroy a service key table, enter:
# ktutil -D -t keytable
For example, to destroy a service key table called
/krb5/mytable, enter:
# ktutil -D -t WFILE:/krb5/mytable
To merge service key tables, enter:
# ktutil -c from_keytable -t to_keytable
For example, to merge all the entries in a service key table called
/krb5/srvtable
with the entries in the default service key table
/krb5/v5srvtab, enter:
# ktutil -c /krb5/srvtable -t WFILE:/krb5/v5srvtab
See
ktutil(1)
and
creacct(1)
for more information about managing the service key table.
C.8 Troubleshooting the SSO Software
Because of the many interlocking dependencies that the SSO software
has across multiple operating systems, it is critical that the setup procedures
are followed exactly as described in
Section C.4.
If they
are not, then the SSO software will not work properly, as generally signified
with an
invalid login
response message.
The majority of
SSO problems are setup problems and can be found quickly by validating the
setup of the SSO software.
C.8.1 SSO Configuration Problems
If the administrative account is not accepted as being valid when running
the
/usr/sbin/creacct
command or the
/usr/sbin/w2ksetup
script, verify that the administrative account is a member of
the Administrators, DnsAdmins, Domain Admins, Domain Users, and Users groups
on the Windows 2000 domain controller.
When the Active Directory is created on the Windows 2000 server, its
name must be specified in lower case.
All other references to this name,
which is the Kerberos Realm name, must be entered in upper case on all platforms.
C.8.2 Problems Using the kinit Command or Obtaining an Initial Ticket on Tru64 UNIX
Follow these steps if you are having trouble when entering the
kinit
command or receiving an initial ticket when logging in to
the Tru64 UNIX system:
Verify that the
/etc/sia/matrix.conf
file has an entry for LDAP and Kerberos by entering the following command
to display the contents of the
matrix.conf
file and
looking for LDAP and Kerberos related entries in the display:
# more /etc/sia/matrix.conf
If the
/etc/sia/matrix.conf
file does not include
the entries, enter the following commands:
# siacfg -r LDAP > /dev/null
# siacfg -r Kerberos > /dev/null
# siacfg -a -g pg -P LDAP /usr/shlib/libsialdap.so > /dev/null
# siacfg -a -P -g sci Kerberos /usr/shlib/libcsfk5siad.so > /dev/null
Verify that there is an entry in the
/etc/hosts
file for the KDC; for example:
12.345.67.890 w2khost.mycompany.com w2khost
This step generally solves the problem when the initial
/usr/sbin/w2ksetup
utility is run and the following error message is displayed after
the administrator's name and password are entered:
ldap_gssapi_bind: Operations error
Verify that the
/krb5/krb.conf
and
/krb/krb.realms
files are set up correctly.
Example
krb.conf
file:
MYCOMPANY.COM
MYCOMPANY.COM  w2khost.mycompany.com admin server
Example
krb.realms
file:
*.mycompany.com MYCOMPANY.COM
Verify that the time on the KDC and the client are the same.
A few minutes difference is acceptable, but should not exceed more than five
(5) minutes.
Verify that the
v5srvtab
file is working
correctly by entering the following command to extract the key:
# kinit -k
If the command fails, rerun the
/usr/sbin/w2ksetup
script or delete the
/krb5/v5srvtab
file, then enter
the following command:
# /usr/sbin/creacct -h mymachinename -u
C.8.3 Password Prompting on Tru64 UNIX
Follow these steps if you are able to get a ticket from the kdc, but
are still prompted for a password during subsequent logins on the Tru64 UNIX
system:
Verify that a service ticket can be acquired for the target
host by entering the following command:
# kinit -S host/targetmachinename.mycompany.com
If this command fails, the host that you are trying to access is
not part of the Kerberos realm.
To correct this, enter the following command:
# /usr/sbin/creacct -h targetmachinename.mycompany.com -u
Verify that the first line of the
/krb5/krb.conf
files are the same on the current host and the target host.
Verify that there are no entries in the
/etc/ldapusers.deny
file or in the
.k5login
file in the users
home directory that prevents login.
Verify that the
/etc/services
and
/etc/inetd.conf
files are set up correctly and contain the following
entries:
In the
/etc/services
file:
kerberos 88/udp
kerberos 88/tcp
kerberos_master 749/udp
kerberos_adm 749/udp
kerberos_adm 749/tcp
In the
/etc/inetd.conf
file:
kshell stream tcp nowait root /usr/sbin/rshd rshd -K
klogin stream tcp nowait root /usr/sbin/rlogind rlogind -K
Note
Add
-x
to the end of the two lines in the
inetd.conf
file if you want encrypted communications.
If you changed the
inetd.conf
file, you
must enter the following command to restart the network:
# rcinet restart
C.8.4 Problems with SSO in a TruCluster
Follow these steps if the SSO software is not working correctly on cluster
members in a TruCluster:
Verify that the
/etc/ldapcd.conf
file
contains the following entries defined for each cluster member:
directory:
searchbase:
machine_acctname:
machine_dn:
If these entries do not display for a cluster member, rerun the
/usr/sbin/w2ksetup
script on that cluster member.
Enter the following command and verify that an entry for each
cluster member is displayed:
# /usr/sbin/ktutil
If an entry for each cluster member is not displayed, enter the following
command:
# /usr/sbin/creacct -h missingmembername -u