After a user is identified and authenticated, Tru64 UNIX uses Discretionary Access Control (DAC) to manage access to system resources including directories, files, devices, and processes. Tru64 UNIX implements DAC through the use of Tru64 UNIX permissions and Access Control Lists (ACLs).
This chapter contains the following information:
The Tru64 UNIX operating system software uses Tru64 UNIX permission and ACLs to control access to files and directories. You use Tru64 UNIX permissions and ACLs to set read, write, and execute access permissions on files and directories for the owning user, the owning user's group, and all other users. In addition, you use ACLs to set read, write, and execute access permissions on files and directories for specific users and groups.
The following list describes how Tru64 UNIX permissions and ACLs are checked when a process requests access to a file or directory:
If the requesting process has the root user privilege, access to the file or directory is granted. ACL and Tru64 UNIX permissions are not checked.
If ACLs are not enabled or if there is no ACL associated with the file or directory, only Tru64 UNIX permission is checked.
If ACLs are enabled and there are associated ACLs with the file or directory, the server collects the ACL of each object in the path to the requested resource to determine access. Access is denied if the ACL for any object in the path prohibits access.
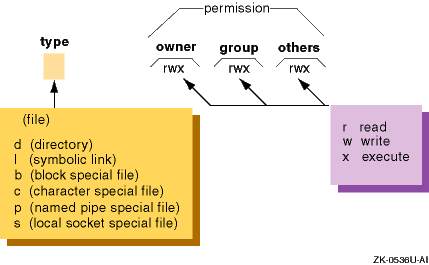
When a file or directory is created, by default, the operating system or the program you are running assigns Tru64 UNIX read, write, and execute permissions for the three classes of users:
u (user/owner)
g (group)
o (all others; also known as world)
Table 2-1
describes the codes for the Tru64 UNIX
permissions as they apply to files and directories.
Table 2-1: Tru64 UNIX Permission Codes
| Permission Code | File | Directory |
| r (read) | Contents can be viewed or printed. | Contents can be read, but not searched. Usually r and x are used together. |
| w (write) | Contents can be changed or deleted. | Entries can be added or removed. |
| x (execute) | File can be used as a program. | Directory can be searched. |
2.2.1 Displaying Tru64 UNIX File and Directory Permissions
To display the Tru64 UNIX permissions for a file, enter:
$
ls
-l
filename
You can specify more than one filename entry.
To display the Tru64 UNIX permissions for the files and subdirectories
in your current directory, enter the
ls
-l
command:
$ ls -l
total 7
-rw-r--r--  1 larry  system  101 Jun 5 10:03 file1
-rw-r--r--  1 larry  system  171 Jun 5 10:03 file2
-rw-r--r--  1 larry  system  130 Jun 5 10:06 file3
drwxr-xr-x  2 larry  system   32 Jun 5 10:07 project
-rw-r--r--  1 larry  system    0 Jun 5 11:03 record1
-rw-r--r--  1 larry  system    0 Jun 5 11:03 record6
drwxr-xr-x  2 larry  system   32 Jun 5 10:31 reports $
The first field contians the permission code that identifies the type
of entry followed by the permission set for user, group, and world.
A dash
(-) in the first place indicates that the entry is a file.
A dash in subsequent
positions indicates that the specified class of user does not have permission
for that operation.
Figure 2-1
describes the permission
fields.
Figure 2-1: Tru64 UNIX File Permission Fields
Note
Although a file's owner, group, and other permissions shown by the
lscommand specify that a process has access to a file, the file's ACL might not allow the process access. This can be true even if the process has the same effective group as the group for the file. See Section 2.3 for more information on ACLs.
2.2.2 Setting File and Directory Permissions (chmod)
Users use the
chmod
(change mode) command to set
or change the permissions on their files and directories.
Only the owner of
a file or directory or the root user can set or change the permission on a
file or directory.
Users usually permit themselves read, modify, and execute permission on a file; permit members of their group the read permission on a file and the modify or execute permission depending upon the nature of their work and the composition of the group; and prohibit all other users from having any access to a file.
It is important to realize that whatever permissions are set on a file
and directory, the root user can always override them.
For example, if a user
uses the
chmod
command to specify that only the user can
access the
report20
file, the root user can still access
this file.
To specify the permissions set by the
chmod
command:
Specify permissions with letters and operation symbols.
Specify permissions with octal numbers.
2.2.2.1 Specifying Permissions with Letters and Operation Symbols
You can use letters and operation symbols to change file and directory permissions.
The following is the format of the
chmod
command
when using letters and operation symbols:
chmod
userclass-operation-permission filename
The userclass-operation-permission entry actually represents three codes as follows:
The userclass is one of the following letters:
u
for user (owner)
g
for group
o
for all others (besides owner and group)
a
for all (user, group, and all others)
The operation is one of the following symbols:
+
to add permission
-
to remove permission
=
to assign permission regardless of previous setting
The permission is one of the following letters:
r
for read
s
to set user or group ID: This permission sets the
effective user ID or group ID to that of the owner or group owner of file
whenever the file is run.
Use this permission setting with the u or g
userclass
entry to allow temporary or restricted access to files
not normally accessible to other users.
When you use the
ls
-l
command to display permissions, an
s
appears in the user or group execute position to show that the file runs with
set-user-ID or set-group-ID permission.
w
for write
x
for execute
The
filename
entry is the name of the file
or files whose permissions you want to change.
You can also use pattern-matching
characters to specify files.
See
Section 2.2.2.1.3
for more information.
2.2.2.1.1 Changing File Permissions
Follow these steps to change permissions on a file called
file1:
Display the permissions for the
file1
file:
$ ls -l file1
-rw-r--r--   1 larry    system     101 Jun  5 10:03 file1
The owner (larry) has read/write
permissions while the group and others have only read permissions.
Expand the permissions for both the group (g)
and for others (o) by giving them write access (+w) to
file1
in addition to the read (r) access they already have:
$ chmod go+w file1
Display the new file permissions:
$ ls -l file1
-rw-rw-rw-  1 larry    system     101 Jun  5 10:03 file1
The group and all other system users have read and write (rw) permissions to the
file1
file.
2.2.2.1.2 Changing Directory Permissions
The procedure for changing directory permissions is the same as that
for changing file permissions.
However, to display information about a directory,
enter the
ls -ld
command.
Follow these steps to change permissions on a directory called
project:
Display the permissions for the
project
directory:
$ ls -ld project
drwxr-xr-x  2 larry  system  32 Jun 5 10:07 project
Expand the permissions for the group (g)
by giving them write access (+w) to
project
in addition to the read and execute (r-x) access they already
have:
$ chmod g+w project
Display the new directory permissions:
$ ls -ld project
drwxrwxr-x  2 larry  system  32 Jun 5 10:07 project
The group has read, write, and execute (rwx) permissions
to the
project
directory.
2.2.2.1.3 Using Pattern-Matching Characters
If you want to make the same change to the permissions for all entries
in a directory, you can use the pattern-matching character asterisk (*) with
the
chmod
command.
To give execute (x) permission to the group (g) for all files (*) in the current directory,
enter:
$ chmod g+x *
To display the new group permissions for all files in the current directory, enter:
$ ls -l
total 7
-rw-rwxrw-  1 larry  system  101 Jun 5 10:03 file1
-rw-r-xr--  1 larry  system  171 Jun 5 10:03 file2
-rw-r-xr--  1 larry  system  130 Jun 5 10:06 file3
drwxrwxr-x  2 larry  system   32 Jun 5 10:07 project
-rw-r-xr--  1 larry  system    0 Jun 5 11:03 record1
-rw-r-xr--  1 larry  system    0 Jun 5 11:03 record6
drwxr-xr-x  2 larry  system   32 Jun 5 10:31 reports
2.2.2.1.4 Setting Absolute Permissions
An absolute permission (=) assignment resets all
permissions for a file or files, regardless of how the permissions were set
previously.
Follow these steps to reset all the permissions for the
file3
file:
Display the file permissions:
$ ls -l file3
-rw-r-x-r--  1 larry  system  130 Jun 5 10:06 file3
Assign all three permissions (rwx) to all
users (a):
$ chmod a=rwx file3
Display the new file permissions:
$ ls -l file3
-rwxrwxrwx   1 larry  system  130 Jun 5 10:06 file3
You can also use an absolute assignment to remove permissions.
Follow these steps to remove the execute permission for the
file3
file:
Remove the execute permission (x) for all
groups (a) from the
file3
file:
$ chmod a=rw file3
Display the new file permissions:
$ ls -l file3
-rw-rw-rw-   1 larry  system  130 Jun 5 10:06 file3
$
2.2.2.2 Specifying Permissions with Octal Numbers
You can use octal numbers to change file and directory permissions.
The following is the format of the
chmod
command
when using octal numbers:
chmod
octalnumber filename
The octalnumber entry is a 3-digit octal number that specifies the permissions for owner, group, and others. The filename entry is the name of the file (or a list of file names separated by spaces) whose permissions you want to change. You can also use pattern-matching characters to specify files. See Section 2.2.2.1.3 for more information.
An octal number corresponds to each type of permission as follows:
4 = read (r) 2 = write (w) 1 = execute (x)
To specify a group of permissions for a permission field, add together the appropriate octal numbers; for example:
3 =
-wx
(2 + 1) 6 =
rw-
(4 + 2) 7 =
rwx
(4 + 2 + 1)
0 =
---
(no permissions)
Table 2-2 lists the possible octal permission combinations.
Table 2-2: Octal Permission Combinations
| Octal Number | Binary Number | Permissions | Description |
| 0 | 000 | None |
No permissions granted |
| 1 | 001 | --x |
Execute |
| 2 | 010 | -w- |
Write |
| 3 | 011 | -wx |
Write/execute |
| 4 | 100 | r-- |
Read |
| 5 | 101 | r-x |
Read/execute |
| 6 | 110 | rw- |
Read/write |
| 7 | 111 | rwx |
Read/write/execute |
The entire permission code for a file or directory is specified with
a 3-digit octal number, one digit each for
owner,
group
and
others.
Table 2-3
shows
some typical permission codes and how they relate to the permission fields.
Table 2-3: How Octal Numbers Relate to Permission Fields
| Octal Number | Owner Field | Group Field | Others Field | Complete Code |
| 777 | rwx |
rwx |
rwx |
rwxrwxrwx |
| 755 | rwx |
r-x |
r-x |
rwxr-xr-x |
| 700 | rwx |
--- |
--- |
rwx------ |
| 666 | rw- |
rw- |
rw- |
rw-rw-rw- |
In
Example 2-1, the
ls -l
command displays the permissions for the
file3
file.
Then the
chmod 754
command gives all three permissions
(rwx) to the user, read and execute (rx)
to group, and read only (r) to all users.
Example 2-1: Setting Octal Permissions
$ ls -l file3
-rw-rw-rw-  1 larry  system  130 Jun 5 10:06 file3
$ chmod 754 file3
$ ls -l file3
-rwxr-xr--  1 larry  system  130 Jun 5 10:06 file3
$
2.2.3 Setting Default Permissions
When a file or directory is created, default permissions are set for it. The default permissions are initially set either by the operating system or the program that created the file or directory. Setting default permissions relieves users of the task of specifying permission codes explicitly every time they create a file or directory. The operating system assigns the default permission values of read, write, and execute (777) for executable files and read and write (666) for all other files.
To change the default permissions on newly created files and directories,
you set the user mask with the
umask
command.
The user
mask is a numeric value that determines the default permissions when a file
or directory is created.
As a result, when you create a file or directory,
its permissions are set to what the creating program specifies, minus what
the user mask value forbids.
The following is the format of the
umask
command:
umask
octal_number
The octal_number entry is a 3-digit octal number that specifies the permissions to be subtracted from the default permissions (777 or 666).
Setting the user mask is similar to setting the permission by using octal numbers (Section 2.2.2.2). The permission code for a file or directory is specified with a 3-digit octal number. Each digit represents a type of permission. The position of each digit (first, second or third) represents 3 bits that correspond to the following:
The first digit is for the
owner
of the
file.
The second digit is for the
group
of the
file.
The third digit is for
others.
When you set the user mask, you actually are specifying which permissions
are not to be granted, regardless of the permissions requested by the file
creating program.
Table 2-4
lists the user mask permission
combinations.
The
umask
permission values are the inverse
of those specified for regular permission codes.
Table 2-4: User Mask Permission Combinations
| Column Head | Allowed Permissions | Description |
| 0 | rwx |
Read/write/execute |
| 1 | rw- |
Read/write |
| 2 | r-x |
Read/execute |
| 3 | r— |
Read |
| 4 | -wx |
Write/execute |
| 5 | -w- |
Write |
| 6 | —x |
Execute |
| 7 | --- |
No permissions granted |
For example, if you specify a user mask of 027 (and the file is executable):
The
owner
is allowed all permissions requested
by the program creating the file.
The
group
is not allowed write permission.
The
others
are not allowed any permissions.
The default user mask is 022, which gives the owner all the permissions and prevents members of the user's group or any other users from writing to the owner's files.
A good user mask value to set for your own files and directories depends upon how freely information resources are shared on your system. The following guidelines might be useful:
In an open computing environment, you might specify 000 as a user mask value, which allows no restrictions on file or directory access. As a result, when a program creates a file and specifies permission codes for it, the user mask imposes no restrictions on what the creating program has specified.
In a more secure computing environment, you might specify 066 as a user mask value, which allows you total access but prevents all others from being able to read or write to your files. As a result, when a file is created, its permissions are set to what the creating program specifies, minus the user mask restrictions that prevent read or write access for everyone but you.
In a secure computing environment, you might specify 077 as a user mask value, which means that only you have access to your files. As a result, when a file is created, its permissions are set to what the creating program specifies, minus the user mask restrictions that prevent anyone else from reading, writing or executing your files.
To understand how a user mask works, assume that you have entered the following command:
$ umask 037
This command establishes a Tru64 UNIX permission code of 740 if the
file is executable (the 777 Tru64 UNIX default permission code minus the
037
umask
code) and produces the following results:
You (the owner) are allowed all permissions (7).
Members of your group are allowed read only permission (4).
Others are not allowed any permissions (0).
Furthermore, assume that you have just created a file.
By default, your
text editor always assigns the following default permissions: owners are allowed
all permissions and all others only read and execute permissions.
However,
because you have previously set a user mask of 037, it further restricts the
file permissions.
As a result, the owner still has all permissions, but the
group cannot execute the file and all others have no permissions.
2.2.3.1 Setting the User Mask
You set the user mask in the following ways:
Include the
umask
command in user login
scripts.
This is the most common and efficient way to specify a user mask,
because the specified value is set automatically when the user logs in.
Enter the
umask
command at the shell prompt
during a login session.
The user mask value you set is in effect for that
login session only.
The following steps provide a more detailed example of how the user mask works in restricting permissions for files you create with a text editor:
Display the current value of your user mask:
$ umask
If the user mask value is 000, there are no restrictions on the permissions established by file-creating programs. Go to step 3.
If the user mask value is set, write it down. Go to step 2.
Set the user mask value to 000, so that there will be no restrictions on the permissions established by file-creating programs. Before resetting the user mask, make sure you have written down the current value in case you need to reset it.
$ umask 000
Create a file, save it and then exit your text editor.
Display the permissions of the file. We will assume that read and write permissions are granted for all users:
$ ls -l
-rw-rw-rw-  1 user-name   15 Oct 27 14:42 yourfile
Reset the user mask to
022:
$ umask 022
A user mask of 022 establishes the following permission restrictions: owners are allowed all permissions and all others are allowed only read and execute permissions.
Create another file, save it and then exit your editor.
Display the permissions of the file:
$ ls -l
-rw-r--r--  1  user-name   15 Oct 27 14:45 yourfile2
The write permissions for the group and all others have been removed in accordance with the user mask value of 022.
Reset the user mask to its original value or to another value (if you choose).
2.3 Access Control Lists (ACLs)
ACLs are an extension of Tru64 UNIX permissions on files and directories. ACLs can be used to set permissions for specific users and groups on files and directories. In addition to the permissions normally associated with a file or directory, an ACL contains a list of users and groups with the specific permissions for each user or group.
A file can have only one ACL associated with it, an access ACL. A directory can have three ACLs associated with it: an access ACL, a default access ACL, and a default directory ACL. The access ACL is used to determine who has access to the file or directory. The default ACLs are used to determine what ACLs are inherited by files and directories created in the directory with the default ACLs.
You can set ACLs at any time, but access checking of ACLs and ACL inheritance take place only when ACLs are enabled. The ACL commands will display warning messages if ACLs are disabled on your system. Not all file systems support ACLs. You can set ACLs only on files and directories that are on file systems that support ACLs.
ACLs are extended file attributes stored in the file or directory's
property list.
ACLs can be associated with any file or directory on a file
system that supports property lists, even if ACLs are disabled on the system.
ACL access checking and ACL inheritance take place only when ACLs are enabled.
See
acl(4)proplist(4)
The following file systems support property lists:
Advanced file system (AdvFS)
On AdvFS file systems there is a hard limit of 1560 bytes for a property
list entry.
Because ACLs are stored in property list entries, this equates
to 62 ACL entries in addition to the three directory ACL entries.
The error
EINVAL
is returned if you exceed this limit.
Network file system (NFS) where both client and server are Tru64 UNIX systems. See Section 2.3.1.1 for more information on enabling ACLs on NFS.
UNIX file system (UFS)
The default value of the UFS ACL limit is 1548 bytes (the AdvFS limit includes the header), equivalent to the 62+3 required entry limit on AdvFS.
The UFS configurable limit on ACLs is defined by the
ufs-sec-proplist-max-entry
attribute in the
sec
subsystem.
The UFS configurable
property list element size is defined by the
ufs-proplist-max-entry
in the
sec
subsystem.
You can dynamically configure
these attributes by using the
sysconfig
command or use
the
sysconfigdb
command to configure these attributes in
the
sysconfigtab
file.
The value of the
ufs-proplist-max-entry
attribute
must be larger than the
ufs-sec-proplist-max-entry
attribute
by at least enough space to hold a property list element header.
The
sysconfig
utility automatically adjusts
ufs-proplist-max-entry
to achieve this.
The default value of
ufs-proplist-max-entry
is 8192 bytes.
See
sysconfig(8)sysconfigdb(8)sysconfigtab(4)
2.3.1 Enabling and Disabling ACLs
The ACL subsystem is shipped as part of the base system, but base system components do not require ACLs for current operations and no files are shipped with ACLs on them. If you want to use ACLs or if layered products need ACL support, then you must enable ACLs.
To display ACL information, enter:
# sysconfig -q sec
To dynamically enable ACLs, enter:
# sysconfig -r sec acl_mode=enable
You can enable ACLs when the system starts by using the
secconfig
utility or by following these steps:
Create a
stanza
file containing the ACL
mode enable entry; for example:
sec:
    acl_mode = enable
Update the
/etc/sysconfigtab
file:
# sysconfigdb -m -f acl_mode.stanza sec
To disable ACLs, enter:
# sysconfig -r sec acl_mode=disable
Note
Disabling ACLs might allow processes to access files and directories to which ACLs disallow access. It is especially important that systems that share files using NFS have a common security domain.
If you disable ACLs, you can still set ACLs on files and directories, but the ACLs will not be used for permission checking and ACL inheritance of any default ACLs will not take place for newly created files and directories.
If you are using NFSv3 and the Tru64 UNIX NFS server has ACLs enabled, ACL access checking and ACL inheritance from the NFS clients will be done properly; however, NFS clients will not be able to set ACLs unless the following steps are complete:
On the NFS server, start the property list (proplistd) daemon:
# /usr/sbin/proplistd 4
On the NFS client, mount the file system with the
proplist
option by using one of the following methods:
Add
proplist
to the options field in the
/etc/fstab
file:
servername:/advfs /nfs_advfs nfs rw,proplist 0 0
Add the
proplist
option to the
mount
command:
# mount -o proplist servername:/advfs /nfs_advfs
Note
You cannot use NFSv2 when using ACLs. Due to limitations in the NFSv2 protocols, ACLs might not always be honored when using NFSv2. For more information, see NFS Flatten Mode in the
. acl(4)
An ACL consists of a list of ACL entries. At a minimum there are three entries:
One for the owning user
One for the owning group
One for others
These entries correspond to the Tru64 UNIX permissions for the file or directory. Any command that changes these ACL entries will also change the Tru64 UNIX permissions.
The external (printable) representation of an ACL consists of comma (,) or newline-separated entries. The fields in the ACL entries are separated by colons (:). The following example shows typical ACL entries:
user::rwx
user:peter:r-w
user:sam:r-x
group::rwx
other::---
The ACL entry keywords and qualifiers are defined as follows:
user::A
user
entry with a NULL qualifier field defines the permissions of the user who
owns the file.
This entry (called an owning-user entry) is always identical
to the UNIX user permission.
An ACL must contain just one
user::
entry.
user:A
user
entry with a non-NULL qualifier field defines the permissions of the user
specified by the qualifier field.
The qualifier field must contain either
a user name or a user identification (UID).
An ACL can contain zero or more
user:
entries.
group::A
group
entry with a NULL qualifier field defines the permissions of members of the
group that owns the file.
This entry (called an owning-group entry) is always
identical to the UNIX group permission.
An ACL must contain just one
group::
entry.
group:A
group
entry with a non-NULL qualifier field defines the permissions of members of
the group specified in the qualifier field.
The qualifier field must contain
either a group name or a group identification (GID).
An ACL can contain zero
or more
group:
entries.
other::The
other
entry is valid only with a NULL qualifier.
This entry defines the
permission of all users that did not match any of the other entries in the
ACL.
This entry is always identical to the UNIX
other
permission.
An ACL must contain just one
other::
entry.
The characters in the permissions field are the same as the characters
the
ls
command displays for the Tru64 UNIX permissions
and are in the same order:
r
for read access,
w
for write access, and
x
for execute or search
access.
When a hyphen (-) character is used in place
of one of the other characters, it indicates denial of that access.
ACL user, group, and other entries correspond to the Tru64 UNIX permission
for the file or directory.
If ACLs are enabled and you use the
chmod
command to change the Tru64 UNIX permission of a file or a directory,
chmod
also makes the appropriate changes to the access ACL for the
owning user, the owning group, and the other entry.
Table 2-5
describes typical ACL entries.
Table 2-5: Example ACL Entries
| Entry | Matching Criteria |
group:acct:r-- |
Matches all users in group
acct
and grants read permission. |
user:joe:rw- |
Matches user
joe
and grants read and write permission. |
user::rwx |
Matches owning user of object, even if owning user changes after the file is created, and grants read, write, and execute permission. |
group::r-- |
Matches owning group of object, even if owning group changes after the file is created, and grants read permission. |
other::r-- |
Matches all users and all groups except the owning user and group and any other users and groups listed in ACL entries. Grants read permission. |
2.3.3 Access Checking with ACLs
When there is an Access ACL on a file or directory, additional access checking takes place before someone is allowed access to that file or directory. The following checks are made in the following order:
If the process has the superuser authority, access to the file or directory is granted. The access ACL and the Tru64 UNIX permissions are not checked.
If ACLs are not enabled, or they are enabled and there is no access ACL associated with the file or directory, the Tru64 UNIX permissions are checked.
The additional entries in the access ACL for the file or directory are checked as follows:
If the user ID (UID) of the process is for the owner of the
object, the permissions in the owning
user::
entry are
granted.
Any other ACL entries are not checked.
This is identical to using
the
user
Tru64 UNIX permission.
If the UID of the process matches a UID listed in a
user:
entry or resolves to a user name listed in a
user:
entry, the permissions in the entry are granted.
Any remaining
ACL entries are not checked.
If the group ID (GID) of the process matches the GID of the
file, or if one of the supplementary groups of the process matches the GID
of the file, the process is granted the union of the permissions of the
group::
entry and any matching
group:
entries
as described in the next list item.
If the GID of the process matches the GID of any
group:
entries, or resolves to a group name listed in any
group:
entries or if the GID or group name of any of the supplementary
groups of the process match any
group:
entries of the
ACL, the process is granted the union of the protections of all matching
group entries.
For example, for a user belonging to group
sales
and group
eng, if the access ACL on a file grants
read access to group
sales
and write access to group
eng, the user is granted read and write access to the file.
The permissions in the
other::
entry are
granted.
This is identical to using the Tru64 UNIX
other
permission.
Note
A file or directory with Tru64 UNIX permission and a file or directory with an access ACL containing only the three required entries (
user::,group::, andother::) are indistinguishable.
When a file or directory is created, it might inherit ACLs from its parent directory. When a new file or directory inherits a default ACL as its access ACL, the permissions of the new file or directory are the intersection of the permissions from the default ACL and the permissions requested by the command or program that is used to create the file or directory. The umask is not used. The default ACLs determine what ACLs are inherited by files and subdirectories created in a parent directory, as follows:
If a parent directory has no default ACLs:
A new file created in that directory is given:
| ACL Type | Status |
| Access ACL | None |
A new subdirectory created in that directory is given:
| ACL Type | Status |
| Access ACL | None |
| Default access ACL | None |
| Default directory ACL | None |
Only Tru64 UNIX permissions are used.
If a parent directory has a default access ACL, but no default directory ACL:
A new file created in that directory is given:
| ACL Type | Status |
| Access ACL | Parent's default access ACL |
A new subdirectory created in that directory is given:
| ACL Type | Status |
| Access ACL | Parent's default access ACL |
| Default access ACL | Parent's default access ACL |
| Default directory ACL | None |
If a parent directory has no default access ACL, but does have a default directory ACL:
A new file created in that directory is given:
| ACL Type | Status |
| Access ACL | None |
A new subdirectory created in that directory is given:
| ACL Type | Status |
| Access ACL | Parent's default directory ACL |
| Default access ACL | None |
| Default directory ACL | Parent's default directory ACL |
If a parent directory has both a default access ACL and a default directory ACL:
A new file created in that directory is given:
| ACL Type | Status |
| Access ACL | Parent's default access ACL |
A new subdirectory created in that directory is given:
| ACL Type | Status |
| Access ACL | Parent's default directory ACL |
| Default access ACL | Parent's default access ACL |
| Default directory ACL | Parent's default directory ACL |
Setting the default ACLs on a directory does not modify the ACLs on
files and subdirectories that already exist in the directory.
2.3.4.1 ACL Inheritance Examples
Examples of ACL inheritance follow:
Assume that the directory
temp
contains
no default ACLs, and the following command is entered to give the directory
temp
a default access ACL:
% setacl -d -u user::rwx,group::r-x,other::r-x,user:jdoe:rwx\
  temp
Any file or directory that is created within the
directory
temp
now inherits the following ACL as the access
ACL:
#
# file: temp
# owner: smith
# group: system
#
user::rwx
user:jdoe:rwx
group::r-x
other::r-x
Assume that the directory
temp
contains
no default ACLs, and the following command is entered to give the directory
temp
a default directory ACL:
% setacl -D -u user::rwx,group::r-x,other::r-x,\
  user:jdoe:rwx temp
Any directory that is created within
the directory
temp
now inherits the following ACL as the
access ACL, as well as its default directory ACL:
#
# file: temp
# owner: smith
# group: system
#
user::rwx
user:jdoe:rwx
group::r-x
other::r-x
Assume that the directory
temp
contains
no default ACLs, and the following commands are entered to give the directory
temp
a default access ACL and a default directory ACL:
% setacl -D -u user::rwx,group::r-x,other::r-x,\
  user:jdoe:rwx temp

% setacl -d -u user::rwx,group::r-x,other::r-x,\
  user:wilson:rwx temp
Any directory that is created
within the directory
temp
now inherits the following ACL
as the access ACL as well as the default directory ACL:
#
# file: temp
# owner: smith
# group: system
#
user::rwx
user:jdoe:rwx
group::r-x
other::r-x
The following ACL would be inherited as the default access ACL:
#
# file: temp
# owner: smith
# group: system
#
user::rwx
user:wilson:rwx
group::r-x
other::r-x
Any file created in the directory
temp
now inherits the following ACL as the access ACL:
#
# file: temp
# owner: smith
# group: system
#
user::rwx
user:wilson:rwx
group::r-x
other::r-x
The following commands display and modify ACLs:
dxsetaclA graphical interface that creates, displays, and changes the ACL for files and directories.
getaclDisplays the ACL for files and directories.
setaclCreates, changes, and removes the ACL for files and directories.
Note
You must be the owner of the file or directory (or have superuser authority) before you can create, change, or remove its ACL.
2.3.5.1 Using the dxsetacl Interface
You can use
the
dxsetacl
graphical interface to create, display, and
change the ACL for a file or directory.
The
dxsetacl
interface
is located in the CDE Desktop Applications under the Applications Manager.
Alternatively, you can open it from the command line by entering the following
command:
% /usr/bin/X11/dxsetacl &
See
dxsetacl(8X)dxsetacl
online help
for more information.
2.3.5.2 Using the getacl Command
You can use the
getacl
command to display the
ACL for a file or directory.
In
Example 2-2, the
getacl file.txt
command displays the ACL for a file called
file.txt:
Example 2-2: Displaying the ACL for a File
$ getacl file.txt
#
# file: file.txt
# owner: peter
# group: system
#
user::rw-
user:jdoe:rw-
group::r--
other::r--
If you are using the
getacl
command to display the
access ACL of a file or directory and that file or directory does not have
an access ACL, the Tru64 UNIX permissions are shown in ACL format.
See
getacl(1)2.3.5.3 Using the setacl Command
You can use the
setacl
command to create, change,
and remove the ACL for a file or directory.
In
Example 2-3,
the
getacl file.txt
command displays the ACL for a file
called
file.txt.
The
setacl
command
updates the ACL:
Example 2-3: Setting the ACL on a File
$ getacl file.txt
#
# file: file.txt
# owner: peter
# group: system
#
user::rw-
user:jdoe:rw-
group::r--
other::r--
$ setacl -u group::rw-,user:evan:rw- file.txt
$ getacl file.txt
#
# file: file.txt
# owner: peter
# group: system
#
user::rw-
user:jdoe:rw-
user:evan:rw-
group::rw-
other::r--
The owning group entry is updated to include the write permission.
The
evan
user entry does not match an existing entry and
is added with read and write permission.
The other entries remain unchanged.
See
setacl(1)2.3.6 ACL Interaction with Commands and Applications
ACLs are a POSIX and System V compatible extension to UNIX based on POSIX P1003.6 Draft 13. Not all existing commands, utilities, and applications properly use or propagate ACLs, especially applications that are not POSIX compliant. If you use any command, utility or application to access or manipulate a file system object (file or directory) that has an ACL, you must check the ACL after completion to make sure that the ACL has not been removed or changed.
Many programs that modify files use the following process:
Create the new version of the file with a temporary name.
Delete the existing version of the file.
Rename the new version from the temporary name to the real name.
When the file being modified has an ACL and the program does not replicate the ACL when creating the temporary version of the file, the previous procedure will delete the file's ACL, or replace it with the default access ACL of the parent directory (if it has one). If you use such a program on a file with an ACL, you must restore the ACL afterwards. This procedure also causes any hard links to be removed from the file. Some common commands that use this method of modifying files are:
gzip
compress
emacs
A solution is to copy the original file to a temporary file, do any
processing on the temporary file, then use the
cp
command
without the
-p
option to copy back.
This procedure retains
the original ACL.
Any time that you copy a file with an ACL, you should use the
cp -p
command to properly copy the ACL and any other extended attribute
(property list).
2.3.6.1 The pax and tar Commands
Both
the
pax
and
tar
command archive any
ACLs and other extended attributes on archived files and directories by default
when you create an archive.
However, when you use the
pax
or
tar
commands to extract files and directories from an
archive, any ACLs on the archived files and directories are not extracted
from the archive by default.
In this case, if the destination directory has
default ACLs defined, the files and directories extracted from the archive
inherit the default ACLs (Section 2.3.4).
To restore the ACLs and property list information from the archive,
use the
-p
option with the
tar
command
and the
-p p
or
-p e
options with the
pax
command when extracting files and directories from the archive.
The
pax
and
tar
commands store the user
and group information for ACLs as UIDs and GIDs.
This means that if you use
the
tar -p,
pax -p p
or
pax
-p e
commands to restore an archive on a system that does not share
user and group information with the source system, you might be granting unintended
access to files.
There currently are no formal industry standards for ACLs and extended
attributes (property lists).
Thus, the extensions to the
pax
and
tar
commands to support property lists and ACLs are
specific to Tru64 UNIX.
Other vendor's
pax
and
tar
implementations should simply ignore the Tru64 UNIX specific
extensions.
However, to ensure interoperability with other vendor's systems
when archiving for multivendor distribution, use the
-V
option to prevent ACLs and any other extended attributes from being archived.
2.3.6.2 Archiving Commands
The archive commands
dump,
rdump,
restore,
rrestore,
vdump,
rvdump,
vrestore, and
rvrestore
always save and restore all extended attributes (property lists) including
ACLs.
Attempting to extract files to a directory that has a default directory
ACL or a default access ACL might cause unintended ACLs to be created on the
extracted files.
If ACLs are enabled on the system, make sure to check all
ACLs after the extraction is complete.