This appendix contains the following information:
A.1 Installing Enhanced Security
To install enhanced security, you must install the
optional enhanced security subsets (OSFC2SECnnn
and
OSFXC2SECnnn).
Before you the install enhanced security subsets, make a backup copy
of the root file system as a precaution.
The backup can be made by using
one of the following commands (dump
only works on UFS file
systems):
# dump -0uf /dev/rmt0h /
or
# vdump -0Nuf /dev/rmt0h /
Substitute the appropriate tape device for your system. See System Administration for more information on backing up file systems.
You can install the enhanced security subsets in the following ways:
During a full installation of the Tru64 UNIX (either advanced
or basic) operating system software.
A full installation brings up the system
with only a root account.
Run the
secconfig
script before
adding accounts.
During
an update installation if you are updating your system from a previous version
of the Tru64 UNIX operating system software.
During an update installation,
all user accounts and databases are preserved, and running the
secconfig
program converts them to the enhanced security format.
After the security subsets are installed, you will see a message like the following:
Configuring "C2-Security " (OSFC2SECnnn)
Configuring "C2-Security GUI " (OSFXC2SECnnn)
If you plan to enable the password triviality checks, you must also install the OSFDCMTEXTnnn subset. See Installation Guide for more information on installing subsets.
The
nnn
represents the Tru64 UNIX version
number.
See
Release Notes
for the current version number.
A.2 Enabling Enhanced Security
The
secconfig
utility is an interactive program that allows you to enable
the security level (base and enhanced) on your system.
You can run the program
while the system is in multiuser mode.
However, depending on the security
features chosen, when
secconfig
is complete, you may need
to change the security features, you must reboot your system.
Follow these steps to enable enhanced security:
Verify that the enhanced security subsets (OSFC2SECnnn
and
OSFXC2SECnnn)
are installed.
# /usr/sbin/setld -i | grep SEC
OSFC2SECnnn   installed   C2-Security (System Administration)
OSFXC2SECnnn  installed   C2-Security GUI (System Administration)
The nnn is a numeric value that represents the current verion of the subset. See Release Notes for the current version number.
Use the
secconfig
utility to enable enhanced
security by using one of the following methods:
Enter the
/usr/sbin/sysman secconfig
command
and select ENHANCED security when prompted for a security level.
Use CDE and select Application Manager -> System_Managent_Utilities -> Configuration -> Security. Enhanced security is enabled when you select Security.
See Section A.2.1 for enabling enhanced security considerations.
Bring down your system to single user and reboot (your shutdown message should inform users of the impending password changes).
The presence of the protected password daemon (/usr/bin/prpasswdd) indicates that enhanced security is enabled.
A.2.1 Enabling Enhanced Security Considerations
The following sections describe considerations when enabling enhanced
security.
A.2.1.1 Using NIS
If the system uses a password database that is served by NIS (Network Information Service), you are prompted to create a local enhanced authentication profile for each user in the NIS server password database. Subsequent changes in NIS passwords are not propagated to the database. The enhanced passwords now on the local system are expired and users must enter a new password the next time they log in.
If you change the security level back to base security, the enhanced authentication profile files are left in place. When you return to ENHANCED security, as long as there is an enhanced authentication profile file and it contains a password, the enhanced password is updated.
See
Section A.6
for more information about using
enhanced security and NIS.
A.2.1.2 Segment Sharing
Because of the page table sharing
mechanism used for shared libraries, the normal file system permissions are
not adequate to protect against unauthorized reading.
For example, user
joe
has the following shared library:
-rw------- 2 joe staff 100000 Sep 18 1997 /usr/shlib/foo.so
When this shared library is used in a program, the text part of
foo.so
may be visible to other running processes even though they
are not running as user
joe.
Only the text part of the
library, not the data segment, is shared in this way.
To disable all segmentation and avoid any unauthorized sharing, answer "yes"
when
secconfig
asks if you want to disable segment sharing.
The
secconfig
script reports when segment sharing is already
disabled.
Note
Disabling segment sharing can cause excessive memory use.
A.2.1.3 Execute Bit Set Only By Root
Enabling the
execute bit set only by root
option
allows only the root user to set the execute permissions on files.
A.2.2 Configuring Enhanced Security
Enhanced security provides the ability to specify system default values that apply to users, terminals, and devices. The following sections briefly describe some common defaults and how to configure them.
The system defaults are stored in the default database at
/etc/auth/system/default.
This database can contain four types
of fields:
System wide fields that exist only in the default database.
These fields are prefixed with a
d_.
User default fields, whose values can be overridden by the
corresponding fields in a user's profile.
These fields are prefixed with a
u_.
Terminal control fields, whose values can be overridden by
the corresponding fields in the terminal control database.
These fields are
prefixed with a
t_.
Device assignment fields, whose values can be overridden by
the corresponding fields in the device assignment database file.
These fields
are prefixed with
v_.
You use the following interfaces to change the default value of enhanced security related users, terminals, and devices settings:
The
dxaccounts
GUI to modify the default
fields for users by going to Local Templates->Default.
The
dxdevices
GUI to modify the default
fields for devices.
The
edauth
utility provides a lower-level
interface to all of the default fields.
See
authcap(4)edauth(8)edauth, and
default(4)prpasswd(4)ttys(4)devassign(4)A.2.2.1 Aging
If you do not want
password aging on your system, in the
default
database
set
u_exp
and
u_life
to 0, and then
(because of the way the default methods of determining length restrictions
on passwords work based on the password lifetime) also set
u_minchosen
and
u_maxchosen
to appropriate values for the
site.
An example entry could be as follows:
:u_exp#0:u_life#0:u_minchosen#5:u_maxchosen#32:\
You can remove the minimum change time interval by setting the
u_minchg
field to 0 as follows:
:u_minchg#0:\
This allows users to immediately change their password after a previous
password change.
A.2.2.3 Changing Controls
The
password-changing controls can be configured to your site's needs.
By putting
the following fields in the
default
database, you allow
users to select how their passwords are chosen:
	:u_pickpw:u_genpwd:u_genchars:u_genletters:u_restrict:\
	:u_policy:u_nullpw:u_pwdepth#0:\
(Of those,
u_pwdepth
is numeric and the rest are Boolean.
A Boolean field is true if it is specified
and false if it is followed by an @.)
A.2.2.4 Maximum Login Attempts
In breakin detection, consective login failures are
counted and compared to a maximum for a user (u_maxtries)
or for a terminal (t_maxtries).
If the maximum is exceded,
then logins to the user account or the terminal are disabled for a time period
specified by
u_unlock
or
t_unlock.
To
disable breakin evasion for user accounts, set
u_maxtries
to 0.
To disable for terminals, set
t_maxtries
to 0.
The
default
database entry for users would be as follows:
:u_maxtries#0:\
A.2.2.5 Time Between Login Attempts
If the default evasion time (86400 seconds
or 24 hours) is not appropriate for your site, change the
u_unlock
field to an appropriate value for your site (number of seconds
before a success is recognized after the last failure, once the
u_maxtries
limit is reached).
Setting the
u_unlock
field to 0 (:u_unlock#0:) sets the time between login attempts
to infinity (no automatic reenabling occurs).
The equivalent behavior for
terminals is controlled by
t_maxtries.
A.2.2.6 Time Between Logins
You can set system wide maximum allowable time
between logins in the
u_max_login_intvl
field of the
default
database.
The system default login timeout for terminals can be changed in the
t_login_timeout
field of the
default
database.
It can also be set in the * entry of the
ttys
database.
This field should be 0 (infinite) for X displays.
A.2.2.7 Per-Terminal Login Records
If you do not want to record per-terminal
login successes and failures, set the
d_skip_ttys_updates
Boolean field in the
default
database as follows:
:d_skip_ttys_updates:\
This has the side effect of disabling any further per-terminal breakin
evasion.
A.2.2.8 Successful Login Logging
Strict C2 security requires the logging
of successful logins.
To disable this logging, set the
d_skip_success_login_log
Boolean field as follows:
:d_skip_success_login_log:\
Failed login attempts to user accounts are
normally recorded.
To disable this logging, which also disables breakin detection
and evasion system wide, set the
d_skip_fail_login_log
Boolean field as follows:
:d_skip_fail_login_log:\
A.2.2.10 Automatic Enhanced Profile Creation
Setting the
d_auto_migrate_users
Boolean field allows the creation of enhanced profiles at login time if they
are missing, so that traditional methods of adding user profiles can be used
without change.
A.2.2.11 Vouching
You can set the
d_accept_alternate_vouching
field to allow enhanced security and DCE to work together.
A.2.2.12 Encryption
If you want the user passwords to stay in the
/etc/passwd
file to support programs that use
crypt()
to do password validation, but still want to use other features of enhanced
profiles, put the following entry in the
default
database
before running the
/usr/sbin/sysman secconfig
utility:
:u_newcrypt#3:\
This corresponds to the AUTH_CRYPT_C1CRYPT value from the
<prot.h>
file.
A.3 Enhanced Security Databases
Table A-1
identifies the enahced security databases.
Table A-1: Enhanced Security Databases
| Database | Location | Contents |
| Protected password | /tcb/files/auth.db
/var/tcb/files/auth.db |
User authentication database |
| System defaults | /etc/auth/system/default |
Default values for database fields |
| Terminal control | /etc/auth/system/ttys.db |
Security information about each terminal |
| File control | /etc/auth/system/files |
Protection attributes of each system file |
| Device assignment |
/etc/auth/system/devassign |
Device-specific controls |
A.3.1 Enhanced (Protected) Password Database
The protected password database stores the enhanced authentication profile for each user who has an account on the system. Each profile contains information such as the following:
User name and ID
Encrypted password
User's audit characteristics
Password generation parameters
Successful and unsuccessful login times and terminals
The enhanced (protected) password database is located in the file
/tcb/files/auth.db.
See
prpasswd(4)A.3.2 System Defaults Database
The system defaults database stores default values for database fields. These defaults are used when the administrator does not set explicit values in the enhanced (protected) password database, terminal control database, or device assignment database.
The system defaults database contains information such as the following:
Default password generation parameters
Default number of unsuccessful login attempts allowed per user
Default number of unsuccessful login attempts allowed per directly connected terminal
Default device assignment parameters
More information on the contents of the system defaults database located
in
/etc/auth/system/default
can be found in
default(4)A.3.3 Terminal Control Database
The terminal control database contains information that the administrator uses to control login activity at each terminal attached to the system. The system uses this database as an aid in controlling access to the system through terminals. The administrator can set different policies for logins at different terminals, depending upon the site's physical and administrative needs.
Each entry in the terminal control database contains information such as the following:
Terminal device name
User ID and time stamp of the last successful login attempt from this terminal
User ID and time stamp of the last unsuccessful login attempt from this terminal
Delay imposed between login attempts from this terminal
Number of unsuccessful attempts that can be made before locking this terminal
When the system is installed, the terminal control database contains an entry for the system console. You modifiy these initial values during system setup. A corresponding entry, also initially installed, is required in the device assignment database before logins are allowed.
For more information about the contents of the terminal control database
located in
/etc/auth/system/ttys.db, see
ttys(4)A.3.4 File Control Database
The file control database contains information about the protection attributes of system files (that is, files important to the enhanced security operation). This database helps maintain system integrity. It contains one entry for each system file.
Each entry in the file control database contains the following information:
Full pathname of the file
File owner and group
File mode and type
Potential and granted privilege sets
Access control list
When the system is installed, the file control database contains entries for all security relevant system files. You do not need to modify this database during system setup and rarely needs to update it during system operation.
See
files(4)/etc/auth/system/files
file.
A.3.5 Device Assignment Database
The device assignment database contains information about devices that are used to exchange data with users. Each login terminal must have an entry in the device assignment database. The system uses this database as an aid in restricting the security attributes of data that can be sent or received through the system's devices.
Each entry in the device assignment database contains information that describes a device and that relates the device pathname to the appropriate physical device. This is necessary because a number of distinct pathnames can refer to the same physical device. For example, two pathnames can refer to the same serial port - one with modem control enabled and the other with modem control disabled.
Each entry in the device assignment database contains information such as the following:
Device pathname
Other pathnames referencing the same physical device
Device type
Entries referring to login terminals must have corresponding entries in the terminal control database.
The device assignment database is located in
/etc/auth/system/devassign.
See
devassign(4)A.4 Enhanced Security Database Management Utilities
A customized version of the Berkeley Database (Berkeley DB) is embedded in Tru64 UNIX to provide high-performance database support for critical security files. The DB includes full transactional support and database recovery, using write-ahead logging and checkpointing to record changes. In the event of catastrophic failure, the security database can be restored to its last transaction-consistent state by restoring the database files and rolling the log forward.
The following database management utilities are included with Enhanced
Security and located in the
/usr/tcb/bin
directory:
db_archiveDisplays the enhanced
security database log files no longer involved in active transactions that
can safely be backed up and deleted to regain space on
/var.
db_checkpointFlushes memory, writes a checkpoint record to the log and flushes the log to disk.
db_loadReads from a file or standard input and loads into a database.
db_unloadUnloads the database into a file.
db_statDisplays the security database statistics.
db_recoverRestores the database to a consistent state after an unexpected failure.
In general, the security database is loaded or unloaded only
by installation utilities.
While the database has been designed to minimize
database administration tasks, the addition of security database log files
does present the possibility of log files expanding to fill
/var.
Thus, the security configuration utility includes an option that
creates a
cron
job to periodically delete log files no
longer involved in active transactions.
A.5 Enhanced Security and Authenticating Users
A system running enhanced
security authenticates users by using the
/etc/passwd
file and an enhanced security authentication database, which is composed of
the following subsidiary databases:
Protected password database (/tcb/files/auth.db
and
/var/tcb/files/auth.db)
System defaults database (/etc/auth/system/default)
The enhanced security authentication database has an entry for each
user account defined in
/etc/passwd.
Under enhanced security,
the
/etc/passwd
file remains unchanged except for the
encrypted password, which moves from the
/etc/passwd
file into
auth.db
database.
The other fields in the
/etc/passwd
file (shell and so forth) remain in the
/etc/passwd
file and are used in a normal fashion.
The enhanced security authentication database uniquely identifies a
user by user name and UID, which must match the user's entry in the
/etc/passwd
file.
In addition to the encrypted password, an entry
contains a set of fields and values used only by enhanced security.
See
prpasswd(4)authcap(4)
A user account can be associated with a template account, which can
be used to specify default values for a group of users.
An account is always
finally associated with the system default template values that are contained
in the
/etc/auth/system/default
file.
Users continue to use the
passwd
command to change
their password when using enhanced security.
A.5.1 User Profiles
A user's entry in the enhanced security authentication database is called a user's profile. Security-aware programs interpret the fields and values in a profile. A user profile need not contain every possible field. If a field is not specified in a user's profile, the system looks in the template account associated with the user, and finally in the system default template, until it finds a value for the field.
Values are obtained as follows:
If the user profile contains a user-specific value, that value is used.
If the user profile contains a reference to a template account, and no user-specific value is defined, the value in the template account is used.
If neither the user profile nor the template account defines a value for a field and the system default template defines a value for that field, the system default template value is used.
If the value is defined nowhere else, a static system default value is used for the field.
The system default template values are located in the
/etc/auth/system/default
file and can be modified by using the
dxaccounts
View Local Template option, or with the
edauth
utility.
Other template accounts are stored in the
auth.db
database.
Note that template accounts have no corresponding entry in the
/etc/passwd
file.
A.5.1.1 Recovery of /etc/passwd Information
If the
/etc/passwd
file is lost, but the enhanced
profiles are still available, you can enter a command sequence like the following
to recover some of the missing data:
# bcheckrc
# /tcb/bin/convuser -dn | /usr/bin/xargs /tcb/bin/edauth -g | \
    sed '/:u_id#/!d;s/.*:u_name=//;s/:u_id#/:*:/;s/:u_.*$/:/' \
        > psw.missing
This creates a
psw.missing
file containing entries like the following:
root:*:0:
jdoe:*:1000:
Primary group, finger, home directory, and login shell
information is not recorded in the enhanced profile.
The data for those fields
must be recovered by other means.
A.5.2 Enhanced Security Authentication Database Integrity Checking
You use the
/usr/tcb/bin/authck
command
to check the overall structure
and the internal consistency of the enhanced security authentication database.
The
authck
command checks for the correctness of entries
within each database and also checks related fields in other databases.
For
example, it checks the protected password database entry for a user against
the
/etc/passwd
file.
The
authck
command produces a report listing any
discrepancies between the databases.
Compare the output of the program with
the actual database entries and rectify any differences immediately.
Problems
typically occur because someone has manually updated one of the databases
without making the corresponding change to the related databases.
You can specify the following arguments on the
authck
command line:
-pChecks the protected
password database and the
/etc/passwd
file to ensure that
they are complete and that they agree with each other.
It also checks the
protected password database for reasonable values.
-tChecks the fields in the terminal control database for reasonable values.
-fChecks the file control database for syntax and value specification errors. Without this flag, entries with unknown authorizations, user names, and so on, are ignored. Typically these errors are typographical, such as "rooot" instead of "root," and the program attempts to guess the right value.
-vVerbose mode.
-aPerforms the functions
of
-f,
-p,
-t, and
-v.
Provides program activity status
during operation.
See
authck(8)A.5.3 Adding Applications to the File Control Database
When you add applications to the system by
a means other than the
setld
program, you should also add
file control database entries for the application's control and database files
and programs.
It is best to consult with the application supplier to get a
file and program list, and suggested protection attributes for all files.
If you add the application's files to the file control database, you gain the benefit of periodic integrity checking of that application's resources.
See
fverify(8)A.6 Enhanced Security and NIS
The Network Information Service (NIS) can be used to distribute all or part of the enhanced (protected) password database as well as the BSD user account and group databases. A Tru64 UNIX NIS master can serve NIS clients that are Tru64 UNIX systems running enhanced security as well as any NIS clients using BSD authentication, including systems from other vendors.
When you are running NIS over enhanced security you have the following user account databases:
On the NIS master server:
The NIS-distributed base user account database generated from
the
/var/yp/src/passwd
and
/var/yp/src/group
files and distributed as
ndbm
or
btree
maps.
The NIS-distributed enhanced security user account database
generated from the
/var/yp/src/prpasswd
file and distributed
as
btree
maps.
On the NIS client:
The local base user account database in the
/etc/passwd
and
/etc/group
files.
The local enhanced security user account database.
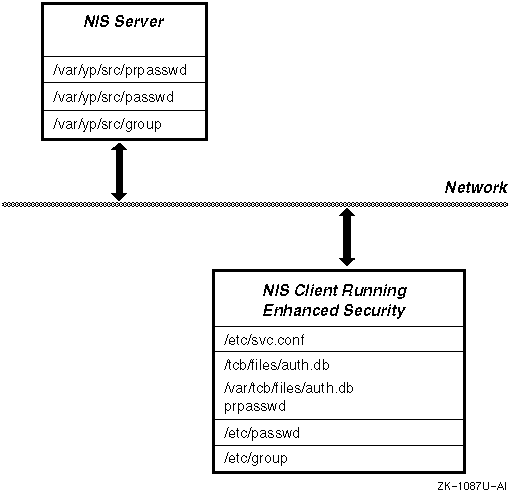
Figure A-1
shows the user account databases
on the NIS master server and client.
Figure A-1: NIS and Enhanced Security Files
The
auth=
entry in the
/etc/svc.conf
file indicates the order in which the local and NIS enhanced security user
account databases are searched for user entries, either local first or NIS
(yp) first.
The
plus sign (+) override feature for
/etc/passwd
entries
works as usual.
Note
When upgrading from a base security system with NIS to an enhanced security system, the
/usr/sbin/sysman secconfigutility only createsauth.dbentries for NIS users (the+usernameentries in the/etc/passwdfile) if you answer yes to the Create Entries for NIS Users question.
There is no override feature for the enhanced security user account
database.
A user's profile is contained completely in either the local database
or in the NIS distributed data base.
Although templates can be defined for
NIS accounts and distributed as part of the NIS enhanced security maps, NIS
does not distribute the system default template (/etc/auth/system/default).
This template provides the final default values for fields not
specified in a user's profile.
Therefore, under enhanced security, a NIS client
uses its own
/etc/auth/system/default
file to obtain
final default values for both local and NIS user profiles.
If the client system
default file contains different values than that of the NIS master, unintended
behavior can occur.
The
passwd
command changes the password in a user's
local or NIS enhanced security entry.
The
yppasswd
command
changes the fields in the NIS-distributed base user account database as usual.
NIS user accounts can be modified using the
dxaccounts
View NIS User option, or by specifying the
-x distributed=1 local=0
options to the
useradd,
usermod,
and
userdel
utilities.
See
Network Administration: Services
for more information about NIS.
A.6.1 Templates for NIS Accounts
The
/var/yp/src/prpasswd
file is the source for enhanced security user accounts distributed
by NIS.
It can contain template profiles and normal user profiles.
As with
a local user profile, a NIS user profile need not contain every possible field.
If a field is not specified in a NIS user's profile, the system looks in the
NIS template account associated with the user, and finally in the local system
default template, until it finds a value for the field.
Values are obtained as follows:
If the user profile contains a user-specific value, that value is used.
If the user profile contains a reference to a template account, and no user-specific value is defined, the value in the template account is used.
If neither the user profile nor the template account defines a value for a field and the system default template defines a value for that field, the system default template value is used.
If the value is defined nowhere else, a static system default is used for the field.
NIS template accounts are modified using the
dxaccounts
View NIS Template option, or with the
edauth
utility.
The system default template values are located in the
/etc/auth/system/default
file on the NIS client.
Note that NIS does not distribute the
system default template.
A NIS client uses its own
/etc/auth/system/default
file to obtain final default values for both local and NIS user
profiles.
If the client system default file contains different values than
that of the NIS master, unpredicted behavior can occur.
A.6.2 Configure a NIS Master with Enhanced Security
Follow these steps to configure a NIS master with enhanced security:
If NIS is running on the master server, stop it:
# /sbin/init.d/nis stop
Ensure that the enhanced security subsets are installed.
Modify the system default template:
# edauth -dd default
Set the following fields:
d_skip_success_login_log:
d_skip_ttys_updates:
Create
/var/yp/src/hosts,
/var/yp/src/passwd,
/var/yp/src/group, and
/var/yp/src/prpasswd
files.
Run the
sysman nis
program.
When the
sysman nis
program first prompts
for security (-s
option to
ypbind),
choose
y
to run
ypbind -s, which
specifies a secure socket.
When the
sysman nis
program again prompts
for security (-S
option to
ypbind),
choose
y
and specify a domain name and up to four authorized
slave servers.
Make sure that the
/etc/svc.conf
file
has the following entry:
auth=local,yp.
Start NIS:
# /sbin/init.d/nis start
A.6.2.1 Manual Procedure: Maps for Small User Account Databases
For a NIS master server supporting clients using enhanced security,
a manual procedure is best.
Set up the account maps using the
dxaccounts
program or alternatively the
adduser,
addgroup,
useradd,
userdel,
and
usermod
commands.
See
Section A.6.5
for another
method of setting up accounts.
A.6.2.2 Automated Procedure: Maps for Large User Account Databases
If you have a large existing NIS distributed base user accounts database, you can automate the creation of the NIS distributed enhanced (protected) password database by entering the following command:
# convuser -Mc
Alternatively, you can create the map by creating a
/var/yp/src/prpasswd
file and then executing the following commands:
# /usr/tcb/bin/edauth -Lg > /var/yp/src/prpasswd
# cd /var/yp;  make prpasswd
A.6.3 Setting Up a NIS Slave Server with Enhanced Security
If NIS is running on a slave server, you
must stop NIS using the
/sbin/init.d/nis stop
command.
The following setup information is specific to a NIS slave server supporting
clients using enhanced security:
Ensure that the enhanced security subsets are installed.
Modify the system default template:
# edauth -dd default
Set the following fields:
d_skip_success_login_log:
d_skip_ttys_updates:
Run the
sysman nis
program.
When the
sysman nis
program first prompts
for security (-s
option to
ypbind),
choose
y
to run
ypbind -s, which
specifies a secure socket.
When the
sysman nis
program again prompts
for security (-S
option to
ypbind),
choose
y
and specify a domain name and up to four authorized
slave servers.
Make sure that the
/etc/svc.conf
file
has the following entry:
auth=local,yp.
Edit the
/var/yp/ypxfr_1perday,
/var/yp/ypxfr_1perhour,
/var/yp/ypxfr_2perday
files to add the following lines to each:
ypxfr -a "$method" prpasswd
ypxfr -a "$method" prpasswd_nonsecure
Start NIS:
# /sbin/init.d/nis start
A.6.4 Setting Up a NIS Client with Enhanced Security
If NIS is running on a slave server, you must
stop NIS using the
/sbin/init.d/nis stop
command.
The following
setup information is specific to a NIS client using enhanced password security:
Ensure that the enhanced security subsets are installed.
Modify the system default template using the following command:
# edauth -dd default
Set the following fields:
d_skip_success_login_log:
d_skip_ttys_updates:
Run the
sysman nis
program.
When the
sysman nis
program first prompts
for security (-s
option to
ypbind),
choose
y
to run
ypbind -s, which
specifies a secure socket.
When the
sysman nis
program again prompts
for security (-S
option to
ypbind),
choose
y
and specify a domain name and up to four authorized
slave servers.
Edit the
/etc/svc.conf
file to include
a
yp
entry for
auth.
The entry should
be as follows:
auth=local,yp.
Start NIS using the
/sbin/init.d/nis start
command.
A.6.5 Moving Local Accounts to NIS
To move existing local accounts to NIS, enter:
# edauth -Lg | edauth -NsC
If you need to remove the NIS, copy the NIS accounts to the local database and then remove NIS using the following commands on the client:
# edauth -gN | edauth -sLC
# sysman nis
<select the Remove option from the menu>
The enhanced (protected) password database on the client is updated
with any accounts from the NIS database that are not present in the local
database.
A.6.7 Implementation Notes
The following information is specific to enhanced security and NIS:
To change your password when running NIS with enhanced security,
use the
passwd
command for both local and distributed
enhanced (protected) password database entries.
The
passwd
command uses the search list in the
svc.conf
file (auth=local,yp
entry) and updates the password in the first enhanced
(protected) password database entry it finds for the specified user, even
if that entry is in the NIS-distributed enhanced password database.
It is very important that each enhanced password database
entry exists in only one database, either the local enhanced password database
or the NIS-distributed enhanced password database.
The routines that check
and manipulate the enhanced password database information work on the first
copy found (as defined in the
svc.conf
file).
NIS
yp
routines work on the NIS-distributed enhanced password database
only.
This can cause confusing results if you have the same entry in both
places.
If this happens, delete one of the entries.
It is strongly recommended that you do not distribute
root
account information.
Maintaining a local
root
account on a client system allows you to still log in on the client systems
using the
root
account if your NIS server is down.
To maintain last successful login information, you can configure
an update to a user's enhanced profile each time that the user logs in.
On
a NIS master, this requires rebuilding the map and shipping it to the slaves.
Tru64 UNIX Version 5.1B
makes these updates optional and you can disable the updates by setting the
value of the
d_skip_success_login_log
system default field
to true.
Disabling successful login logging means that the NIS master server
does not always have to be available for logins to be successful if there
is a properly configured NIS slave server.
Scalability improvements include:
An update to a single entry does not always cause a rebuild
of the entire
prpasswd
map.
The map entries are updated
directly if possible.
Manual modifications to the
prpasswd
file followed
by manual rebuilds is strongly discouraged because the
rpc.yppasswdd
daemon might have cached an entry and the manual modification could
be overwritten.
If you feel the need to modify the
prpasswd
file, stop the NIS server, make the modifications, then restart the NIS server.
If successful login logging is enabled, a successful login does not wait for the NIS map to be distributed before completing. It only waits to make sure that the NIS master has been updated. If unsuccessful login logging is enabled, unsuccessful login attempts still wait for the map to be distributed to the slave servers before completing. This is required for security and timing issues.
The database format for NIS maps is configurable.
You can
choose
btree
or
hash
in addition to
ndbm.
When using
ndbm
for NIS map storage, there
is a limit to the number of account records that can be stored, which depends
on the mix of account names and UIDs.
A typical limit is about 30,000 entries,
but some mixes of account names and UIDs can result in a limitation of fewer
than 10,000 entries.
Because of this constraint in
ndbm,
use
btree
as your database format, especially when using
enhanced security.
NIS servers work best with a common database format.
If a
slave server has defined a different format than the master (ndbm
instead of
btree, for example), the time it
takes to push any maps to that slave server is drastically increased because
the slave server must rebuild its database one element at a time, instead
of receiving the database from the master as a single entity.
NIS slaves that are not listed in the
ypservers
NIS map on the NIS master can cause performance problems for NIS clients bound
to those slaves.
To solve this, define all NIS slaves in the
ypservers
NIS map on the NIS master.
Then, on the slave server, execute
the following commands to pull the user account databases from the NIS master:
# /var/yp/ypxfr -d `domainname` -h NISMASTER -c prpasswd
# /var/yp/ypxfr -d `domainname` -h NISMASTER -c prpasswd_nonsecure
In the example, substitute the name of the local NIS master server for NISMASTER. This will transfer initial copies of those maps for those slave servers.
A login process that encounters a login failure has to check
the
prpasswd
map for the latest unsuccessful login information.
This requires an up-to-date
prpasswd
map.
Thus, the
yppush
operation for the
prpasswd
map must
occur for each failed login; that map (at least) must be pushed during the
normal operation of the
rpc.yppasswdd
daemon.
Setting the
/var/yp/Makefile
variable
NOPUSH
is not recommended
for such configurations.
Sites that cannot use NIS to share
prpasswd
information may want to use NFS to share the
/tcb/files
and
/var/tcb/files
directories.
This requires exporting
the directories with root access to the participating nodes with
-root=client1:client2:client3
or
-root=0, as
appropriate.
See
exports(4)
Table A-2
discusses some common
NIS problems and possible reasons for those problems.
Table A-2: NIS Troubleshooting
| Problem | Possible Reason |
Successful login to a local account,
but cannot log in to any of the NIS accounts.
The
dxaccounts
utility displays that the account exists and is not locked. |
1.
Check the
2.
Check the
|
Slave NIS server does not get
the updated
prpasswd
maps on boot. |
Check the
|
The
dxaccounts
program View popup menu does not show any NIS User Account Database options
(for example, NIS Users, NIS Groups, and NIS Templates). |
NIS is not running or has not been configured. |
When you issue the
|
This is an informational message. No action is required. |
When you issue the
|
The hosts map does not exist. Enter the following commands:
|
A.7 Enhanced Security in a TruCluster
A TruCluster Server cluster is a single security domain. Identification and authentication, access control lists (ACLs), and auditing are configured identically on each member by default, presenting a coherent interface to the user and the system administrator.
Because a single copy of the authentication files is shared among all
cluster members, each user account is valid on all cluster members and a user
can log in to the cluster without concern for which member accepts the connection.
Identically configured ACL checking means consistent authorization and file
access control; a user has the same access rights from every member.
Clusterwide
audit settings ensure a uniform capture of cluster activity.
A.7.1 Upgrading from Base to Enhanced Security in a TruCluster
Upgrading from base to enhanced security in an existing TruCluster requires
a full cluster reboot.
The upgrade copies user accounts from the
/etc/passwd
file into the
auth.db
databases,
removes passwords from the
/etc/passwd
file, and switches
to a new security library.
A new process authenticating a user name and password,
such as a
telnet
session, uses the new library and accesses
the new databases.
However, an existing process, such as a
dtlogin
session or a locked CDE window, continues to use the original library.
Because this library expects to access the
/etc/passwd
file, from which passwords have been removed, an existing process consistently
encounters password verification failures.
In particular, the console login
window encounters this problem, which can create the erroneous belief that
the root account is disabled.
The cluster reboot prevents this situation.
A.7.2 Installing and Configuring Enhanced Security in a TruCluster
The best time to configure enhanced security for a TruCluster is before loading the TruCluster Server license and subsets and creating the cluster. You must select the enhanced security subsets (OSFC2SECnnn and OSFXC2SECnnn ) during the installation.
The nnn represents the Tru64 UNIX version number. See Release Notes for the current version number.
The enhanced security software is installed on members in a TruCluster as follows:
If you are installing Tru64 UNIX on the first member of cluster, you must completely set up your security environment before installing the TruCluster Server software. The security configuration, as well as other configuration data, will be propagated to other cluster members as they start.
If you are installing Tru64 UNIX on a member of a cluster other than the first member, the enhanced security environment will be inherited from the existing members in the cluster when the TruCluster software is installed.
If you are enabling enhanced security on systems already running in a cluster environment, you must setup enhanced security from a single member, then reboot each member in the cluster.
Both base and enhanced security are supported in a cluster.
Base security,
which uses the standard UNIX
/etc/passwd
and
/etc/group
files, is the default configuration.
Enhanced security
is configured by using the Security Configuration icon on the Custom Setup
menu of the
secconfig
utility.
A.7.3 Access Control Lists
The Security Configuration icon on the Custom Setup menu of the
/usr/sbin/sysman secconfig
utility contains a checkbox that enables
or disables access control list support on all cluster members, under either
base or enhanced security.
ACL support determines the state (enabled or disabled)
of access checking and ACL inheritance.
Note that ACLs can be created, modified,
deleted and examined regardless of the state of ACL support.
The NFS file systems require the
proplistd
daemon
to support ACLs.
A.7.4 Distributed Logins and NIS
A cluster provides a common authentication environment to enable secure, distributed, highly available logins. The cluster can additionally function as a NIS master, slave, or client. (Note that all cluster members must play the same role in a NIS environment.)
As a NIS master, the cluster supports the NIS distribution of both standard
user profiles from
/etc/passwd
and the enhanced user
profiles available with enhanced security maintained in the protected password
database.
These enhanced user profiles can be distributed by NIS as the
prpasswd
map, in the same manner that
/etc/passwd
is distributed as the
passwd
map.
Follow these steps to set up a cluster running enhanced security as a NIS master:
Load
/var/yp/src, including
passwd
with specified accounts.
See
Network Administration: Services
for more
information.
Set up the
prpasswd
map with one line
per entry using
convuser -Mc.
See
convuser(8)
Set up NIS as described in
Network Administration: Services.
When running
nissetup, select the
-S
security option of
ypbind
to bind the member to an authorized list of NIS servers and
specify the cluster alias as one of these servers.
Modify the map maintenance scripts to support
prpasswd
maps as discussed in the Tru64 UNIX
Network Administration: Services
guide.
Notes
In domains where one or more nodes are running enhanced security and that mix Tru64 UNIX Version 5.1B and higher and UNIX Version 4.x systems, a Tru64 UNIX Version 5.1B or higher system must be the NIS master. If none of the nodes are running enhanced security, a Version 4.x system can be the NIS master.
The
dxaccountsutility does not allow you to add a NIS account and change the user's security options at the same time. You must first create the account and then change the user's security options.The
useraddcommand fails unless the user's primary group is defined in the/var/yp/src/groupmap.
Enabling enhanced security introduces
a new daemon,
prpasswdd.
Two instances of the daemon, a
parent and a child, execute on each cluster member.
The parent is primarily
responsible for starting or restarting the child.
The child is responsible
for writing changes to the authentication database.
To eliminate lock contention
in a cluster, only the daemon on the cluster member serving the
/var
mount point actually performs writes for all clients.
The
other
prpasswdd
daemons are in hot standby mode.
If the
cluster member serving the mount point and containing the active daemon fails,
another member assumes both roles.
On a cluster acting as a NIS master with enhanced security, the
rpc.yppasswdd
daemon acts in the same fashion as the
prpasswdd
for the NIS
prpasswd
map.
A.8 Securing Devices
Workstations present security problems because they are typically found in ordinary offices, rather than the more easily protected environment of the computer room.
It is possible for someone who gains access to a workstation, to get superuser status on that system, and consequently on other systems. One method is to boot the system into single user mode.
If your office has a locking door, lock the door when you are away from your system.
You must also protect your removable media, such as tape cartridges and floppy disks by locking up all floppy disks and tape cartridges when they are not in use.
Some workstations allow a console password to be set.
When a console
password is in use, only a default boot can be done without a password.
Check
your hardware and firmware documentation for more information about console
passwords.
A.8.1 Device Security Characteristics
Defining and setting security characteristics include the following considerations:
Creating and maintaining device-specific information. You can override system defaults for an individual device, where appropriate, to grant additional rights or to impose additional restrictions. You can also lock a terminal to prevent use.
Setting default control parameters for the devices that are included in the system's secure configuration. The system defaults for terminals are as follows:
Maximum number of unsuccessful login attempts is 10.
Login timeout as shipped is unset, which implicitly defaults to 0 which is treated as infinite.
Delay between unsuccessful login attempts is 2 seconds.
Before you create or modify a secure device, all of the device installation
procedures required
during ordinary system hardware and software installation
must be completed.
The special files for devices must exist in the
/dev
directory and have the appropriate permissions.
The special
files for terminals must be owned by
root, have the group
set to
tty, and have the mode set to
0620.
You can verify that the installation has been completed with the
ls
command.
The following example is typical:
# ls -lg /dev/tty*

crw----------  1  root  tty  0, 2 Aug 15 09:29 /dev/tty00

crw----------  1  root  tty  0, 3 Aug 15 09:29 /dev/tty01
You define the security characteristics of all the devices that are
part of the system by using the
dxdevices
program.
The
dxdevices
program provides control over the device assignment database
and the terminal control database.
You can use the
dxdevices
program to assign security attributes to terminals and X displays.
A.8.1.1 Modifying, Adding, and Removing Devices with the dxdevices Program
Using the Devices dialog box, select the Modify/Create dialog box then
the Select devices dialog box.
To add or remove a device, first select or
enter the device, then click on File to make the required changes.
To modify
a device, first select the device, then click on Modify to make the required
changes.
See the online help for
dxdevices
for more information.
A.8.1.2 Setting Default Values with the dxdevices Program
Using the Devices dialog box, select the Defaults dialog box.
Set the
system defaults for all of your terminals as required.
A terminal uses these
defaults unless specifically overridden by settings in the Modify Terminal
dialog box.
See the online help for
dxdevices
for more
information.
A.8.2 Updating Security Databases
When you assign device defaults or device-specific parameters, the system updates the following security databases:
The system defaults database,
/etc/auth/system/default, contains the default values (for example,
default
control parameters) for all system devices.
The device assignment database,
/etc/auth/system/devassign, contains device-specific values for system devices.
The terminal control database,
/etc/auth/system/ttys.db, contains device-specific values for authentication (for example,
the number of failed login attempts).
Each device in your secure configuration must have an entry in the device
assignment database.
This database centralizes information about the security
characteristics of all system devices.
It includes the device pathname and
type.
By default a wildcard entry exists for terminals (but not X displays)
in the
/etc/auth/system/ttys.db
and
/etc/auth/system/devassign
databases.
The X display entries shipped on the system
have
:t_login_timeout#0:
entries in them, in case a site
changes its system default login timeout.
If wildcard X display entries are
needed, they can be created as follows:
# echo \
 \'*\:*:t_devname=*\:*:t_login_timeout#0:t_xdisplay:chkent:\' \
                                       | /tcb/bin/edauth -s -dt

# echo \'*\:*:v_type=xdisplay:chkent:\' | /tcb/bin/edauth -s -dv
A.9 Enhanced Security Troubleshooting
This section describes problems that can occur on your system and gives guidance on how to avoid or correct from them. It provides you with insight on what is involved in the system startup, so you can examine critical files and programs required for correct system operation. Once the system is in single-user mode, there is no substitute for careful backup procedures. This is the only precaution that will avert serious data loss in your system.
The problems discussed in the following sections will prevent the system
from booting.
A.9.1 Lock Files
The system security databases are critical to correct system operation. These databases use a lock file to synchronize rewrites to security-relevant databases. Before a process rewrites a database entry, it automatically creates the lock file. If the lock file already exists, the program assumes that another process is currently using the database and waits for the lock file to be removed. If the lock file persists and is not modified within a reasonable time period (currently 50 seconds), the program waiting for the lock file removes it and creates a new one, assuming that there has been a system crash or software error.
The system names lock files by appending a
:t
extension
to the normal file name.
The system's startup scripts include lines that remove all lock files at system startup. The following files have associated lock files that can prevent correct operation of the system:
/dev/console
/etc/auth/system/default
/etc/auth/system/devassign
A.9.2 Required Files and File Contents
The following files are required to run the system:
/tcb/files/auth.db
/etc/auth/system/ttys.db
/etc/auth/system/default
/etc/auth/system/devassign
/etc/passwd
/etc/group
/sbin/rc[023]s
/dev/console
/dev/tty*
/dev/pts/*
/sbin/sulogin
/sbin/sh
/vmunix
A.9.2.1 The /tcb/files/auth.db Database
When the system begins operation, it consults the security databases for various parameters. If any of the databases are corrupt, the system will not boot successfully. If possible, the startup programs report that there is a problem in the databases and start a single-user shell at the system console to allow you to repair the system. In some cases, however, the system will not boot and you must repair the system from standalone procedures described in the manual System Administration.
The enhanced (protected) password database entry for root is held in
the
/tcb/files/auth.db
database.
If the entry for root
is inconsistent, the system
enters single-user mode, but assumes default
characteristics for all security parameters of the shell it starts.
When the system is in single-user mode, you can create an enhanced (protected) password database entry for root by entering the following command:
# edauth root
The following example shows a typical enhanced (protected) password database entry for root:
root:u_name=root:u_id#0:\
    :u_pwd=encrypted_password:\

    :u_minchg#0:u_pickpw:u_nullpw:u_restrict@:\
    :u_maxtries#100:u_lock@:chkent:
For a complete explanation
of all the fields, see
prpasswd(4)
Must contain root.
Must also be root.
Must have a value of 0.
The encrypted version of the password. At authentication, the system checks the entered password against the encrypted version of the password. You can leave this field blank if you are creating the database entry.
As with all databases, the entry must end with the single word chkent.
The other fields in this entry are informational or are used to guard
against unwanted account locking.
The system overrides all conditions that
can cause the root account to lock when changing to single-user mode.
A.9.2.2 The /etc/auth/system/ttys.db File
The terminal control database must have a valid entry for the system
console.
The entry for the system console must begin with the word
console
followed by
a colon.
It must end with the single word
chkent.
The
only required field is
t_devname, which must be set to
a value of
console.
For example:
console:t_devname=console:chkent:
A.9.2.3 The /etc/auth/system/default File
The
system default database must have an initial field
default
and must end with
chkent.
There must not be a
:t
lock file associated with this database.
The following example is typical:
default:\
        :d_name=default:\
        :d_boot_authenticate@:\
        :d_audit_enable@:\
        :d_pw_expire_warning#3456000:\
        :u_pwd=*:\
        :u_minchg#0:u_maxlen#20:u_exp#15724800:u_life#31449600:\
        :u_pickpw:u_genpwd:u_restrict@:u_nullpw@:\
        :u_genchars:u_genletters:u_maxtries#5:u_lock@:\
        :t_logdelay#1:t_maxtries#5:t_lock@:t_login_timeout#60:\
        :chkent:
A.9.2.4 The /etc/auth/system/devassign File
If
the entry for the console is inconsistent, no application can be started.
The field must start with the word
console
and end with
the word
chkent.
The
v_type
field must be set to
terminal.
The following example is typical:
console:v_devs=/dev/console:v_type=terminal:\
       :chkent:
The
/etc/passwd
file is the password database.
This file must be present and its format must
be correct.
No encrypted passwords are updated in this file.
A.9.2.6 The /etc/group File
The
/etc/group
file is the group database.
This file must be present and its format
must be correct.
A.9.2.7 The /sbin/rc[023] Files
The
/sbin/rc[023]
files are used by
init
to change
between run levels.
Save copies of these files after installation.
A.9.2.8 The /dev/console File
The
/dev/console
file designates
the character device associated with the system console.
This file must be
present for the system to boot.
A.9.2.9 The /dev/pts/* and /dev/tty* Files
The
/dev/pts/*
and
/dev/tty*
files are pseudoterminal devices used for
interprocess communication.
A.9.2.10 The /sbin/sulogin File
The
/sbin/sulogin
executable file allows restricting
access in single-user mode to those users with the root password.
A.9.2.11 The /sbin/sh File
The
/sbin/sh
executable file must be present for
the system to start a shell to transition to single-user mode.
A.9.2.12 The /vmunix File
The
/vmunix
file is the executable image of the operating
system.
The boot loading software loads the
operating system into memory and transfers control
to it at boot time.
A.9.3 Problems Logging In or Changing Passwords
If users experience problems
logging in to the system or changing their passwords, examine the file attributes
for the files in the security subset using the
fverify
command.
For example, to verify the file attributes for the files in the OSFC2SEC510
subset, enter the following commands:
# cd /
# /usr/lbin/fverify < /usr/.smdb./OSFC2SEC510.inv
The file attributes of the local user profile files
are examined using the
ls -l
and
authck -pf
commands.
If a user complains of login troubles involving the inability to update the protected profile or to obtain a lock and you are running centralized account management, see Section A.6.
The utilities such as
dxaccounts
and
usermod
share a lock file called
/etc/.AM_is_running.
If the file is present, the utilities warn you.