This chapter discusses the issues involved when upgrading to TruCluster Server Version 5.1B from TruCluster Production Server Software or TruCluster Available Server Software Version 1.5 or Version 1.6. (Although the primary focus in this chapter is upgrading Production Server and Available Server clusters, Section 8.9 provides information on upgrading a cluster running Memory Channel Software.)
Note
For simplicity, this chapter uses the term ASE to refer to a Version 1.5 or 1.6 TruCluster Production Server Software cluster or TruCluster Available Server Software, and the term cluster to refer to the new TruCluster Server Version 5.1B cluster.
This chapter discusses three upgrade paths for upgrading from TruCluster Production Server Software or TruCluster Available Server Software Version 1.5 or Version 1.6:
Option 1: Create a separate cluster with new systems and new storage hardware. When the new cluster is fully configured and tested, migrate data from the ASE to the new cluster.
Option 2: Create a separate cluster with new systems and enough new storage to create the cluster and test applications. When the new cluster is fully configured and tested, physically move the old storage from the ASE to the new cluster.
Option 3: Upgrade the existing ASE using its hardware and storage. Remove and disconnect one member from the ASE, install and configure Tru64 UNIX Version 5.1B on that system, shut down the remaining systems in the ASE, connect the ASE's storage to the Tru64 UNIX Version 5.1B system, configure the storage, create a single-member cluster, and then add the other systems to the new cluster.
Note
For TruCluster Production Server Software or TruCluster Available Server Software products earlier than Version 1.5, you must perform a full installation of Tru64 UNIX Version 5.1B and TruCluster Server Version 5.1B.
See Table 1-1 for the list of supported upgrade paths for TruCluster products.
You can also choose to design your own customized procedure based on your current configuration and your goals. Section 8.8 describes a case study that uses a modified version of the Option 3 procedure. You can find another case study at the following URL, which contains a link to the description of an upgrade of an in-house production-level cluster from TruCluster Production Server Version 1.6 to TruCluster Server Version 5.0A plus a patch kit:
http://www.tru64unix.compaq.com/docs/highavail/index.htm
This chapter provides the following information:
How to decide whether to create a separate cluster or to upgrade an existing cluster (Section 8.1)
A list of storage and cluster interconnect restrictions (Section 8.2)
How to prepare for an upgrade (Section 8.3)
A description of the upgrade scripts used with Option 2 and Option 3 (Section 8.4)
Option 1: Creation of a separate cluster — Use new systems and new storage (migrate data only) (Section 8.5)
Option 2: Creation of a separate cluster — Use new systems and migrate existing storage (move physical storage) (Section 8.6)
Option 3: Upgrade of an existing ASE — Use its systems and storage (Section 8.7)
An upgrade case study, which uses a modified version of the Option 3 procedure (Section 8.8)
An approach to upgrading a cluster running the TruCluster Server Memory Channel Software product (Section 8.9)
To prepare for an upgrade, read
Chapter 1
through
Chapter 5.
8.1 Determine Whether to Create a Separate Cluster or Upgrade an Existing Cluster
Of the many possible ways to approach an upgrade, this chapter focuses on three distinct methods for upgrading an ASE to a cluster:
Option 1: Create a separate cluster with all new system hardware and storage. This cluster can be a minimal two-node configuration designed solely for testing up to a full-scale, production-level cluster.
This approach (new systems, new storage) lets you create a new cluster without any of the limitations of the current hardware configuration, or any restrictions imposed by the Tru64 UNIX Version 4.x operating systems or the Version 1.5 or 1.6 TruCluster Software products. For example, you can build a new no-single-point-of-failure (NSPOF) cluster using HSG80 controllers and Fibre Channel.
You then run the old ASE side-by-side with the new Version 5.1B cluster. This configuration lets you extensively test applications on the new cluster while still serving clients from the existing ASE. When you are satisfied with the new cluster, migrate application data (not storage hardware) from the old ASE to the new cluster.
Using a separate, but parallel, cluster with new systems and new storage has the lowest risk because no hardware is shared and no storage is moved from the ASE to the new cluster. Because the new cluster has no legacy hardware, it can take advantage of all TruCluster Server Version 5.1B features; for example, configuring hardware multipathing for redundancy.
Section 8.5 discusses creating a separate cluster.
Option 2: Create a separate cluster with some new storage, but move existing storage from the ASE to the new cluster.
This approach (new systems, old storage) provides a degree of separation in that you configure new systems and perform application testing without affecting the ASE. However, any limitations in the current ASE storage configuration will become part of the new cluster. These limitations might prevent the cluster from taking advantage of new features; for example, the older storage might not support multipathing.
Section 8.6 describes how to move storage from an existing ASE to a new cluster, and configure the storage on the new cluster. The section includes a procedure that uses scripts to help migrate and configure storage.
Note
One trade-off to consider is data migration: For your site, determine the advantages and disadvantages of copying data (Option 1) versus physically moving storage (Option 2). For example, if an ASE has so much shared storage that the amount of time it would take to back up and restore data to the new cluster is unacceptable, you might decide that physically moving storage is the better solution for your environment.
With Option 1, both the ASE and the cluster can have fully replicated sets of application data, which allows for extensive tuning and testing of the application environment on the new cluster before switching client services from the ASE to the cluster.
With Option 2, the first time the new cluster has access to all the application data from the ASE is when you physically connect the ASE's storage to the cluster. At some point you must shut down the ASE and connect the physical storage to the new cluster.
Option 3: Use the existing ASE hardware as the basis for the new cluster, adding Memory Channel hardware (if desired) and storage, and migrating storage and systems as needed.
This approach (old systems, old hardware) has the lowest monetary cost. However, it has, by definition, more risk than running a fully separate cluster. You must remove a member from the working ASE, which reduces the number of systems available to serve clients. Because application testing takes place on a single-member cluster rather than on a multi-member cluster, you will not have the opportunity to do application failover testing.
Section 8.7 discusses this approach. This section also includes a procedure that uses scripts to help migrate and configure the storage known to ASE services.
If you do not know which approach to take, we recommend that you read the entire chapter before making a decision. Use the information in this chapter as a starting point for designing an approach and a procedure that fit your needs. Section 8.8 and the following URL each describe a upgrade case study.
http://www.tru64unix.compaq.com/docs/highavail/index.htm
Reading these case studies might help you decide which upgrade approach to take.
8.2 Storage and Cluster Interconnect Restrictions
This section lists general restrictions that you must observe during an upgrade from an ASE to a TruCluster Server cluster. The restrictions are more applicable when upgrading existing hardware, but during any upgrade, the ASE and the new cluster must never both be active on the same storage bus or on the same cluster interconnect.
Do not have running systems from the ASE and the new cluster on the same storage bus.
Storage is accessed either by the ASE or by the new cluster, not by both. If systems from both the ASE and the new cluster can access the same storage devices, there is a likelihood of data corruption. When migrating storage, either physically disconnect ASE systems from shared storage or make sure the systems are halted and turned off.
Do not have running systems from the ASE and the new cluster on the same cluster interconnect.
The cluster interconnect hardware is actively connected to the ASE or the new cluster, never to both. If both the ASE and the new cluster are connected to the same cluster interconnect, booting the wrong system can cause a variety of problems (for example, machine checks). When migrating systems, either physically disconnect the existing ASE systems from the cluster interconnect or make sure the systems are halted and turned off.
Do not modify the storage topology from the time you halt the ASE system that will become the first member of the new cluster until you map all existing devices to their new-style device names on the new cluster.
Changing the storage topology after you start the upgrade but before you map devices to the new-style device names introduces devices that are known only to the Tru64 UNIX Version 5.1B system. This makes it more difficult to ensure that the device mappings are correct. This restriction applies mainly to an upgrade that uses existing hardware. However, if you plan to physically connect existing storage to a separate cluster, the same restriction applies.
The following sections describe how to prepare for an upgrade:
General requirements (Section 8.3.1)
Hardware and storage topology requirements (Section 8.3.2)
File-system requirements (Section 8.3.3)
Most of the preparation involves understanding the differences between the existing ASE and the new features and architecture in TruCluster Version 5.1B. When you understand the differences, you can design an upgrade approach that fits your site-specific needs.
Read the Tru64 UNIX Technical Overview and System Administration manuals for information on the new AdvFS format, extended SCSI support, and new device naming conventions.
Read the TruCluster Server Cluster Hardware Configuration and Cluster Technical Overview manuals to gain a solid understanding of the recommended TruCluster Server Version 5.1B configurations, and to learn about the critical ways in which a TruCluster Server Version 5.1B cluster configuration differs from previous TruCluster configurations, both operationally and with respect to no-single-point-of-failure (NSPOF).
Read the
Cluster Highly Available Applications
manual, which explains
how to run highly available applications in a Version 5.1B
cluster.
TruCluster Server does not use the ASE paradigm to provide
highly available services: there is no
asemgr
command, and there is no
asecdb
database.
Instead,
TruCluster Server uses the cluster file system (CFS), cluster
application availability (CAA), and cluster alias features to provide
highly available applications.
Note
If you use third-party applications from Oracle, Informix, or any other vendor, consult with that application's vendor.
If you plan to use hardware RAID to mirror file systems in the new cluster, the upgrade is a good time to add RAID hardware and take advantage of multipathing.
Make an extremely detailed plan.
Draw diagrams.
Use the
cluster_map_create -full
command to create a configuration
map of the current environment.
Use the cluster monitor
(cmon) to display and print the map.
If you plan to migrate storage, label all cables and storage. Acquire any needed hardware. Make copies of site-specific files. Decide when and what to back up. Read the sections for all the upgrade options and look at the procedures. Then create a detailed procedure that fits your site and your method of upgrade. Even if you plan to create a separate cluster, reading the procedures will give you an idea of what is involved when migrating storage.
The following URL takes you to the administrator's text log from an Option 3 upgrade of a two-member, in-house cluster:
http://www.tru64unix.compaq.com/docs/highavail/migration/migration_log.htm
The cluster was upgraded from TruCluster Software Production Server Version 1.6 to TruCluster Server Version 5.0A plus a patch kit. Although this is not an upgrade to Version 5.1B, it uses the same planning approach and basic procedural steps.
Use the checklists in Appendix A to keep a record of the host names, disks, and IP addresses for the new cluster.
8.3.2 Hardware and Storage Topology Requirements
The following list contains the most common hardware requirements that can affect an upgrade from an existing ASE. These requirements apply to the Option 2 and Option 3 upgrade paths, which use some or all of the current ASE hardware in the new cluster. The Cluster Hardware Configuration manual is the definitive source for TruCluster Server Version 5.1B hardware configurations.
(Option 2) When configuring the new cluster, remember that each system will need an open SCSI adapter in order to connect the storage from the ASE to the new cluster. (An alternative is to move the ASE adapters with the storage.)
(Option 2 and Option 3) When the upgrade path involves migrating
physical storage, the ASE must have a symmetrical shared storage
configuration.
(Each shared device used by an ASE service is known to
all ASE members by the same special file name; for example, on all
members,
rz17c
refers to the same physical device.)
In addition, a Production Server environment must contain only one ASE.
The reason for these requirements is that the automated scripts described in Section 8.4 depend on the current ASE environment having unique AdvFS domain names, LSM volumes, and device special file names for all shared storage used by ASE services. These scripts automate the migration of the storage currently in use by ASE services to the new cluster. (A site with an ASE that does not meet these restrictions can use the manual device name mapping and storage configuration steps in Appendix F.)
If you have not created a configuration map of the current ASE, or if
that map is outdated, perform the preparatory steps listed in
cluster_map_create(8)/etc/CCM
file:
# cluster_map_create cluster_name -full
Use the cluster monitor (cmon) to display the
cluster configuration map.
Use this information to decide whether you
can use the migration scripts to map storage during an upgrade.
(See
either the TruCluster Software Products Version 1.5 or Version
1.6
Administration
manual for more information
on the
cluster_map_create
and
cmon
commands.)
(Option 3) The ASE systems must be systems that are supported by TruCluster Server Version 5.1B. See the TruCluster Server Version 5.1B QuickSpecs for supported-hardware information.
(Option 3) If the new cluster will require additional storage hardware, we recommend that you add this hardware to the ASE before beginning the upgrade. The new cluster should have shared storage for clusterwide file systems, member boot disks, and, optionally, a quorum disk. We recommend an HSZ or HSG type of storage device on this shared bus so you have the option of mirroring the quorum disk and member boot partitions. (See the note about mirroring clusterwide file systems in Section 2.5 for more information.)
Note
Although a quorum disk is somewhat analogous to an ASE tie-breaker disk, there are important differences. An ASE tie-breaker disk must participate in an ASE service. A quorum disk should not contain any valuable data.
We also recommend that you have a spare disk on the private bus of the system on which you will install Tru64 UNIX Version 5.1B. If possible, you want to avoid installing the Version 5.1B Tru64 UNIX operating system on the disk that contains the operating system used by the ASE. If you decide to revert to the ASE, booting the ASE operating system disk is easier than reinstalling the older operating system and re-creating the ASE environment for this system.
Notes
TruCluster Server supports SCSI IDs 0-15. If you do not have SCSI IDs available before starting the upgrade, you can add additional storage after you boot the Tru64 UNIX operating system and map existing device names to new device names. You must have all storage attached and visible to the Tru64 UNIX system before creating a cluster.
Tru64 UNIX Version 5.1B and TruCluster Server Version 5.1B member boot disks do not have to reside at LUN 0.
(Option 3) If you plan to use LSM in the new cluster, see
Section 2.5.2.
You will need at
least one available partition on a shared drive for the
rootdg
disk group (for redundancy, you should have
more than one).
You can use the
a
partition of
the device that you plan to use for the clusterwide root
(/) file system, which is usually put in the
b
partition for size reasons.
If you plan to use hardware RAID to mirror the cluster's file systems, the upgrade is a good time to add RAID hardware and take advantage of multipathing. See the Cluster Hardware Configuration manual for information on configuring storage in a TruCluster Server Version 5.1B cluster.
8.3.3 File-System Requirements
TruCluster Server Version 5.1B clusters use AdvFS file systems. UFS is supported read-only clusterwide. A cluster member can mount a UFS file system read/write. However, that file system is accessible only by that member.
Note
To make it easier to migrate file systems when performing an upgrade, TruCluster Server Version 5.1B includes read/write support for UFS file systems. When you mount a UFS file system in a Version 5.1B cluster for read/write access, the
mountcommand-o server_onlyargument is used by default. These file systems are treated as partitioned file systems, which means that the file system is accessible only by the member that mounts it. Other cluster members cannot read from, or write to, the file system. There is no remote access; there is no failover. If you want to mount a UFS file system for read-only access by all cluster members, you must explicitly mount it read-only.You can mount an AdvFS file system as a partitioned file system by explicitly using the
-o server_onlyargument when mounting the file system.File system partitioning is described in the Cluster Administration manual and
. mount(8)
If the current ASE services use any UFS file systems for data that you want to access read/write on the new cluster, we recommend that you migrate those file systems to AdvFS before beginning the upgrade. (If it is acceptable that only one member of the new cluster have read/write access to a UFS file system, you can use file system partitioning.) If you decide to migrate the data, how you perform the data migration depends on whether you have enough storage in your current configuration to create AdvFS domains on new storage, or whether you have to do backups and restores to reuse current storage. You may decide to use the TruCluster Server local support for UFS read/write as part of your migration strategy.
Note
If your upgrade path is Option 1 (new systems, new storage), you do not have to convert or modify the file systems used by the ASE. However, the file-system data migration strategy you use should deliver AdvFS file systems to the new cluster in order to provide file systems that all members can both read and write.
Version 5.0 and later operating systems create AdvFS domains with an disk structure known as domain version number 4 (DVN4). DVN4 provides support for quota values larger than 2 terabytes (TBs) and increases performance for directories containing thousands of files. Domains created prior to Version 5.0 use DVN3; these domains are recognized by later versions but are not automatically upgraded to the new disk structure.
When the upgrade to TruCluster Server is complete, you can convert AdvFS
DVN3 domains to DVN4.
Whether you convert, and when you convert, are up to
you.
Tru64 UNIX Version 5.1B recognizes both DVN3 and DVN4 formats.
(You
can use the
mkfdmn
-V3
option to create old-style AdvFS domains on the new
cluster.)
If you plan to reuse current storage, converting from UFS to AdvFS on the existing ASE means you can do the file system conversion at your convenience, but the file system format is DVN3. If you do not convert from UFS to AdvFS on the current ASE, you can do the conversion as part of the upgrade, which increases your down time. You may also have a difficult time reverting to the ASE if you encounter problems during the upgrade.
It takes time to run the
vdump/vrestore
utilities on file systems when converting formats.
If you want to take
advantage of the new AdvFS format on the new cluster, you have these UFS
conversion choices:
Convert UFS file systems to AdvFS DVN3 domains before migrating, and then convert again to AdvFS DVN4 after migrating. You perform two conversions, but the data is available as read/write as soon as it is migrated to the cluster. (You can also convert from UFS to AdvFS on the ASE, but continue to use the AdvFS DVN3 format on the new cluster, converting domains to DVN4 when you need to take advantage of the DVN4 features.)
Convert to AdvFS after migrating. You perform only one conversion, but the data is available read-only for clusterwide use or read/write for local use only until you perform the conversion. (You can use the UFS read/write local-use-only feature to control when you migrate some UFS file systems to AdvFS domains on the new cluster.)
8.4 Upgrade Scripts Used with Option 2 and Option 3
The following list describes the scripts in the
TCRMIGRATE540
subset that are used in the
Option 2 and Option 3 upgrade procedures.
The scripts and associated
utility programs are available from the TruCluster Server Version 5.1B
directory on the Tru64 UNIX Associated Products Volume 2 CD-ROM, in
the
TCRMIGRATE540
subset.
Use the
setld
command to load the subset on each member of
the ASE.
The utilities and associated libraries are installed in the
/usr/opt/TruCluster/tools/migrate
directory.
The scripts are KornShell (ksh) scripts.
If you
know shell programming and want to know exactly what the scripts do,
you can perform a code inspection of the scripts before running them.
(As an alternative to running the storage migration scripts,
Appendix F
provides manual steps for mapping
device names and configuring storage.)
clu_migrate_check(Option 3) Performs general hardware, firmware, and file-system type checks.
Before beginning an Option 3 upgrade, run
clu_migrate_check
on each member of the
current ASE.
clu_migrate_save(Option 2 and Option 3) Creates a directory and saves information about the current system, ASE configuration, and the shared storage used by ASE services.
After creating a new cluster and while all shared storage is still
connected to the ASE, run
clu_migrate_save
on each member of the ASE that
has an online ASE service.
The
clu_migrate_save
script gathers the
information needed to migrate the storage currently used by ASE
services to the new cluster.
(This includes the migration of any AdvFS
domains or LSM volumes associated with this storage.)
The only change the script makes to the
current configuration is to write each shared disk's
rz*
special file name to the
label:
field of that disk's label.
However,
the script saves the original disk label, which you can
restore when running
clu_migrate_configure.
Putting the
rz*
name in the
label:
field
makes it possible for
clu_migrate_configure
to map each disk device to its
new-style
dsk*
device name.
The
clu_migrate_save
script gives you the option of automatically copying
data to the new cluster (Option 2) or the Tru64 UNIX Version 5.1B system (Option 3).
The script stores information in the
/var/TruCluster_migration
directory, giving each
member its own directory on the target system.
It uses the value of
each member's
/etc/rc.config
CLUSTER_NET
variable to create the following naming
convention:
/var/TruCluster_migration/CLUSTER_NET
The
clu_migrate_configure
script then uses the information in these
directories to map physical storage device names, and to configure storage
on the new cluster or Tru64 UNIX system.
clu_migrate_configure(Option 2 and Option 3) Configures storage on the new TruCluster Server Version 5.1B cluster (Option 2) or on the Tru64 UNIX Version 5.1B system (Option 3).
After the ASE systems are turned off and the shared storage is connected to
the new cluster, run
clu_migrate_configure
to automatically configure the
storage previously managed by the ASE.
The
clu_migrate_configure
script
merges the information gathered from the
clu_migrate_save
output on the
ASE members.
It then configures storage — mapping the old-style device
names written to each disk's
label:
field to the
new-style
dsk
device names, importing LSM volumes,
re-creating AdvFS domains, testing mount points, and adding entries to
/etc/fstab
and
/etc/exports.
When the storage configuration is
complete, the script restores any saved
label:
field values that were overwritten by
clu_migrate_save.
Although the
clu_migrate_configure
script will provide device-name
mapping for all shared disk devices, it does not configure storage
that was not managed by the ASE.
It does not migrate
entries in an ASE member's
/etc/fstab
file for
shared storage if that storage was not managed by the ASE.
The script does not convert existing AdvFS file systems to the new AdvFS format. To use the new AdvFS format, convert AdvFS file systems after completing the upgrade.
When running the
clu_migrate_configure
script, you
may see a message prompting you to run
vollogcnvt.
This indicates that volumes that use Block Change Logging (BCL) were
found and must be converted to Dirty Region Logging (DRL).
The
vollogcnvt
utility will perform that conversion.
For more information, see
vollogcnvt(8)
clu_migrate_recover(Option 2 and Option 3) Frees device reservations and restores the LSM configuration on an ASE member. During a successful upgrade, you do not run this script.
The
clu_migrate_recover
script is run on the ASE systems to revert back
to an ASE as part of the recovery procedure in
Section 8.7.2.
Run this script only if an upgrade fails
to complete successfully.
Note
If you converted AdvFS file systems to the new AdvFS format during the upgrade, the
clu_migrate_recoverscript does not them convert back to the old format. You must do this manually.
8.5 Option 1: Create a Separate Cluster — New Systems and New Storage
A separate cluster lets you test applications and system configurations without any interaction with your current production environment.
Whether you can set up a separate cluster depends on your current hardware configuration, and your ability to obtain new hardware. If you can afford new hardware and have the space to configure a separate cluster, this is the preferred approach.
The following procedure outlines the general steps for this approach:
Use the information in the Cluster Hardware Configuration manual to design the hardware configuration for the new cluster. Some things to consider are:
Creating a no-single-point-of-failure (NSPOF) cluster. (The Cluster Hardware Configuration manual provides a section listing the basic hardware requirements for an NSPOF cluster.)
Using fast RAID controllers and multipathing to perform hardware mirroring of the quorum disk or member boot partitions. (TruCluster Server does not support LSM mirroring of these file systems.)
Providing room for growth. For example, order systems that, when configured, still have open peripheral component interconnect (PCI) slots, creating an expandable network and storage topology.
When the hardware is on site, physically connected, and with all firmware and console configuration completed, use the information in this manual to create a TruCluster Server cluster.
Note
When selecting IP addresses for the new cluster, do not use those currently in use by the ASE. (Remember that when the new cluster is in operation, clients must direct all NFS mount requests to the default cluster alias or to an alias whose name is in
/etc/exports.aliases.)
Become familiar with the capabilities of the new cluster.
Using the information in the Cluster Administration manual, configure and administer the cluster. For example, create and test data backup and restore procedures, monitor hardware, and tune and balance the cluster.
Using the information in the Cluster Highly Available Applications manual, create and test highly available applications. For each critical application you will deploy, determine which approach best fits that application. After you configure applications and failover policies, force failovers and verify that the results are what you expected. Modify and tune until you are satisfied.
Data migration: Because the new cluster is completely separate from the current ASE, the major task is migrating application data from the ASE to the new cluster.
Note
We recommend that, before beginning data migration, you back up both the ASE and the new cluster.
You are responsible for deciding how and when to migrate the data used by the ASE to the new cluster. This section does not supply a recommended procedure or set of tools. The following list discusses some of the important points to consider when defining a strategy for your data migration:
Whether you use standard
vdump/vrestore
utilities or
application-specific data migration tools depends on your current
environment, the application, and the amount of data.
In addition, if
some or all of an application's data is stored in UFS format, restore
it to the AdvFS format on the new cluster.
(See
Section 8.3.3
for information on converting from UFS
to AdvFS.)
Database vendors often provide applications that can update remote copies of databases. If you have a database application with remote update capabilities, you can use that feature to migrate data from the ASE to the cluster. When the update is complete (and tested on the new cluster), move the live IP addresses for the database services to the new cluster.
If the current ASE is serving multiple applications, you must decide whether to migrate all application data at the same time, or to migrate one application at a time, serving clients from both the ASE and the new cluster. If you decide to migrate applications one at a time, determine the order in which you will migrate them.
If both the ASE and the cluster will be serving clients during part of the migration, devise a procedure to perform backups and recovery during the transition period.
8.6 Option 2: Create a Separate Cluster — New Systems and Existing Storage
This approach is similar to Option 1, with the exception that at some point you plan to physically move the existing ASE storage devices to the new cluster. This section provides the following information:
Upgrade procedure (Section 8.6.1)
Procedure for reverting a partial upgrade (Section 8.6.2)
8.6.1 Option 2: Upgrade Procedure
The following procedure outlines the general steps for Option 2:
Use the information in the Cluster Hardware Configuration manual to design the hardware configuration for the new cluster. Some things to consider are:
Creating a no-single-point-of-failure (NSPOF) cluster. (The Cluster Hardware Configuration manual provides a section listing the basic hardware requirements for an NSPOF cluster.) Because you are using the storage hardware from the ASE, any NSPOF limitations in that configuration will affect the new cluster. For example, some disks might not support multipathing.
The new cluster must have the shared storage required to create a cluster and add members. In addition, provide some additional shared storage for application testing before the ASE storage is physically moved to the new cluster.
Because the new cluster will use the storage hardware from the current ASE for application data, make sure that the new cluster systems have storage adapters that are compatible with the ASE's storage topology. If you plan to move the adapters from the ASE systems to the new systems, make sure that the adapters are supported on the new systems.
Using fast RAID controllers and multipathing to perform hardware mirroring of the quorum disk or member boot partitions. (TruCluster Server does not support LSM mirroring of these file systems.)
Providing room for growth. For example, order systems that, when configured, still have open slots, creating an expandable network and storage topology.
When the new hardware is on site, and physically connected, with all firmware and console configuration complete, use the information in this manual to create a TruCluster Server Version 5.1B cluster.
Note
When selecting IP addresses for the new cluster, do not use those currently in use by the ASE.
Become familiar with the capabilities of the TruCluster Server cluster.
Using the information in the Cluster Administration manual, configure and administer the cluster. For example, create and test data backup and restore procedures, monitor hardware, and tune and balance the cluster.
Using the information in the Cluster Highly Available Applications manual, create and test highly available applications. For example, use CAA and cluster alias until you understand the differences between the two subsystems. After you configure applications and failover policies, force failovers and verify that the results are what you expected. Modify and tune until you are satisfied.
Up to this point, the ASE and TruCluster Server cluster are entirely separate: what you do on one does not affect the other. Starting with the next step, you are preparing to move storage from the ASE to the new cluster. Before continuing, do the following:
Read the description of the utility scripts in Section 8.4. Read the Option 3 procedure in Section 8.7.1. You will use the scripts and parts of the procedure when moving the storage from the ASE to the cluster.
Edit
/.rhosts
on the new cluster
to allow
root
access from each
member of the ASE.
(This lets
clu_migrate_save
automatically copy
information from the ASE members to the
/var/TruCluster_migration
directory on the cluster.)
Back up the new cluster. If anything goes wrong, you have a good starting point for recovery.
On each member of the ASE, load the
TCRMIGRATE540
subset, which is in the
TruCluster Server Version 5.1B directory on the Tru64 UNIX
Associated Products Volume 2 CD-ROM.
The following example assumes
that the CD-ROM is mounted on
/mnt:
# setld -l /mnt/TruCluster/kit TCRMIGRATE540
The migration scripts, utility programs, and libraries are installed
in the
/usr/opt/TruCluster/tools/migrate
directory.
Label all storage cables and adapters (in case you ever need to reconnect the storage to the ASE).
Make sure that all LSM-based services are online in the ASE.
On each member of the ASE that is running an ASE service, run
clu_migrate_save:
# /usr/opt/TruCluster/tools/migrate/clu_migrate_save
On the TruCluster Server Version 5.1B cluster:
Verify that the files created by
clu_migrate_save
have been copied to the
/var/TruCluster_migration
directory.
Shut down and halt the cluster:
# shutdown -c now
Turn off each member of the cluster.
Note
Whether or not to turn off storage is your decision.
On all members of the ASE, do the following:
Using your normal backup procedures, back up all data. Starting with the next step, you are moving storage devices from the ASE to the cluster. If for any reason you need to revert to the ASE, this is your last chance to do a full backup of the current configuration.
Take all ASE services off line. (If you did not need to take them off line when backing up the data, take them off line now.)
Shut down and halt each system.
Turn each system off.
On the TruCluster Server cluster, do the following:
Connect the shared storage from the ASE to the cluster systems.
Note
TruCluster Server Version 5.1B does not insist that the storage be connected symmetrically to the cluster members in order to be available. However, because the ASE storage contains application data that should be highly available, we recommend that you connect the storage so that it is directly accessible from all members.
If you turned off the shared storage, turn it on.
Turn on the cluster members.
At each console, run the
show dev
command and, to
the extent possible, verify that the disk devices used by the ASE are
visible.
Find and fix any hardware-related problems before booting the
cluster.
Boot the cluster. If the new storage is not symmetrically configured, make sure to boot all members that have direct connections to the new storage.
Note
During the boot phase, the cluster members will discover the new devices and create special device files.
On one member of the cluster, run
clu_migrate_configure.
This
command verifies that storage devices are visible to the operating
system, maps old-style device names to new-style device names, and
configures storage.
On the cluster, do the following:
Test applications with full storage. Can the applications see the data? Can applications use the data? The earlier application testing established that the application ran without problems. The purpose of this full-storage testing is to satisfy yourself that applications can see and manipulate the data they will use when serving clients.
Note
If you encounter problems that you cannot resolve, and you decide to revert back to the ASE, follow the procedure in Section 8.6.2.
Start serving clients.
NFS clients must direct NFS mount
requests to the default cluster alias or to an alias whose name is in
/etc/exports.aliases.
(Optional) Remove the migration directories and delete the migration subset. On one member of the cluster:
Remove the migration directories:
# rm -rf /var/TruCluster_migration
Delete the migration tools:
# setld -d TCRMIGRATE540
8.6.2 Option 2: Reverting a Partial Upgrade
If you encounter problems that you cannot resolve when migrating storage or completing the upgrade, follow these steps to revert to the ASE configuration:
Halt the cluster.
Turn off each member of the cluster.
Note
Whether or not to turn off storage is your decision.
Reconnect storage to the ASE. Make sure to connect it exactly the same way it was connected.
If you turned the shared storage off, turn it on.
Turn on all ASE systems.
Boot the ASE members.
On each member of the ASE on which you ran
clu_migrate_save,
run the
clu_migrate_recover
command:
# /usr/opt/TruCluster/tools/migrate/clu_migrate_recover
When all members are up and recovered, on one member run the
asemgr
command to set all services on line.
(Optional) Remove the migration directories and delete the migration subset. On each member of the ASE:
Remove the migration directories:
# rm -rf /var/TruCluster_migration
Delete the migration tools:
# setld -d TCRMIGRATE540
8.7 Option 3: Use Existing Systems and Storage
This section explains how to upgrade an existing Version 1.5 or Version 1.6 TruCluster Production Server Software cluster or TruCluster Available Server Software (ASE) to TruCluster Server Version 5.1B using the existing hardware. The section provides the following information:
Upgrade procedure (Section 8.7.1)
Procedure for reverting a partial upgrade (Section 8.7.2)
8.7.1 Option 3: Upgrade Procedure
The following procedure uses the scripts described in Section 8.4 to automate several migration tasks. In order to use the scripts, the current ASE configuration must meet the hardware and storage topology requirements in Section 8.3.2.
These are the paths you can take through the following procedure:
Automatic storage configuration: Use the scripts to examine the current system configuration, save information, and automatically configure storage on new cluster.
Manual storage configuration: Use the scripts to examine the current
system configuration and save information, but on the new cluster run
clu_migrate_configure -x.
The
-x
option displays all the
configuration information, but, instead of configuring storage, just
lists the configuration commands that
clu_migrate_configure
normally
uses.
You can then examine the command sequence, with the option of
creating and manually executing your own series of commands, or
rerunning
clu_migrate_configure
without the
-x
option.
For either path, most steps are identical.
Steps that are only for
those who plan to manually configure storage on the new cluster are
marked
MANUAL STORAGE CONFIGURATION ONLY.
Steps that are
only for those who are using
clu_migrate_configure
to configure
storage on the new cluster are marked
AUTOMATIC STORAGE CONFIGURATION ONLY.
We recommend that you read the entire procedure before you decide which path best fits your site's requirements.
On each member of the ASE, load the
TCRMIGRATE540
subset, which is in the
TruCluster Server Version 5.1B directory on the Tru64 UNIX
Associated Products Volume 2 CD-ROM.
The following example assumes
that the CD-ROM is mounted on
/mnt:
# setld -l /mnt/TruCluster/kit TCRMIGRATE540
The migration scripts, utility programs, and libraries are installed
in the
/usr/opt/TruCluster/tools/migrate
directory.
On each member of the current ASE, run
clu_migrate_check:
# /usr/opt/TruCluster/tools/migrate/clu_migrate_check
Use the output in conjunction with the requirements listed in Section 8.3.2 to determine whether each system's hardware and firmware are configured properly for an upgrade.
Label all storage cables and adapters.
Decide which ASE member system will become the first member of the new cluster.
Manually relocate ASE services to the remaining member or members of the ASE.
Delete the system that will become the first member of the new cluster from the ASE.
On the system that will become the first member of the new cluster:
Shut down and halt the system.
At the system console:
Run the
show dev
command and capture the output for
all shared storage.
Make a record of all console variables and values.
Set the following console variables:
>>> set auto_action halt
>>> set bootdef_dev ""
>>> set boot_reset on
For systems that support the
bus_probe_algorithm
variable:
>>> set bus_probe_algorithm new
See
Section 2.7
for more
information on console variables.
Note that setting
bus_probe_algorithm
variable on systems that do not
use the variable is benign.
The variable is cleared at the
next
init
or power cycle.
Turn the system off.
After making sure that all cables and connections are labeled, disconnect all shared storage cables (for example, SCSI or Fibre Channel) from the system and terminate adapters as needed; if the existing cables are terminated with Y cables or trilink adapters, you should not need to add any terminators. See the Cluster Hardware Configuration manual for information on terminating SCSI adapters.
If the system has one or more Memory Channel cluster interconnect adapters, disconnect the cable or cables.
If you are making any changes to the cluster interconnect, follow the instructions in the Cluster Hardware Configuration manual. Do not connect the adapters to cables at this time.
Turn the system on.
Use the console
show config
command to determine
whether the console and adapter firmware revisions are compatible with
Tru64 UNIX Version 5.1B.
If they are not, update the firmware as needed.
Following the instructions in Chapter 3, perform a full installation of Tru64 UNIX Version 5.1B.
Note
We strongly recommend that you do not overwrite the disk or disks containing the operating system used by the ASE. If you encounter problems later on, you can quickly return this system to the ASE as long as these disks are intact.
If you must overwrite the disk or disks, back up the current operating system before installing Tru64 UNIX Version 5.1B.
On the Tru64 UNIX Version 5.1B system, do the following:
Fully configure the Tru64 UNIX operating system. Follow the instructions in Chapter 3.
Install applications.
Edit
/.rhosts
on the Tru64 UNIX Version 5.1B system to allow
root
access from the remaining members of the
ASE.
(This lets
clu_migrate_save
automatically copy information from the
remaining ASE members.)
Install the TruCluster Server Version 5.1B license and subsets.
Note
We recommend that you back up the Version 5.1B system before continuing. If something goes wrong later in the procedure, you can restore to this point faster than you can install and configure Tru64 UNIX, install applications, and load the TruCluster Server subsets.
On the ASE, make sure that all LSM-based services are on line.
On each member of the ASE that is running an ASE service, run
clu_migrate_save:
# /usr/opt/TruCluster/tools/migrate/clu_migrate_save
On the Tru64 UNIX system:
Verify that the files created by
clu_migrate_save
have been copied to the
/var/TruCluster_migration
directory.
Halt the system and turn it off.
On all members of the ASE, do the following:
Using your normal backup procedures, back up all data. Starting with the next step, you are moving storage devices from the ASE to the Tru64 UNIX Version 5.1B system. If for any reason you need to revert to the ASE, this is your last chance to do a full backup of the current configuration.
Take all ASE services off line. (If you did not need to take them off line when backing up the data, take them off line now.)
Shut down and halt each system.
At each system's console, set the following console variables:
>>> set auto_action halt
>>> set bootdef_dev ""
>>> set boot_osflags A
>>> set boot_reset on
For systems that support the
bus_probe_algorithm
variable:
>>> set bus_probe_algorithm new
See
Section 2.7
for more
information on console variables.
Note that setting
bus_probe_algorithm
variable on systems that do not
use the variable is benign.
The variable is cleared at the
next
init
or power cycle.
Turn each system off.
Note
Do not turn these systems on until instructed to do so.
On the Tru64 UNIX Version 5.1B system, do the following:
Connect all shared storage to the system. Make sure to cable the storage just as it was cabled when the system was part of the ASE.
Connect the cluster interconnect cable or cables to the system. If the cluster configuration uses a Memory Channel hub, or an Ethernet hub or a switch, connect the cable or cables to the hub or a switch. If you are not using a hub or switch, just connect the cables.
Turn the system on.
At the console, run the
show dev
command and, to
the extent possible, verify that all shared devices are
visible.
(Compare the displayed device list to the information you
saved before disconnecting storage.) Find and fix any hardware-related
problems before booting the system.
Also compare the remaining saved console information to the current console.
Boot the system to multi-user mode, and log in.
AUTOMATIC STORAGE CONFIGURATION ONLY:
On the Tru64 UNIX Version 5.1B system, run
clu_migrate_configure.
This
command verifies that storage devices are visible to the operating
system, maps old-style device names to new-style device names, and
sets up storage.
# /usr/opt/TruCluster/tools/migrate/clu_migrate_configure
MANUAL STORAGE CONFIGURATION ONLY:
On
the Tru64 UNIX Version 5.1B system, run
clu_migrate_configure -x:
# /usr/opt/TruCluster/tools/migrate/clu_migrate_configure -x
The
-x
option displays all the configuration
information, but, instead of configuring storage, just lists the
configuration commands that
clu_migrate_configure
normally uses.
You
can then examine the command sequence, with the option of creating and
manually executing your own series of commands, or rerunning
clu_migrate_configure
without the
-x
option.
If, after examining the displayed series of commands, you decide to
automatically configure storage, run
clu_migrate_configure:
# /usr/opt/TruCluster/tools/migrate/clu_migrate_configure
If, after examining the displayed series of commands, you decide to manually configure storage, do so now. (Section F.2 provides a procedure for manually configuring storage.) When you are finished, use the following commands to examine the storage configuration and (optional) recover the original disk labels:
Run the following LSM commands to display the LSM configuration:
# voldisk list
# volprint -thA
For each AdvFS domain, run the
showfdmn
domain
command.
For each AdvFS domain, run the
showfsets
domain
command
and verify that the filesets are correct for the domain.
(Optional) The
clu_migrate_save
created a
/var/TruCluster_migration/CLUSTER_NET/Packids
file for each ASE member on which it was run.
The
Packids
file contains the original disk labels
for shared devices known to that member.
If the original disk labels
contained values in the packid (label:) field, you
can restore the original labels.
To restore the original disk labels,
use the
restore_packids
script.
Change directory to
/usr/opt/TruCluster/tools/migrate/utils.
Run the
following command:
# ./restore_packids -f \
  /var/TruCluster_migration/CLUSTER_NET/Packids
For each member, replace
CLUSTER_NET
with
its value.
For example, for an ASE member whose
CLUSTER_NET
value was
mcclu14, the command is:
# ./restore_packids -f \
  /var/TruCluster_migration/mcclu14/Packids
On the Tru64 UNIX Version 5.1B system, do the following:
Follow the procedures in
Chapter 4
and run
the
clu_create
command to create a single-member
cluster.
Halt the system and boot it as a single-member cluster.
On the single-member TruCluster Server Version 5.1B cluster, do the following:
Set up CAA profiles and scripts for applications.
See the
Cluster Highly Available Applications
manual, the
Cluster Administration
manual, and
caa_profile(8)
If you plan to use cluster aliases other than the default cluster
alias, specify and join those cluster aliases.
See the
Cluster Administration
manual and
cluamgr(8)
Test applications with full storage. Can the applications see the data? Can applications use the data? The earlier application testing established that the application ran without problems. The purpose of this full-storage testing is to satisfy yourself that applications can see and manipulate the data they will use when serving clients.
Note
If you encounter problems that you cannot resolve, and you decide to revert back to the ASE, follow the procedure in Section 8.7.2.
Start serving clients.
NFS clients must direct all NFS
mount requests to the default cluster alias or to an alias whose name
is in
/etc/exports.aliases.
One at a time, add the remaining ASE members to the cluster. Follow these steps for each system:
Make sure the system is turned off.
If adding or replacing cluster interconnect adapters (Memory Channel or Ethernet), install the adapter or adapters.
Connect the system to the shared storage.
Connect cluster interconnect cables.
Turn the system on.
Use the console
show config
command to determine
whether the console and adapter firmware revisions are compatible with
Tru64 UNIX Version 5.1B.
If they are not, update firmware as needed.
Following the procedure in
Chapter 5, run
the
clu_add_member
command on a current cluster
member to create a boot disk for the new member.
Boot the new
member into the cluster.
(Optional) Remove the migration directories and delete the migration subset. On one member of the cluster:
Remove the migration directories:
# rm -rf /var/TruCluster_migration
Delete the migration tools:
# setld -d TCRMIGRATE540
8.7.2 Option 3: Reverting a Partial Upgrade
If you encounter problems that you cannot resolve when migrating storage or completing the upgrade, follow these steps to revert to the ASE configuration:
Halt all systems.
Turn all systems off.
Note
Whether or not to turn off storage is your decision.
If you installed Memory Channel adapters, remove them.
If storage is not connected to all systems, reconnect storage. Make sure to connect it exactly the same way it was connected for the ASE.
If you turned the shared storage off, turn it on.
Turn all systems on.
Restore console variables to their previous values.
If you used SCSI wide addressing (8-15) during the upgrade, restore the previously saved settings.
On each member of the ASE, boot the previous version of the operating system to multi-user mode.
On each member of the ASE on which you ran
clu_migrate_save, run the
clu_migrate_recover
command:
# /usr/opt/TruCluster/tools/migrate/clu_migrate_recover
When all members are up and recovered, on one member run the
asemgr
command to set all services online.
(Optional) Remove the migration directories and delete the migration subset. On each member of the ASE:
Remove the migration directories:
# rm -rf /var/TruCluster_migration
Delete the migration tools:
# setld -d TCRMIGRATE540
This section describes an upgrade of a four-member TruCluster Production Server Version 1.6 cluster to TruCluster Server Version 5.0A. The customer had several Version 1.6 production-level clusters and wanted to perform a test migration on similar hardware before deciding how to upgrade its existing clusters.
Note
Although the target version for the case study was Version 5.0A, the basic steps are the same regardless of which 5.x version of TruCluster Server you upgrade to.
In addition to the case study described here, the following URL contains a link to the description of an upgrade of an in-house production-level cluster from TruCluster Production Server Version 1.6 to TruCluster Server Version 5.0A plus a patch kit:
http://www.tru64unix.compaq.com/docs/highavail/index.htm
The pre-upgrade cluster consisted of the following hardware and software:
4 AlphaServer GS140 rackmount systems, each with 8 CPUs, 8 GB RAM, and 14 KGPSA-BC adapters.
14 Fibre Channel Storage Area Network switches (16-port).
14 StorageWorks ESA 12000 Storage Array Fibre Channel cabinets. (Each cabinet contained dual-redundant HSG80 array controllers and forty-eight 36-GB disks.)
2 StorageWorks ESL9326D Enterprise tape libraries.
2 Memory Channel II hubs.
Tru64 UNIX Version 4.0F with patches.
TruCluster Production Server Version 1.6 (no ASE services, no LSM). (The cluster was configured to be shipped with Tru64 UNIX Version 5.0A and TruCluster Server Version 5.0A. It was deliberately loaded with Version 4.0F and Production Server Version 1.6 to test an upgrade.)
Single instance of Oracle 8.1.6 with 112 distributed raw disk (DRD) devices. (The customer planned to run the same binaries on the Version 5.0A cluster to test the success of the upgrade.)
The post-upgrade cluster will run TruCluster Server Version 5.0A on Tru64 UNIX Version 5.0A.
After reviewing the three general upgrade paths, the customer decided to use a modified version of Option 3. The following decisions were made:
Do not disconnect storage cables or Memory Channel cables.
Because there were so many cable connections in a cluster of this size, the customer decided that not allowing any disconnects would save time and reduce risk.
Do not turn off storage, Memory Channel hubs, or systems.
Because a real upgrade would be controlled remotely from a computer center, the customer decided that taking the systems to the console prompt as needed could replace the recommended power downs. They trusted that the administrator would not boot a system at the wrong time.
Halt all systems at the same time.
Because storage and Memory Channel hubs were connected and turned on, they would not keep the Production Server cluster running while installing Tru64 UNIX Version 5.0A.
Before upgrading, copy all output from
clu_migrate_save
to a
file system on a local disk on the system where they would install
Tru64 UNIX Version 5.0A.
After the Tru64 UNIX Version 5.0A system
was installed, they would mount that file system and copy the files to
/var/TruCluster_migration
before running
clu_migrate_configure.
In both Option 2 and Option 3, the output from
clu_migrate_save
is copied
across the network to a new cluster (Option 2) or to a member of the
current cluster that has been physically disconnected from storage and
Memory Channel (Option 3).
Because the proposed procedure shuts down the
entire Version 1.6 Production Server cluster before installing
Tru64 UNIX Version 5.0A, the customer needed a method for getting the
files to the Version 5.0A system.
The pre-upgrade cluster was somewhat artificial in nature. It was not using LSM, nor were any ASE services defined. A single-instance of Oracle 8.1.6 would be used to test the "success" of the upgrade. If the application ran on the new cluster and could access all its storage, the upgrade would be considered a success.
The following is a summary of the actual upgrade procedure:
Loaded the TCRMIGRATE505 subset on all four members of the TruCluster Software Version 1.6 cluster.
Ran
clu_migrate_check
on all members.
Chose one member as the lead member (the first system to upgrade).
Created a
/var/TruCluster_migration
directory.
Ran
clu_migrate_save
on all members, using the lead member's
/var/TruCluster_migration
directory as the
destination for the
rcp
of the data files created
by
clu_migrate_save.
Used
disklabel -r
to examine a sampling of disk labels.
Verified that the
@rzxxx
string representing a disk's current device special file name was
embedded in that disk's label.
Shut down all members of the Version 1.6 cluster to console mode.
Note
The Fibre Channel switch fabric was already configured to take advantage of Version 5.0A support for HSG80 multiple-bus failover. If it were not, this would have been the time to recable the SAN switches. For this upgrade, while all systems were at the console prompt, each HSG80 controller was changed from transparent failover to multiple-bus failover, and then rebooted.
At an HSG80 console, used five disks to create a storageset (RAID level 5) with the following partitions (sizes in percentages; total available space after deducting for parity is approximately 145 GB):
6 percent for the Tru64 UNIX Version 5.0A disk (approximately 8.7 GB)
6 percent for the TruCluster Server Version 5.0A disk: root
(/),
/usr/, and
/var
(approximately 8.7 GB)
15 percent for each member boot disk (approximately 21.8 GB each)
Because each GS140 contains 8 GB of memory, each system would need lots of swap space.
1 percent for the quorum disk (approximately 1.45 GB)
The remaining partition (27 percent) was reserved for future use (approximately 39.3 GB)
The following is a summary of the commands used at the HSG80 console:
Note
Only some of the console and HSG80 commands that were used to configure storage and boot disks are shown in these examples. If you plan to use boot disks behind an HSG80 controller, use the full procedures described in the TruCluster Server Cluster Hardware Configuration manual.
HSG14 BOT> show unit

    LUN                                      Uses             Used by
------------------------------------------------------------------------------
  D0                                         R1
  D1                                         R2
  D2                                         R3
  D3                                         R4
  D100                                       R5
  D101                                       R6
  D102                                       R7
  D103                                       R8

HSG14 BOT> locate d103       ! verify the disk to be deleted
HSG14 BOT> locate cancel
HSG14 BOT> delete unit d103  ! delete the existing unit
HSG14 BOT> show r8           ! check how much space is available

Name          Storageset                     Uses             Used by
------------------------------------------------------------------------------

R8            raidset                        DISK21100
                                             DISK31100
                                             DISK41100
                                             DISK51100
                                             DISK61100
        Switches:
          POLICY (for replacement) = BEST_PERFORMANCE
          RECONSTRUCT (priority) = NORMAL
          CHUNKSIZE = 256 blocks
        State:
          UNKNOWN -- State only available when configured as a unit
        Size:             284389020 blocks


HSG14 BOT> create_partition r8 size=6
HSG14 BOT> create_partition r8 size=6
HSG14 BOT> create_partition r8 size=15
HSG14 BOT> create_partition r8 size=15
HSG14 BOT> create_partition r8 size=15
HSG14 BOT> create_partition r8 size=15
HSG14 BOT> create_partition r8 size=1
HSG14 BOT> create_partition r8 size=largest

Name          Storageset                     Uses             Used by
------------------------------------------------------------------------------
R8            raidset                        DISK21100
                                             DISK31100
                                             DISK41100
                                             DISK51100
                                             DISK61100
        Switches:
          POLICY (for replacement) = BEST_PERFORMANCE
          RECONSTRUCT (priority) = NORMAL
          CHUNKSIZE = 256 blocks
        State:
          UNKNOWN -- State only available when configured as a unit
        Size:             284389020 blocks
        Partitions:
          Partition number        Size               Starting Block     Used by
          ---------------------------------------------------------------------
            1                 17062907 (   8736.20 MB)            0
            2                 17062907 (   8736.20 MB)     17062912
            3                 42657787 (  21840.78 MB)     34125824
            4                 42657787 (  21840.78 MB)     76783616
            5                 42657787 (  21840.78 MB)    119441408
            6                 42657787 (  21840.78 MB)    162099200
            7                  2843643 (   1455.94 MB)    204756992
            8                 76788375 (  39315.64 MB)    207600640

HSG14 BOT> add unit d4 r8 part=1    ! Tru64 UNIX V5.0A disk
HSG14 BOT> add unit d5 r8 part=2    ! TruCluster V5.0A disk
HSG14 BOT> add unit d6 r8 part=3    ! member 1 boot disk
HSG14 BOT> add unit d7 r8 part=4    ! member 2 boot disk
HSG14 BOT> add unit d8 r8 part=5    ! member 3 boot disk
HSG14 BOT> add unit d9 r8 part=6    ! member 4 boot disk
HSG14 BOT> add unit d10 r8 part=7   ! quorum disk
HSG14 BOT> add unit d11 r8 part=8   ! remaining space

HSG14 BOT> show r8

Name          Storageset                     Uses             Used by
------------------------------------------------------------------------------

R8            raidset                        DISK21100        D10
                                             DISK31100        D11
                                             DISK41100        D4
                                             DISK51100        D5
                                             DISK61100        D6
                                                              D7
                                                              D8
                                                              D9
        Switches:
          POLICY (for replacement) = BEST_PERFORMANCE
          RECONSTRUCT (priority) = NORMAL
          CHUNKSIZE = 256 blocks
        State:
          NORMAL
          DISK21100 (member  0) is NORMAL
          DISK31100 (member  1) is NORMAL
          DISK41100 (member  2) is NORMAL
          DISK51100 (member  3) is NORMAL
          DISK61100 (member  4) is NORMAL
        Size:             284389020 blocks
        Partitions:
          Partition number        Size               Starting Block     Used by
          ---------------------------------------------------------------------
            1                 17062907 (   8736.20 MB)            0      D4
            2                 17062907 (   8736.20 MB)     17062912      D5
            3                 42657787 (  21840.78 MB)     34125824      D6
            4                 42657787 (  21840.78 MB)     76783616      D7
            5                 42657787 (  21840.78 MB)    119441408      D8
            6                 42657787 (  21840.78 MB)    162099200      D9
            7                  2843643 (   1455.94 MB)    204756992      D10
            8                 76788375 (  39315.64 MB)    207600640      D11

HSG14 BOT> show unit

    LUN                                      Uses             Used by
------------------------------------------------------------------------------

  D0                                         R1
  D1                                         R2
  D2                                         R3
  D3                                         R4
  D4                                         R8           (partition)
  D5                                         R8           (partition)
  D6                                         R8           (partition)
  D7                                         R8           (partition)
  D8                                         R8           (partition)
  D9                                         R8           (partition)
  D10                                        R8           (partition)
  D11                                        R8           (partition)
  D100                                       R5
  D101                                       R6
  D102                                       R7

HSG14 BOT> set d4 id=100   ! create user-defined identifiers (UDIDs)
HSG14 BOT> set d5 id=101
HSG14 BOT> set d6 id=1
HSG14 BOT> set d7 id=2
HSG14 BOT> set d8 id=3
HSG14 BOT> set d9 id=4
At the lead member's (member 1) console, used the
wwidmgr
command to map console device names to the
user-defined IDs (UDIDs) created on the HSG80 for the Tru64 UNIX
Version 5.0A disk and this member's boot disk to console device names,
and then set
bootdef_dev:
P00>>> set mode diag
Console is in diagnostic mode
P00>>> wwidmgr -quickset -udid 100    # Tru64 UNIX Version 5.0A disk
P00>>> wwidmgr -quickset -udid 1      # member 1 boot disk

.
.
.
Disk assignment and reachability after next initialization:

6000-1fe1-0005-9dc0-0009-0010-4628-00c6
                          via adapter:         via fc nport:        connected:
dgm1.1001.0.7.7          kgpsam0.0.0.7.7      5000-1fe1-0005-9dc3      Yes
dgm1.1002.0.7.7          kgpsam0.0.0.7.7      5000-1fe1-0005-9dc1      No
dgn1.1003.0.10.7         kgpsan0.0.0.10.7     5000-1fe1-0005-9dc2      No
dgn1.1004.0.10.7         kgpsan0.0.0.10.7     5000-1fe1-0005-9dc4      Yes

.
.
.
P00>>> init

.
.
.
P00>>> show device

.
.
.
kgpsam0.0.0.7.7        PGM0        WWN 1000-0000-c922-09f9
dgm100.1001.0.7.7      $1$DGA100   HSG80  V85F
dgm1.1001.0.7.7        $1$DGA1     HSG80  V85F
dgm1.1002.0.7.7        $1$DGA1     HSG80  V85F
dgn1.1003.0.10.7       $1$DGA1     HSG80  V85F
dgn1.1004.0.10.7       $1$DGA1     HSG80  V85F

.
.
.
P00>>> set bootdef_dev dgm1.1001.0.7.7
P00>>> init

.
.
.
For each remaining member, used the
wwidmgr
command
at its console to map a UDID for that member's boot disk to a console
device name, and then set
bootdef_dev:
(member 2)
P00>>> set mode diag
Console is in diagnostic mode
P00>>> wwidmgr -s   quickset udid 2
P00>>> init

.
.
.
P00>>> set bootdef_dev dgm2.1001.0.7.7
P00>>> init

.
.
.
(member 3)
P00>>> set mode diag
Console is in diagnostic mode
P00>>> wwidmgr -quickset -udid 3
P00>>> init

.
.
.
P00>>> set bootdef_dev dgm3.1001.0.7.7
P00>>> init

.
.
.
(member 4)
P00>>> set mode diag
Console is in diagnostic mode
P00>>> wwidmgr -quickset -udid 4
P00>>> init

.
.
.
P00>>> set bootdef_dev dgm4.1001.0.7.7
P00>>> init

.
.
.
Note
During this initial configuration of the disks that were needed to create a cluster, the customer assigned UDIDs only to bootable devices. In retrospect, it would have made sense to assign UDIDs to the other disks as well. Associating a UDID with a disk makes it easier to track a device through utilities such as
hwmgr. Because 1000 UDIDs were available for use, there was no need to ration them.The customer also set only one path to each boot device at the console using the
bootdef_devenvironment variable. After creating the cluster, the customer set multiple boot paths for each member.
At the lead member's console, installed Tru64 UNIX Version 5.0A. Configured basic network and time services. Loaded the TruCluster Server Version 5.0A subsets.
Mounted the Tru64 UNIX Version 4.0F
usr_domain#usr
on
/mnt
and copied the migration directory containing
the storage information collected by
clu_migrate_save
to
/var/TruCluster_migration
on the Version 5.0A system.
Ran
clu_migrate_configure -x.
Examined the commands that
clu_migrate_configure
would run.
Ran
clu_migrate_configure.
(Because the TruCluster Software Version 1.6
Production Server cluster used neither ASE services nor LSM,
clu_migrate_configure
did not add any entries to
/etc/fstab, mount any file systems, or create any
LSM volumes.)
Used the
clu_migrate_configure
log file as input for a
shell script that mapped the new-style
dsk
device names to the
drd
links used by the Oracle
test database.
Note
The disk devices that were used to install Tru64 UNIX Version 5.0A and create the Version 5.0A cluster were created after the Version 1.6 cluster was shut down. Therefore,
clu_migrate_savehad no knowledge of those devices, andclu_migrate_configurecould not map their nonexistent old-style device names to the new-style device names that were assigned to these disks when Tru64 UNIX Version 5.0A was installed.
Ran
clu_create
to create a single-member cluster.
Halted the Tru64 UNIX Version 5.0A system and set multiple boot paths to its cluster boot disk before booting it as a single-member cluster:
P00>>> set bootdef_dev dgm1.1001.0.7.7,dgm1.1002.0.7.7,\
dgn1.1003.0.10.7,dgn1.1004.0.10.7

.
.
.
P00>>> init
Ran
clu_add_member
to complete the creation of a
four-member TruCluster Server Version 5.0A cluster.
As with the first
member, set multiple boot paths for each member before booting it into
the cluster.
Ran the Oracle Version 8.1.6 binaries to test whether Oracle could still access the test database that was created on the Version 1.6 Production Server cluster.
The test was successful.
The migration was complete.
8.9 Upgrading a TruCluster Memory Channel Software Cluster
This section provides a generic procedure for customers who plan to upgrade a TruCluster Memory Channel Software cluster to TruCluster Server Version 5.1B.
The discussion in this section makes the following assumptions:
The goal is a reasonably low-cost upgrade to a TruCluster Server Version 5.1B cluster. Therefore, the preference when adding storage is to use SCSI adapters, cables, and low-end storage containers such as the UltraSCSI BA356 rather than HSZ70 RAID array controllers or Fibre Channel and HSG80 controllers.
The Memory Channel cluster is not currently configured with the shared storage required to install TruCluster Server Version 5.1B. In all likelihood there is little or no shared storage; the only connection between members is the Memory Channel. Any storage required by a member is either internal to that member or on a private bus. The major hardware modifications will be the addition of the SCSI adapters, cables, storage containers, and disks needed to create a TruCluster Server Version 5.1B cluster. The existing Memory Channel interconnect and any external network connections will not have to be changed.
Because most Memory Channel clusters are designed for high performance rather than high availability, the upgrade configuration is not a no-single-point-of-failure (NSPOF) cluster. When adding hardware in preparation for creating the Version 5.1B cluster, you can configure the level of redundancy that best fits your needs.
The Memory Channel cluster has some level of built-in operating system
redundancy because each member has its own operating system.
(The
failure of a single member's operating system disk does not disable
the cluster.) After the upgrade, the TruCluster Server cluster members
share the same root (/),
/usr, and
/var
file
systems.
For this reason, some form of software or hardware RAID is
required to make sure that the loss of a single disk does not disable
the cluster.
Because the upgraded cluster uses low-end storage that does not
support hardware RAID controllers, LSM will be used to mirror the
shared root (/),
/usr, and
/var
file systems.
Downtime during the upgrade is not an issue. The Memory Channel cluster will be shut down to add shared storage and to install the TruCluster Server Version 5.1B software. If your environment cannot tolerate downtime, you will have to create a separate TruCluster Server Version 5.1B cluster.
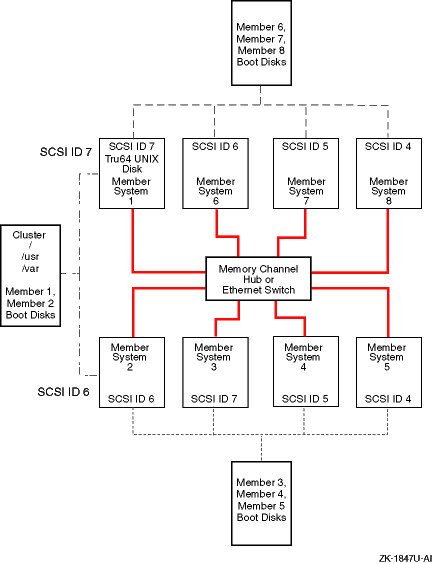
Figure 8-1 shows a basic block diagram of an eight-node cluster. This diagram and several others that show detailed cabling connections and storage layout are in the Cluster Hardware Configuration manual.
Notes
The Cluster Hardware Configuration manual has a chapter titled "Configuring an Eight-Member Cluster Using Externally Terminated Shared SCSI Buses," which contains this figure plus several other detailed configuration diagrams. The chapter also provides detailed hardware configuration information, which you need to use in conjunction with the procedure in this section.
The block diagram does not show the storage that contains the LSM mirrors of the root (
/),/usr, and/varfile systems. The "Introduction" chapter in the Cluster Hardware Configuration manual provides a figure that shows how to configure dual SCSI buses for LSM mirroring of these file systems.
Figure 8-1: Block Diagram of an Eight-Node Cluster
Because we do not know how your Memory Channel cluster is configured, the following procedure might not have all the steps you need to upgrade your cluster. Use the following steps as a starting point for designing a procedure that fits your upgrade requirements.
Make sure that the systems in the Memory Channel cluster are supported by TruCluster Server Version 5.1B. For information on supported systems, see the TruCluster Server Version 5.1B QuickSpecs. You can find the latest version at the following URL:
http://www.tru64unix.compaq.com/docs/pub_page/spds.html
Note
You cannot use the
clu_migrate_checkscript described in Section 8.4. The script is designed for TruCluster Production Server and Available Server clusters.
Use the "Configuring an Eight-Member Cluster Using Externally Terminated Shared SCSI Buses" chapter in the Cluster Hardware Configuration manual to decide what storage hardware you need to add to the cluster. Based on the number of members in your Memory Channel cluster, decide how many shared SCSI buses you will need to perform an upgrade (you can connect up to four members to one SCSI bus). Then determine how many SCSI adapters, cables, terminators, storage shelves, and disks you will need.
In addition, read Chapter 1 and Chapter 2 in this installation manual. Decide how to allocate disk space and whether or not to use a quorum disk. Fill out the information checklists in Appendix A.
Obtain the hardware, software, and licenses required for the upgrade.
Note
New versions of the operating system and cluster software usually require new versions of AlphaServer SRM firmware. You can update SRM firmware now or you can wait until you shut down the Memory Channel cluster. To keep downtime to a minimum, upgrade SRM firmware, one system at a time, before shutting down the entire Memory Channel cluster. For more information on SRM firmware, see Section 3.1.
Use the
sysconfig -q rm
to display the value of the
rm_rail_style
attribute.
Record this value.
(Most
Memory Channel clusters use multiple-active rail style
(rm_rail_style=0), but the default style for
TruCluster Server Version 5.1B is failover pair
(rm_rail_style=1).)
Decide which system will become the first member of the new
cluster.
This system must be directly connected to the storage that will
contain the TruCluster Server shared root (/),
/usr, and
/var
file systems.
If you plan to install Tru64 UNIX on the disk or disks that contains the current operating system, back up the current operating system before continuing.
Shut down and halt each system.
At each system's console, set the following console variables:
>>> set auto_action halt
>>> set bootdef_dev ""
>>> set boot_osflags A
>>> set boot_reset on
For systems that support the
bus_probe_algorithm
variable:
>>> set bus_probe_algorithm new
See
Section 2.7
for more
information on console variables.
Setting the
bus_probe_algorithm
variable on systems that do not
use the variable is benign.
The variable is cleared at the
next
init
or power cycle.
Turn each system off.
Note
Do not turn these systems on until instructed to do so.
Using the information in the Cluster Hardware Configuration manual, add the storage required to create a TruCluster Server Version 5.1B cluster. If you are adding or reconfiguring any other hardware, do it now. If you have not updated SRM firmware, do it now.
If using a Memory Channel hub, make sure that the hub is turned on.
Turn on the system that will become the first member of the new
cluster.
At the console prompt, use the console
show
config
command to determine whether the console and adapter
firmware revisions are compatible with Tru64 UNIX Version 5.1B.
If they are not,
update firmware as needed.
Following the instructions in Chapter 3, perform a full installation of Tru64 UNIX Version 5.1B.
Note
We strongly recommend that you do not overwrite the disk or disks containing the operating system used by the Memory Channel cluster. If you encounter problems later on, you can quickly return this system to the Memory Channel cluster as long as these disks are intact.
On the Tru64 UNIX Version 5.1B system, do the following:
Fully configure the Tru64 UNIX operating system. Follow the instructions in Chapter 3. (See Section 2.5.2 when configuring LSM on the base operating system.)
Install applications.
When and how you install applications depends on the types of applications and how you were using your Memory Channel cluster. Remember that the TruCluster Server Version 5.1B cluster file systems share the same name space. See the Cluster Highly Available Applications manual for information on running applications in a TruCluster Server Version 5.1B cluster.
Install the TruCluster Server Version 5.1B license and subsets.
Note
We recommend that you back up the system before continuing. If something goes wrong later in the procedure, you can restore to this point faster than you can install and configure Tru64 UNIX, install applications, and load the TruCluster Server subsets.
Follow the procedures in
Chapter 4
and run
the
clu_create
command to create a single-member
cluster.
Halt the system and boot it as a single-member cluster.
If the Memory Channel cluster systems had the
rm
subsystem attribute
rm_rail_style=0, set it to
0
on the single-member TruCluster Server
Version 5.1B cluster, and then reboot the system:
Modify the
/etc/sysconfigtab
file to include the
following stanza:
rm:
 rm_rail_style=0
Reboot the single-member cluster:
# shutdown -r now
Use LSM to mirror the root (/),
/usr, and
/var
file
systems.
(See
Section 2.5.2,
volmigrate(8)volencap(8)
One at a time, add the remaining systems to the cluster. Follow these steps for each system:
Turn the system on.
Use the console
show config
command to determine
whether the console and adapter firmware revisions are compatible with
Tru64 UNIX Version 5.1B.
If they are not, update firmware as needed.
Following the procedure in
Chapter 5, run
the
clu_add_member
command on a current cluster
member to create a boot disk for the new member.
Boot the new member into the cluster.