Japanese, Chinese, and Korean can include user-defined characters (UDCs) that supplement the characters defined in the standard character sets for Asian languages. This appendix explains how to create UDCs and the files that support UDC input and display.
You create UDCs with the
cedit
editor, discussed in
Section B.1.
You use
the
cgen
command, discussed in
Section B.2,
to create font, collation, and other support files for UDCs.
X applications
can also obtain fonts for UDCs directly from a UDC database by using font
renderers.
See
Section 7.6
for information about
font renderers.
Note
The system default
sortcommand does not access the collation files created for UDCs. Use theasortcommand to access these files. Seeand the Using International Software manual for information on sorting strings that may contain these characters. asort(1)
There are setup operations that you need to complete before terminals or workstation monitors can display UDCs.
The
atty
driver includes a mechanism to allow on-demand loading of files
associated with UDCs.
You enable this mechanism and change some of its default
parameter values with the
stty
command.
Table B-1
describes the
stty
command options that you use with on-demand
loading.
Table B-1: The stty Options for On-Demand Loading of UDC Support Files
| stty Option | Description |
odl |
Enables the Software On-Demand Loading (SoftODL) service. |
-odl |
Disables the Software On-Demand Loading (SoftODL) service. |
odlsize
size |
Sets the maximum size of the ODL buffer. This size should be the same as a terminal's font-cache size. By default, size is 256 characters. |
odltype
type |
Sets the ODL buffer replacement strategy.
Valid values for
type
are
fifo
(first-in-first-out) and
lru
(least recently used) |
odldb
path |
Sets the path to the database and other files that support UDCs. If this path is not specified, either the system default files are used or, if users are allowed to create personal UDC databases, the process default files are used. Default pathnames
for various databases are specified in the
|
odlreset |
Resets the ODL service and clears the internal ODL buffers. |
odlall |
Displays the current settings for the ODL service. |
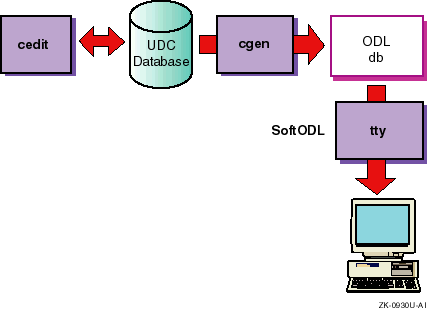
Figure B-1
demonstrates the relationship among components
mentioned in
Table B-1
and the SoftODL service.
Figure B-1: Components That Support User-Defined Characters
B.1 Creating User-Defined Characters
The
UDC editor (invoked with the
cedit
command) is a
curses
application for managing attributes of user-defined characters.
The character attributes that you usually manipulate with the
cedit
application include the following:
Symbolic names
Styles and sizes (16x18, 24x24, 32x32, and 40x40) for bitmap fonts
Codeset values
Collating values
Input key sequences for supported input methods
Character classes
Each user-defined character has a character attribute record, which is stored in a character attribute UDC database. A UDC database can be systemwide or private. There can be only one systemwide database that all users share. However, any user can have a private database in addition to a systemwide database.
The following command invokes the UDC editor:
% cedit
With no options, the
cedit
command
uses the default database.
If you are superuser, the default database is
/var/i18n/udc.
If you are not a privileged user, the default database
is
$HOME/.udc.
You can encounter a number of
problems when using UDCs that are maintained in private databases.
For example,
users who exchange data with characters that rely on attributes defined in
private databases must maintain those databases in common.
To prevent these
problems, make sure that a privileged user maintains all UDCs in a systemwide
database.
The
cedit
command has a number of options
and an argument, which are described in
Table B-2.
Table B-2: The cedit Command Options
| cedit Options and Arguments | Description |
| -c old_db | Converts a Japanese ULTRIX
fedit
font file or an Asian ULTRIX character attribute database file
to the format used by
cedit. |
| cur_db | Specifies the path of a character attribute database (to override the default path). |
| -h | Displays
cedit
syntax. |
| -r ref_db | Specifies the path of the reference character attribute database (to override the default path). This database provides a model for the UDC database on which you are working
with the
The Reference Database
item on the
|
The
cedit
command returns an error message if your locale setting is not supported for
creation of UDCs.
Locales supported for UDCs include those for the Chinese
and Japanese languages.
After you invoke
cedit, you can
use the Options menu on the
cedit
user interface screen
to change the language of user interface messages and help text back to English.
Note
The
dttermterminal emulator does not supportceditfunctions and an attempt to useceditfunctions underdttermmay hang the UDC Manager utility. Use thedxtermterminal emulator, which does supportceditfunctions.
The following sections discuss the screens, menu items, editing modes,
and function keys of the
cedit
utility.
B.1.1 Working on the cedit User Interface Screen
When the
LANG
variable is set to
a supported locale, such as
zh_TW.big5, the
cedit
command displays the user interface screen (Figure B-2).
Figure B-2: The cedit User Interface Screen
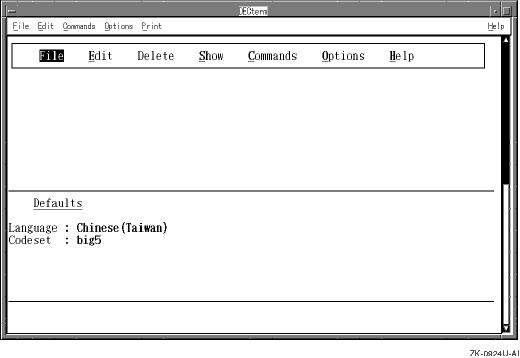
The user interface screen is divided into the following areas:
Menu area
This area contains a menu bar. When you choose and activate a particular menu, its items appear in the portion of the menu area below the menu bar.
Status area
Below the menu area is the status area, which displays the current language and codeset.
Input and message area
The bottom two lines of the screen accept user input and display warning or informational messages.
To see items on the menu, press the key for the letter that is underlined in the title of the menu. Alternatively, you can use the four arrow keys on the keyboard to choose a menu and then press either the Return key or the space bar.
Menu items are displayed in one of the following states:
Active
An active item is one that you can choose. Active items appear with one letter highlighted and underlined. You can press the key for that letter to start the function represented by the item.
Inactive
You cannot choose inactive items. Inactive items do not contain underlined and highlighted letters.
Chosen
If you press the down arrow key rather than the key for a highlighted letter, you can choose items without starting the functions they represent. The currently chosen item is in reverse video.
Activated
You activate an item when you press the key for a highlighted letter
or when you press the Return key or the space bar after choosing the item
with the down arrow key.
Activating an item usually displays a pop-up menu,
causes a particular function to start, or both.
Activating an item that is
followed by the characters
>>
displays a cascade menu.
To return to a higher menu level without activating items, press Ctrl/x.
Menus on the user interface screen provide the following options for managing user-defined characters and their attributes:
Use the File menu to peform the following tasks:
Save changes made to the current character
Cancel changes made to the current character
Change the reference character attribute database
Exit from the
cedit
program
Use the Edit menu to choose a character and create or change its font glyph, codeset value, collating value, input key sequence, class, or name.
Section B.1.2
discusses editing a character's
font glyph.
For information on changing codeset or collating values and input
key sequences, see the description of the Show, Commands, and Options menus
in this section or see
cedit(1)
Use the Delete menu to delete a character or some of its attributes.
Use the Show menu to display attributes of the character you are working on or the status of databases (current character attribute database or reference character attribute database).
The
cedit
utility keeps track of
a character through its attribute record.
This record contains fields to identify
the following attributes:
Character number (unique for each character in the UDC database)
Codeset values (one for each codeset supported by a particular language and territory combination)
Font styles and sizes
Collation values (one for each collation sequence supported by the language)
Input key sequences (one for each input method supported by the language)
Class identifiers (reserved for future use)
Character mnemonic (reserved for future use)
Some variation exists among Asian codesets in support
for UDC attributes.
For example, you cannot define an input key sequence through
cedit
for a Japanese user-defined character.
For Chinese, you can
define an input key sequence for use only with the DEC Hanyu codeset and TsangChi
and QuickTsangChi input modes.
Use the Commands menu to perform the following tasks:
Copy character records from the reference character attribute database to the current character attribute database or, within the current character attribute database, copy records from one range of characters to another.
You can implement the copy operation without confirmation (No Confirm), confirm the copy operation for each character in the range (Confirm All), or confirm the copy operation only for characters that will overwrite other characters (Confirm Conflict).
List all characters currently defined in the current character attribute database for the current language and codeset setting.
Scale the character's font from one size to another.
After you define a character in one font size, you can use this option to make the character available in other sizes. The scaling algorithm is a simple one, so you might need to do some manual editing to refine font glyphs after they are scaled.
Use the Options menu to change the current setting for language and
codeset that is applied to your work on UDCs.
You can also independently set
the language of messages and help text in the
cedit
user
interface.
By default, the language of the
cedit
user
interface is the same as the locale setting in effect when you invoked
cedit.
Use the Help menu to display introductory text for
cedit
functions.
Help is also available for menu items through the Help key when
this key is provided on your keyboard or, for workstation users, enabled by
your terminal setting.
In other words, you can first choose a menu item with
the arrow keys and then press the Help key for a short description of the
chosen item.
To create or change the font glyph
of a user-defined character, you must invoke the font editing screen of
cedit
as follows:
Choose a character by choosing the Character item from the Edit menu.
The
cedit
program prompts
you to enter the hexadecimal code value (without the
\x
prefix) for the character to be edited.
The range of valid codes for UDC characters
is defined in a set of configuration files.
When more than one codeset is
supported for the language and territory of your current locale,
cedit
attempts to supply values for the additional codesets so the
character can be used with all the associated locales.
If
cedit
cannot determine the character's value in
other codesets, you can change the codeset setting through the Options menu
and then explicitly specify the character's encoding in the additional codeset.
In general, define UDCs to have values that can be mapped to other codesets supported for the language. For more information on codes for UDCs in specific Asian languages, see the following language-specific manuals:
Technical Reference for Using Chinese Features
Technical Reference for Using Japanese Features
Technical Reference for Using Korean Features
Technical Reference for Using Thai Features
These manuals are available from the programming bookshelf of the operating system documentation Web site ( http://www.tru64unix.compaq.com/docs/).
The
cedit
editor first searches your current UDC
database for the code that you enter.
If a character with that code is not
found in the UDC database, the editor searches the current reference character
database.
Choose the Font item from the Edit menu to see options for font style/size.
Choose one of the font style/size options.
If you are creating a font glyph for use in a Motif application, the available size options may not be appropriate for the window area where you intend to use the font. In this case, choose the smallest size option that will accommodate both dimensions of your font.
The
cedit
editor then displays
the full-screen font editor interface (Figure B-3).
Figure B-3: The cedit Font Editing Screen
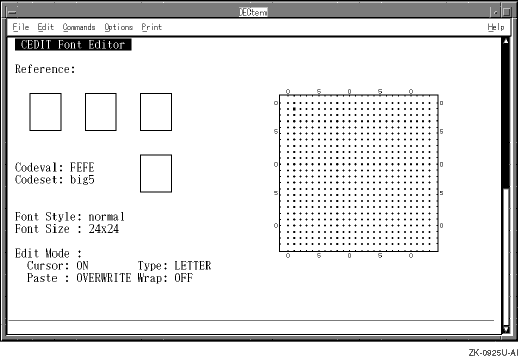
The
cedit
font editing screen has the following
windows:
The large window on the right side of the screen is where
you edit the UDC font glyph.
To edit, use the cursor movements and editing
functions that
cedit
supports.
Each dot on the editing window represents one pixel.
The three small windows immediately under the Reference title
display other font glyphs that you can refer to while editing the current
one.
You use the
cedit
Refer function to control which
font glyphs appear in these windows.
The small window under the three reference windows is called the display window. The display window contains the font glyph you are editing in its actual size. The display window does not automatically reflect changes you make in the editing window. You must press the KP. key to update the font glyph in the display window.
Note
There are some hardware restrictions regarding font glyph displays in the small windows.
Font glyph displays in the reference and display windows are enabled only on local language terminals that support the Dynamic Replacement Character Set (DRCS) function.
On terminal emulation windows, the font glyph in the Display window does not appear in its actual size.
Fonts created in the editing window for use with system software are processed to occupy the size dimensions you chose before the editor interface screen appeared.
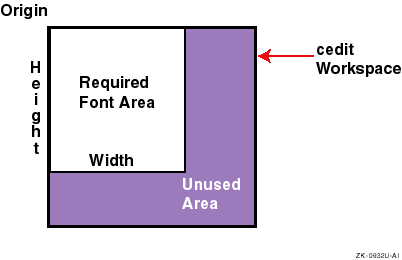
You can also create a font for use with Motif applications and whose dimensions are smaller than those chosen. In this case, you confine your editing operations to a rectangle that originates at the upper-left corner of the editing window and has dimensions smaller than the available editing space (Figure B-4).
The UDC font converter that supports a Motif application considers the upper-left corner of the editing window as the font origin, generates dimensions needed to encompass the glyph based on this origin, and discards unused space outside these dimensions. This utility also allows you to explicitly specify the size dimensions for the compiled font glyphs.
Figure B-4: Interpretation of Font Editing Screen for Sizing a Font
All functions in
cedit
are
bound to keys; in other words, you press a key to invoke a function.
Press
either the PF2 or the Help key to see a diagram of how keys are bound to editing
functions.
Because of differences in keypad design from system to system,
your on-line diagram may vary from the one described in this section.
The
cedit
editing screen has the following editing modes:
Using the arrow keys to move the cursor does not affect the pixel state. However, when you use keypad keys to move the cursor, the following list describes how Cursor modes affect the pixel state:
On: Turns on the pixel under the cursor.
Off: Sets the pixel under the cursor off.
On/Off: Toggles the pixel under the cursor.
You can also toggle the pixel under the cursor with any movement by pressing the KP5 key.
Move: Moves the cursor without changing the pixel state.
Paste modes control the pixel operation when you perform the paste function.
Overlay: Sets a pixel on if its corresponding pixel in the paste buffer is on.
Overwrite: Sets the pixel to the state of the corresponding pixel in the paste buffer.
Type modes determine whether the margin of one pixel width is maintained around the character.
Body: Allows you to edit the entire font glyph area.
Letter: Prevents you from editing the pixel value of the boundary area. Under this mode, you cannot set pixels to the on state when at the boundary of the editing window.
Wrap modes enable or disable cursor wrapping.
On: Causes the cursor to wrap to the leftmost pixel when you move the cursor beyond the rightmost pixel in the editing area.
Similar wrapping behavior occurs when you move the cursor beyond the leftmost, uppermost, and lowermost pixels in the editing area.
Off: Causes the bell to ring and stops cursor movement on attempts to move the cursor beyond the leftmost, rightmost, uppermost, and lowermost pixels in the editing area.
The
cedit
font editor uses
four buffers to store bitmap data.
Some of these buffers are used by editing
functions, which are discussed following the buffer descriptions.
This is the buffer whose contents normally appear in the editing window.
This buffer is associated with the Use function and contains a font glyph you retrieved from a UDC database or one of the reference windows.
Use this buffer when pasting bitmap data in the editing window. The bitmap data being pasted is copied either from a Use buffer or the Edit buffer (if you are copying something from one section of the editing window to another).
This buffer contains the changes made during the last edit operation
and is used by the
cedit
Undo function to delete those
changes.
When you are working on windows in the font-editing screen, you invoke editing functions by using keystrokes or, in some cases, through a pop-up menu that appears when you press the Do key. The following functions are available on the pop-up menu:
This function lets you scale the current font glyph to another size supported by the system. The SCALE function does not have a keystroke alternative and is available only on the pop-up menu.
This function retrieves a font glyph from a UDC database or from one of the reference windows.
This function saves a font glyph copied from a UDC database into one of the reference windows.
Figure B-5
describes the
keypad keymaps for invoking different editing functions.
The keypad functions,
along with the letter keys used for drawing, are described in the following
tables.
Figure B-5: Keymap for cedit Functions
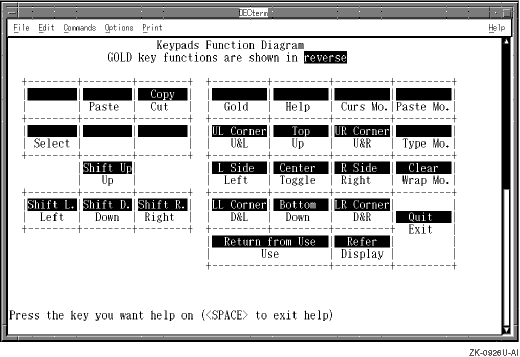
Table B-3: Keys for Miscellaneous Font Editing Functions
| Key | Description |
| Help or PF2 | Describes which keys are bound to which editing functions. Press Help along with another key in the diagram for more information on a particular key's editing function. |
| PF1 | Toggles the GOLD state, a word processing term for a key with alternate functions. Some keypad keys represent more than one function; in this case, one of those functions is invoked by pressing PF1 and then the other keypad key. |
| KP. | Displays the font glyph in actual size on the display window. |
| GOLD KP. | Clears the font glyph displayed in the editing window. |
| U or u | Undoes the previous operation. |
| Ctrl/L | Redraws the screen. |
| Ctrl/z | Suspends the
cedit
program. |
| Do | Displays the pop-up menu for invoking SCALE, USE, and REFER functions. |
| Enter | Saves changes and exits from the font editor. |
| GOLD Enter | Quits the font editor without saving changes. |
Table B-4: Keys for cedit Mode Switching
| Key | Description |
| PF3 | Toggles Cursor mode. |
| PF4 | Toggles Paste mode. |
| KP- | Toggles Type mode. |
| KP. | Toggles Wrap mode. |
Table B-5: Keys for Fine Control of Cursor Movement
| Key | Description |
| Up-arrow | Moves the cursor up. |
| Down-arrow | Moves the cursor down. |
| Left-arrow | Moves the cursor left. |
| Right-arrow | Moves the cursor right. |
| KP7 | Depending on Cursor mode, moves the cursor up and left. |
| KP8 | Depending on Cursor mode, moves the cursor up. |
| KP9 | Depending on Cursor mode, moves the cursor up and right. |
| KP4 | Depending on Cursor mode, moves the cursor left. |
| KP6 | Depending on Cursor mode, moves the cursor right. |
| KP1 | Depending on Cursor mode, moves the cursor down and left. |
| KP2 | Depending on Cursor mode, moves the cursor down. |
| KP3 | Depending on Cursor mode, moves the cursor down and right. |
| KP5 | Toggles the pixel under the cursor without moving the cursor. |
Table B-6: Keys for Moving Cursor to Window Areas
| Key [Footnote 5] | Description |
| GOLD KP7 | Moves the cursor to the upper-left corner. |
| GOLD KP8 | Moves the cursor to the top row. |
| GOLD KP9 | Moves the cursor to the upper-right corner. |
| GOLD KP4 | Moves the cursor to the leftmost column. |
| GOLD KP5 | Moves the cursor to the center of the window. |
| GOLD KP6 | Moves the cursor to the rightmost column. |
| GOLD KP1 | Moves the cursor to the lower-left corner. |
| GOLD KP2 | Moves the cursor to the bottom row. |
| GOLD KP3 | Moves the cursor to the lower-right corner. |
Table B-7: Keys for Drawing Font Glyphs
| Key | Description |
| L or l | Draws a line connecting two selected points. |
| C or c | Draws a circle centered at a selected point. |
| r | Draws an open rectangle in a selected area. |
| R | Draws a solid rectangle in a selected area. |
| e | Draws an open ellipse in a selected area. |
| E | Draws a solid ellipse in a selected area. |
| X or x | Mirrors the font glyph along the horizontal axis (X axis). |
| Y or y | Mirrors the font glyph along the vertical axis (Y axis). |
| / | Mirrors the font glyph along the 45-degree diagonal axis. |
| \ | Mirrors the font glyph along the 135-degree diagonal axis. |
| F or f | Depending on cursor mode, fills an area. |
| T or t | Inverts the state of all pixels. |
Table B-8: Keys for Editing Font Glyphs
| Key [Footnote 6] | Description |
| KP0 | Changes the display in the Edit window from the font glyph in the Edit buffer to the font glyph in the Use buffer. |
| GOLD KP. | Displays font glyphs in the reference windows. |
| GOLD KP0 | Changes the display in the Edit window from the font glyph in the Use buffer to the font glyph in the Edit buffer. |
| Select | Starts or cancels a selected area. |
| Insert | Inserts the contents of the CUT-AND-PASTE buffer. |
| Remove | Cuts a selected area to the CUT-AND-PASTE buffer. |
| GOLD Remove | Copies a selected area to the CUT-AND-PASTE buffer. |
| GOLD Up arrow | Shifts the font glyph up by one line. |
| GOLD Down arrow | Shifts the font glyph down by one line. |
| GOLD Left arrow | Shifts the font glyph left by one column. |
| GOLD Right arrow | Shifts the font glyph right by one column. |
The following summary discusses the recommended method to accomplish
common
cedit
operations.
Keep in mind that there is often
more than one way to perform the same editing operation.
Use the KP1 to KP9 keys to draw and navigate in the editing window. These keys are bound to cursor movement. With the exception of KP5, you can think of these keys as points on a compass; each point represents the direction in which drawing occurs. Drawing is affected by cursor mode, which is controlled using the KP3 key. When cursor mode is set to Move, the drawing keys move the cursor without drawing anything.
Use the KP5 key (in the middle of the compass) to toggle the pixel state on or off.
Cursor movement is affected by Type and Wrap modes, which are bound to the KP- and KP, keys, respectively.
Use the drawing keys to change pixels one at a time. Several operations (cut, paste, and copy) affect pixels as a block. Use the Select function to define a select area. Then use Cut or Copy to move the block of pixels to a paste buffer. You can then move the cursor to another position and use the Paste function to move the pixels in the paste buffer to the new position. The paste operation is affected by the Paste mode setting.
To move the entire glyph in a particular direction, you can press the GOLD or PF1 key and the appropriate arrow key.
To undo the last editing operation, press the U key.
Displaying the glyph in actual size
If you are working on an Asian terminal rather than in a terminal emulation window, you can press the KP. key to display the glyph in actual size. This operation is not supported in a desktop windows environment.
Creating multiple prototypes of a glyph
You can create several versions of a glyph, store the versions in reference windows, and later choose the one you like best. Press the KP. key to move a glyph from the editing window to a reference window. The three reference windows are used in round-robin fashion, from left to right.
The Refer function available from the pop-up menu allows you to move an existing glyph from the current or reference database to a reference window.
Replacing the glyph in the editing window with another glyph
The Use function moves a glyph into the editing window. The Use function that is bound to the keypad copies a glyph from another codepoint in the current or reference database. The Use function that is accessed from the pop-up menu moves a glyph from one of the reference windows into the editing window.
The Use function saves a copy of the current glyph in the editing window to the Use buffer. You can retrieve the glyph from this buffer by pressing the KP0 key. Unlike the contents of the Undo buffer, the glyph in the Use buffer is available across editing operations.
Creating multiple sizes of glyphs
The Scale option on the
cedit
main menu creates multiple
sizes of all glyphs in the database with the currently selected size.
The
Scale option available for the font-editing screen creates multiple sizes
of only the character currently being edited.
If you are working with an
existing UDC database, use the Scale option from the font-editing screen rather
than the
cedit
main menu.
When scaling is implemented
from the
cedit
main menu and affects an entire database,
the operation undoes any manual refinements that may have been made to fonts
after scaling.
Quitting the font-editing screen
Press the Enter key to save your edits and to exit from the font editing screen.
Press the GOLD or PF2 and Enter keys to quit without saving your edits.
After
you create a font glyph, you need to specify its name, input key sequence,
collating value, and, optionally, the name of the class to which the character
belongs.
Use the Edit menu items on the
cedit
user interface
screen to specify these attributes.
B.2 Creating UDC Support Files That System Software Uses
The
character attributes stored in the UDC database must be directed to specific
kinds of files to meet the needs of different kinds of system software.
Terminal
driver software and the
asort
utility, for example, must
recognize user-defined character attributes but cannot directly access information
in UDC databases.
Therefore, after you create or change character attributes
in a UDC database, you use the
cgen
command to create the
following support files:
Font files that the SoftODL (Software On-Demand Loading) service uses
Font files that can be directly loaded to the device
Collating value tables for sorting characters
Files of input key sequences for UDCs
Font files that X and Motif applications use
The following command creates some of these files for the UDC database
in
~wang/.udc:
% cgen -odl -pre -col -iks ~wang/.udc
If you enter the
cgen
command without specifying options, statistical information about
the specified database is displayed.
If you are a nonprivileged user and you
enter the command without specifying a UDC database, the private user database
is used.
If you are a superuser and you enter the command without specifying
a UDC database, the system database is used.
In other words, the database
specification in the preceding example would not be needed if the user who
entered the command was logged on as
wang.
Table B-9
describes
cgen
command options.
In
this table,
bdf
format stands for Bitmap Distribution Format
and
pcf
format stands for Portable Compiled Format.
For
information on these formats, see
bdftopcf(1X)Table B-9: The cgen Command Options
| Option | Description |
| -bdf | Creates
.bdf
(Bitmap
Distribution Format) files needed for X and DECwindows Motif applications. |
| -col | Creates collating value tables.
You must
use the
asort
command, rather than the
sort
command, if you want to apply these tables during sort operations. |
| -dpi 75|100 | Sets resolution to either
75
or
100
when creating
.bdf
and
.pcf
files with the
-bdf
and
-pcf
options. |
| -fprop property | Sets the font property when creating
.bdf
and
.pcf
files with the
-bdf
and
-pcf
options. |
| -iks | Creates the input key sequence file. |
| -merge font_pattern | Invokes the
If you specify the
-merge
option, you must also specify the
-pcf
and
-size
options.
The output
|
| -osiz width-xheight | Specifies the font size for
The font size in
If the size parameters specified for the -osiz option are smaller than the size parameters specified for the -size option, only the upper-left portion of the UDC font glyph is used. If the size parameters specified for the -osiz option are larger than the size parameters specified for the -size option, the lower-right portion of the resulting font glyph is filled with OFF pixels. |
| -pcf | Invokes the
When you use this option, the
|
| -pre | Creates preload font files. Preload font files are files that are directly and completely loaded to a terminal and some printers. Preload files are not useful when UDC databases are large because of the limited memory available on most devices. On-Demand Loading (ODL), which uses ODL font files, is an alternative to using preload font files. |
| -odl | Creates ODL font files. The terminal driver handles loading of fonts from ODL font files on an incremental basis, according to need and available memory. |
| -win userfont | Generates a font file with the name
userfont, which can be copied to a Windows Version 3.1 or Windows
NT Version 3.5 system.
You must also specify the
-size
flag
because only one size can apply to the specified file.
Supported codesets
for font files created by this option are
|
B.3 Processing UDC Fonts for Use with X11 or Motif Applications
The
preload font files created with the
-pre
option of the
cgen
utility must be converted to BDF (Bitmap Distribution Format)
or PCF (Portable Compiled Format) for use by X11 or Motif applications.
The
fontconverter
command performs this conversion and can do one of
the following with the converted output:
Create independent
pcf
and
bdf
font files, which you must then install on your workstation for
use by an application.
Merge the fonts into an existing (pcf)
font file.
The remainder of this section discusses
the
fontconverter
command and its options.
The
cgen
command has comparable options; in other words, you can perform
fontconverter
operations indirectly by using similar options on
the
cgen
command line.
B.3.1 Using fontconverter Command Options
The following example demonstrates the simplest form of the
fontconverter
command, which produces a default name for the output
files.
Assume for this example and the following discussion that the locale
is set to a Japanese locale when the command is entered and that 24x24 was
specified in the
cedit
editor when the font glyphs were
created.
% fontconverter \
-font -jdecw-screen-medium-r-normal--24-240-75-75-m-240-jisx0208-kanji11 \
my_font.pre
The preceding command converts fonts in the
my_fonts.pre
file.
By default, the command creates the
JISX.UDC_24_24.pcf
and
JISX.UDC_24_24.bdf
font files.
The default base name for the output font files varies according to language, as follows:
Japanese:
JISX.UDC
Hanyu:
DEC.CNS.UDC
Hanzi:
GB.UDC
Font width and height are automatically appended to
the base name in the names of output font files.
The base name is also used
in the XLFD (X Logical Font Description) as the registry name.
For the fonts
to be available to applications, perform one of the following actions with
the compiled (pcf) fonts:
In the directory where the fonts reside, enter the following commands:
% /usr/bin/X11/mkfontdir
% /usr/bin/X11/xset +fp `pwd`
% /usr/bin/X11/xset fp rehash
These commands make the fonts available for testing until a server restart or system shutdown occurs.
Alternately, you can include
the
-pcf
option on the
cgen
command line
to execute the
fontconverter
and
mkfontdir
commands.
To make the fonts available on a more permanent basis (that is, after a server restart or system shutdown), use the following commands:
Copy the
pcf
fonts to an existing font
directory, such as
/usr/i18n/usr/lib/X11/fonts/decwin/100dpi:
% cp JISX.UDC_24_24.pcf \
/usr/i18n/usr/lib/X11/fonts/decwin/100dpi
Change to that directory:
% cd /usr/i18n/usr/lib/X11/fonts/decwin/100dpi
Enter the
mkfontdir
command at that location:
% /usr/bin/X11/mkfontdir
Enter the following command
xset
command:
% /usr/bin/X11/xset fp rehash
Table B-10
describes options of the
fontconverter
command.
With the
exception of
-preload, the options are listed in command-line
order.
See
Section B.3.2
for examples that use
these options.
Table B-10: Options and Arguments of the fontconverter Command
| Argument or Option | Description |
| -merge | Specifies that command output be merged with an existing font file. See also the entry for the -font option. |
| -w | Specifies the font width. Use this option when the fonts are created with a width smaller than the one
specified for the
|
| -h | Specifies the font height. Use this option when the fonts are created with a height smaller than the
one specified for the
|
| -udc base_name | Specifies the base file name of the output UDC font file. Use this option when you are creating a standalone output file (you are not merging output into an existing file) and you do not want your output file to have a default base name. |
| -font reference_font | Specifies a reference font.
The reference
font is the name of a font that is available on the current display.
Use the
If you use the -font option with the -merge option, reference_font indicates the font with which converted font glyphs are merged. If you use the -font option without the -merge option, the header of reference_font is used as a reference for generating the header of the standalone output file. Information in reference_font is also used to determine default characters in the standalone output file. A default character is a glyph (usually a square) that appears when the font does not contain any glyphs for a specified code. |
| -preload preload_font | Specifies the input file (created by
the
Use
this option when you want to specify the
preload_font
argument at an arbitrary position in the
|
B.3.2 Controlling Output File Format
X and Motif applications require loadable fonts in PCF format.
If you do not use the
-merge
option, the
fontconverter
command creates standalone font files in both PCF
and BDF format.
When you specify the
-merge
option, the command
merges converted fonts with the standard PCF font specified by the
-font
option and creates a standalone file only in PCF format.
When you merge UDC fonts with standard fonts, you can use the combined file with all Motif applications.
When you create independent font files, you can use the fonts with applications that explicitly load the file. If the font registry is one of the UDC registries for a particular locale, you can also use the files with standard system applications.
Note that
fontconverter
processing time is longer
when you merge fonts into an existing font file as compared to when you create
independent files.
The following example of the
fontconverter
command:
Converts preload format fonts in the
udc_font.pre
file to PCF format
Merges the converted output with the standard font
-jdecw-screen-medium-r-normal--24-240-75-75-m-240-jisx0208-kanji11
Generates the
JISX0208-Kanji11_24_24.pcf
output file, which combines the standard and new fonts
% fontconverter -merge -font \
-jdecw-screen-medium-r-normal--24-240-75-75-m-240-jisx0208-kanji11 \
udc_font.pre
The following example of the
fontconverter
command:
Creates thedeckanji.udc_24_24.bdf
and
deckanji.udc_24_24.pcf
files
Obtains the default characters and most header information
for these files from the standard font
-jdecw-screen-medium-r-normal--24-24-240-75-75-m-240-jisx0208-kanji11
Sets the font registry field to
deckanji.udc
% fontconverter -udc deckanji.udc -font \
-jdecw-screen-medium-r-normal--24-240-75-75-m-240-jisx0208-kanji11 \
udc_font.pre