![[Compaq]](../../images/compaq.gif)
![[Go to the documentation home page]](../../images/buttons/bn_site_home.gif)
![[How to order documentation]](../../images/buttons/bn_order_docs.gif)
![[Help on this site]](../../images/buttons/bn_site_help.gif)
![[How to contact us]](../../images/buttons/bn_comments.gif)
![[OpenVMS documentation]](../../images/ovmsdoc_sec_head.gif)
| Document revision date: 15 October 2001 | |
|
|
|
|
|
|
| Previous | Contents | Index |
The Configuration Manager lets you select name resolution for wide-area network support, using LMHOSTS, WINS, and DNS name resolution. (You can enable one, two, or all three of these name resolution methods.)
DNS is not configured as a replacement for WINS or LMHOSTS but rather as a supplement. DNS is used primarily for resolving node or computer names; it is not used for resolving domain names. With DNS, the Advanced Server still uses WINS, LMHOSTS, or both methods for resolving domain names and certain other names. |
For additional procedures required to set up wide-area networking, refer to the Compaq PATHWORKS for OpenVMS (Advanced Server) Server Installation and Configuration Guide.
To enable or disable LMHOSTS, on the Transport Configuration Parameters screen, select Enable LMHOSTS Resolution. The checkbox contains an X when LMHOSTS Resolution is enabled.
To enable or disable DNS name resolution, on the Transport Configuration Parameters screen, select Enable DNS Resolution. The check box contains an X when DNS name resolution is enabled.
To enable or disable WINS name resolution, on the Transport Configuration Parameters screen, select Enable WINS Resolution. The check box contains an X when WINS name resolution is enabled.
When WINS name resolution is enabled, you must supply the TCP/IP address for the WINS Server.
To supply the TCP/IP address for the WINS Server, on the Transport Configuration Parameters screen:
If your Advanced Server runs in an OpenVMS Cluster in the domain and you have it set up for dynamic cluster load balancing using DNS, then enable the use of DNS for NetBIOS name resolution on all servers and clients. Remove any entries for the cluster alias from the LMHOSTS file and from the WINS database on WINS servers that might be used by clients. For information about setting up dynamic load balancing, see Section 2.4.4, Dynamic Cluster Load Balancing in WANs. |
You can save the changes you have made to the transport configuration, or you can quit without saving your changes.
To save transport configuration parameter changes, on the Transport Configuration Parameters screen, choose the OK command button. If any setting is not appropriate, the Configuration Manager displays an Information screen, such as the one shown in Figure 7-5, Information Screen. If all the settings are appropriate, the Basic Configuration Parameter screen reappears.
To ignore transport configuration parameter changes, on the Transport
Configuration Parameters screen, choose the Cancel
command button, or press Ctrl/C. The Basic Configuration Parameters
screen reappears.
7.2.7 Verifying and Saving the New Configuration
When you verify the configuration, the Configuration Manager determines whether the new configuration can be supported.
To verify the new configuration, on the Basic Configuration Parameters screen, select the Verify command button.
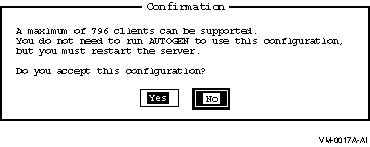
If the configuration can be supported, the Configuration Manager displays a Confirmation screen that allows you to accept or reject the new configuration. The Confirmation screen also tells you whether the server must be restarted for the new settings to take effect, or if AUTOGEN and/or reboot will be necessary to use the new configuration.
Figure 7-4 Confirmation Screen
If the configuration cannot be supported, or if it requires AUTOGEN, reboot, or both, the Configuration Manager displays an Information screen, such as the one shown in Figure 7-5, Information Screen, which allows you to view the configuration log file for details.
Figure 7-5 Information Screen

To view the log file, select the View Log File button. The log file shows the OpenVMS SYSGEN parameter changes required to support the new configuration, or why the configuration cannot be supported at all.
To dismiss the Information screen, select the OK
button.
7.2.8 Navigating the Configuration Manager Using a Keyboard
You can control the Configuration Manager using a mouse or using keys on the keyboard. Using the mouse, you can navigate through the Configuration Manager screens by pointing and clicking on the desired item to select (highlight) items in the menus, scroll boxes, or dialog boxes. (You must have a DECterm window or equivalent emulator.) Table 7-2, Keys for Controlling the Configuration Manager, lists the keys you use to control the action of the Configuration Manager.
| Desired Action | Keys to Use |
|---|---|
| Access the menu bar | Press F10, or press PF1 twice. Use the Tab key to select the first item on the menu bar. |
| Move from one menu to another | Use the left and right arrow keys. |
| Point to a menu item | Use the up and down arrow keys. |
| Select a menu item within a menu | Use the up and down arrow keys, then press the Enter or Return key. |
| Select a menu or an item within a menu | Move to the menu or menu item, then press the Enter or Return key. |
| Exit the menu bar | Press Ctrl/Z. |
| Point to buttons and items in a dialog box | Press the Tab key to advance, and PF1 Tab to back up. |
| Move within a set of buttons or check boxes | Use the arrow keys. |
| Choose among a set of options (radio buttons) | Advance to the currently selected option button using Tab or PF1 Tab. Then use the arrow keys to choose a new option within the set. |
| Change the state of a check box (on or off) | Advance to the check box, then press the space bar to toggle the state of the box. |
| Press a command button | Advance to the button and press the space bar or the Return key. This executes the button's command. |
| Enter new text in a text box | Advance to the text box using Tab or PF1 Tab, and enter the new text. Any previous text is erased. |
| Edit text or edit text in a text box | Advance to the text box using Tab or PF1 Tab. Use the arrow keys to move within existing text. |
| Refresh the display at any time | Press Ctrl/W. |
| Save any changes made in a dialog box, and return to the previous dialog box | At the OK command button, press the Enter or Return key. |
| Discard any changes made in a dialog box and return to the Basic Configuration parameters screen. | At the Cancel command button, press the Enter or Return key; or press Ctrl/C; or press the Enter or Return key at the Quit button on the Basic Configuration Parameters screen. |
The LANMAN.INI file defines the basic configuration of the server. This file is located in the OpenVMS PWRK$LMROOT:[LANMAN] system directory and contains a collection of keywords with associated values. The values define the configuration of a server running PATHWORKS Advanced Server software. When the PATHWORKS Advanced Server is installed, default values are assigned to these keywords.
This section contains the following topics:
The LANMAN.INI file must be world readable. To set the file as world readable from OpenVMS at the DCL prompt, enter the following command:
|
This section describes the organization of the LANMAN.INI file and provides hints on how to adjust certain parameters that affect server performance.
The LANMAN.INI file contains several sections. Within each section, you can use keywords that define specific server functions. Sections can appear in any order in the LANMAN.INI file.
The LANMAN.INI section names are:
The following example shows the default PATHWORKS for OpenVMS (Advanced Server) LANMAN.INI file. The entry nodename is replaced with the actual node name of the node where the configuration is established.
; Advanced Server initialization file, for server configuration. ; ; Refer to the PATHWORKS V6 for OpenVMS (Advanced Server) Server ; Administrator's Guide for information on keywords and keyword values. ; ; W A R N I N G ; ; DO NOT modify DOMAIN, LISTENNAME, or PWRKALIAS. Doing so will have adverse ; effects on the server. To change these parameters use PWRK$CONFIG.COM or ; PWRK$SETINI.COM. ; [server] srvcomment = PATHWORKS V6.1 for OpenVMS (Advanced Server) srvservices = alerter,netlogon [vmsserver] autoshare = noautoshare = dad, _dfs pwrkalias = [workstation] domain = LANGROUP [netlogon] scripts = PWRK$LMROOT:[LANMAN.REPL.IMPORT.SCRIPTS] |
When the PATHWORKS Advanced Server is installed, the LANMAN.INI file
contains values for certain keywords. Other keywords, and the titles of
the sections to which they belong, are added when you run the
Configuration Manager or edit the LANMAN.INI file. If a keyword does
not appear in the file (or is commented out with a semicolon), it is
set to its default value.
7.3.2.1 Syntax of the LANMAN.INI File
Within each section of the LANMAN.INI file, keywords are listed as follows:
[NODE_DOT] AUTOSHARE = DUA1:=D,DUA2:=E |
Before you change any keywords in the LANMAN.INI file, you should understand the relationship between the LANMAN.INI file entries and server parameter default settings. All server parameters have default settings.
With certain exceptions, you can edit the LANMAN.INI file to set keywords to values other than the server defaults. Server parameter defaults do not appear in the LANMAN.INI file. A value assigned to any keyword in the LANMAN.INI file always supersedes the default value for that keyword.
The keywords whose value you cannot change by editing the LANMAN.INI file are:
To change these parameters, use the PWRK$CONFIG.COM configuration command procedure.
When you want to set the value of a keyword to something other than the default, you must edit the LANMAN.INI file, locate or add the appropriate section title in the file, and then add the desired keyword=value entry.
To change a keyword in the LANMAN.INI file:
Edit the LANMAN.INI file with an ASCII editor or use the PWRK$CONFIG.COM configuration procedure.
The following sections describe each LANMAN.INI keyword. The keywords are grouped according to the section of the LANMAN.INI file in which they reside. Sections are in alphabetical order.
7.3.2.3 BROWSER Section
In the BROWSER section, you specify how the server deals with Browser
activity. The Master Browser polls for domains, and builds and updates
a master list of its domains. The backup Browser sends a request to the
Master Browser to update its own list. The Browser service is always
started at server startup.
| Keyword | Description | Setting | Default Setting |
|---|---|---|---|
| masterupdate =n | Specifies the interval after which domain updates occur. | Minimum: 60 Maximum: unlimited | 720 seconds (12 minutes) |
| backupupdate =n | Specifies the interval after which a backup Browser updates its list by querying the Master Browser. | Minimum: 60 Maximum: unlimited | 900 seconds (15 minutes) |
| backuprecovery =n | Specifies that recovery is initiated if the backup Browser gets no response from the Master Browser after the specified interval. | Minimum: 60 Maximum: unlimited | 1800 seconds (30 minutes) |
| morelog=YES/NO | Specifies whether the Browser is to log more details. | YES or NO | NO |
7.3.2.4 NETLOGON Section
In the NETLOGON section, you specify parameters related to network
logon. The NetLogon service is started automatically at server startup.
| Keyword | Description | Setting | Default Setting |
|---|---|---|---|
| maxclisess =n | Specifies the number of links for internal communication that this server can initiate. This represents the maximum number of domains that this domain can trust, plus one (number of trusted domains plus 1). |
Minimum: 5
Maximum: 128 |
32 |
| maxsrvsess =n | Specifies the number of links used for internal communication that this server can accept. This number must include the number of domains that trust this domain, the number of backup domain controllers in this domain, and the number of Windows NT workstations in this domain (trusting domains + BDCs + Windows NT workstations). |
Minimum: 5
Maximum: unlimited |
200 |
| pulse =n | Specifies the number of seconds that the primary domain controller waits before sending update notices to each backup domain controller and member server. | 60-3600 seconds |
300 seconds
5 minutes |
| randomize =n | Specifies the number of seconds that a backup domain controller randomizes a request to get updates after receiving an update notice from the primary domain controller. This keyword decreases the odds of servers in the same domain requesting an update from the primary domain controller at the same time. | 5-120 seconds | 30 seconds |
| scripts =path | Specifies the location of logon scripts. | If you do not specify this keyword, the login scripts are assumed to be stored at: | |
|
PWRK$LMROOT:[LANMAN.REPL.IMPORT.SCRIPTS]
|
|||
| update=YES/NO | Controls synchronization of the user accounts database with the master database on the primary domain controller when the server starts. This keyword applies only to a backup domain controller and is ignored by the primary domain controller. | YES or NO | NO (do not synchronize on startup) |
7.3.2.5 NODE_servername Section
In the NODE_servername section, servername specifies
the name of a server node, and you use keywords to enable node-specific
keyword values. For example, if you use the Autoshare
keyword in a section called NODE_TINMAN to create an autoshare name for
a disk device, only users on node TINMAN can see and connect to that
autoshare.
If keywords appear in both the NODE_servername and VMSSERVER sections of your LANMAN.INI file, values in VMSSERVER take precedence. |
| Keyword | Description | Setting | Default Setting |
|---|---|---|---|
| autoshare= device=sharename | |||
| Specifies a synonym for the autoshare name created by default for an OpenVMS disk device. The value for this keyword is a list of OpenVMS device names (or volume labels) and share name synonym to which each device maps. | All OpenVMS disk devices are automatically shared, and share names are based on the volume label of each disk device. (See Section 7.3.3, Defining Autoshares). | NULL | |
| noautoshare =(device[,...]) | |||
| Specifies a disk device or list of devices that should not be automatically shared when the server starts. Autosharing DFS devices is not recommended. | Up to 512 characters, including commas | dad, _dfs | |
| listenname= servername | |||
|
Specifies the name of the server on the network; up to 15 characters.
Using this keyword, you enable users to connect to a server using a
different server name.
Caution: Do not change the listenname by editing the LANMAN.INI file directly. To change the listenname, use the PWRK$CONFIG.COM configuration procedure. |
Up to 15 characters | The server node name | |
| srvservices =list |
Specifies the services that start automatically when the server is
started. Because services are started in the order they appear in the
srvservices entry, you must ensure that "NetLogon" appears
before any services that require the NetLogon service.
The Browser service is not controlled by this keyword. It is started automatically when the Server service starts. |
alerter, netlogon, browser | alerter, netlogon |
| Previous | Next | Contents | Index |
|
|
| privacy and legal statement | ||
| 6556PRO_019.HTML | ||