Chapter 7 - GUI Reference
This chapter describes all of the GUI controls in HTMLDOC.The HTMLDOC GUI
The HTMLDOC GUI (Figures 7-1 through 7-11) is contained in a single window showing the input, output, and generation options. At the bottom are buttons to load, save, and generate documents.Document File Operations
HTMLDOC stores the HTML files, settings, and options in.BOOK files. The buttons on the bottom of the
HTMLDOC window allow you to manage these files and generate
formatted documents.
New
The New button starts a new document. A confirmation dialog will appear if you have not saved the changes to the existing document.Open...
The Open... button retrieves a document that you have saved previously. A file chooser dialog is displayed that allows you to pick an existing book file.Save
The Save button saves the current document. A file chooser dialog is displayed if there is no filename assigned to the current document.Note: Saving a document is not the same as generating a document. The book files saved to disk by the Save and Save As... buttons are not the final HTML, PDF, or PostScript output files. You generate those files by clicking on the Generate button.
Save As...
The Save As... button saves the current document to a new file. A file chooser dialog is displayed to allow you to specify the new document filename.Note: Saving a document is not the same as generating a document. The book files saved to disk by the Save and Save As... buttons are not the final HTML, PDF, or PostScript output files. You generate those files by clicking on the Generate button.
Generate
The Generate button generates the current document, creating the specified HTML, PDF, or PostScript file(s) as needed. The progress meter at the bottom of the window will show the progress as each page or file is formatted and written.Note: Generating a document is not the same as saving a document. To save the current HTML files and settings in the HTMLDOC GUI, click on the Save or Save As... buttons instead.
Close
The Close button closes the HTMLDOC window.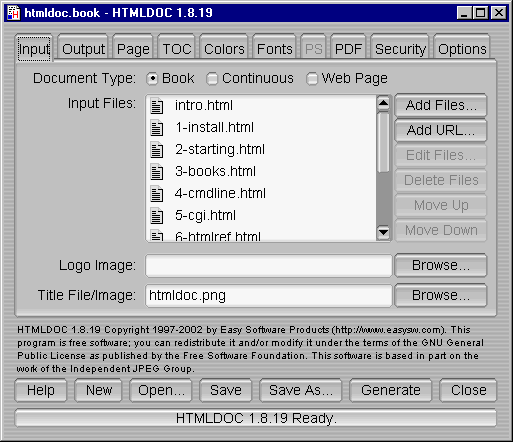
Figure 7-1 - The Input Tab
The Input Tab
The input tab (Figure 7-1) lists all of the HTML source files that are used to generate the document. You also specify the type of document (book or web page) and the title and logo images in this tab.Document Type
The Book radio button specifies that the input files are structured with headings. The Continuous radio button specifies unstructured files without page breaks between each file. The Web Page radio button specifies unstructured files with page breaks between each file.Input Files
The Input Files list shows all of the HTML input files that will be used to produce the document. Double-click on files to edit them.Add Files...
The Add Files... button displays the file chooser dialog, allowing you to select one or more HTML files to include in the document.Edit Files...
The Edit Files... button starts the specified editor program to edit the files selected in the Input Files list. Select one or more files in the Input Files list to enable the Edit Files... button.Delete Files
The Delete Files button removes the selected files from the Input Files list. Select one or more files in the Input Files list to enable the Delete Files button.The Delete Files button only removes the files from the Input Files list. The files are not removed from disk.
Move Up
The Move Up button moves the selected files in the Input Files list up one line in the list. To enable the Move Up button select one or more files in the Input Files list.Move Down
The Move Down button moves the selected files in the Input Files list down one line in the list. To enable the Move Down button select one or more files in the Input Files list.Logo Image
The Logo Image field contains the filename for an image to be shown in the header or footer of pages, and in the navigation bar of HTML files.Click on the Browse... button to select a logo image file using the file chooser dialog.
Title File/Image
The Title File/Image field contains the filename for an image to be shown on the title page, or for a HTML file to be used for the title page(s).Click on the Browse... button to select a title file using the file chooser dialog.
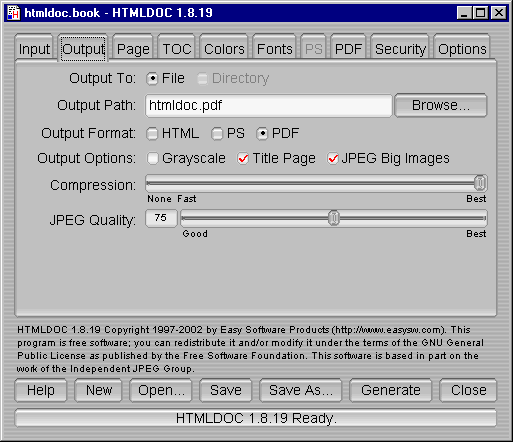
Figure 7-2 - The Output Tab
The Output Tab
The output tab (Figure 7-2) specifies where your document will be generated, the output format, and some of the generic output options.Output To
The File radio button selects output to a single file. The Directory radio button selects output to multiple files in the named directory.Directory output is not available when generating PDF files.
Output Path
The Output Path field contains the output directory or filename. Click on the Browse... button to choose an output file using the file chooser dialog.Output Format
The HTML radio button selects HTML output, the PS radio button selects PostScript output, and the PDF radio button selects PDF output.Output Options
The Grayscale check box selects grayscale output for PostScript and PDF files. The Title Page check box specifies that a title page should be generated for the document. The JPEG Big Images check box specifies that JPEG compression should be applied to continuous-tone images.Compression
The Compression slider controls the amount of compression that is used when writing PDF or Level 3 PostScript output.Note: HTMLDOC uses Flate compression, which is not encumbered by patents and is also used by the popular PKZIP and gzip programs. Flate is a lossless compression algorithm (that is, you get back exactly what you put in) that performs very well on indexed images and text.
JPEG Quality
The JPEG Quality slider controls the quality level used when writing continuous-tone images with JPEG compression.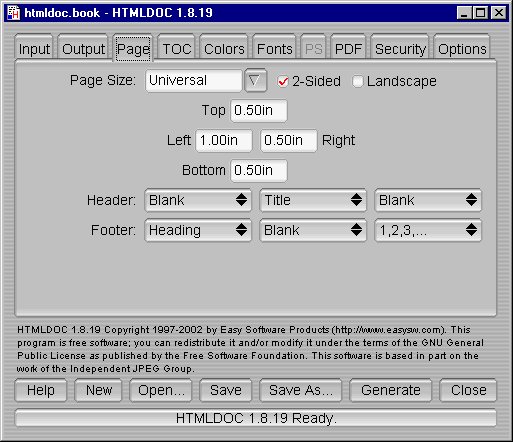
Figure 7-3 - The Page Tab
The Page Tab
The page tab (Figure 7-3) defines the page header, footer, size, and margins for PostScript and PDF output.Page Size
The Page Size field contains the current page size. Click on the arrow button to choose a standard page size.HTMLDOC supports the following standard page size names:
- Letter - 8.5x11in (216x279mm)
- A4 - 8.27x11.69in (210x297mm)
- Universal - 8.27x11in (210x279mm)
Click in the Page Size field and enter the page width and length separated by the letter "x" to select a custom page size. Append the letters "in" for inches, "mm" for millimeters, or "cm" for centimeters.
2-Sided
Click in the 2-Sided check box to select 2-sided (duplexed) output.Landscape
Click in the Landscape check box to select landscape output.Top, Left, Right, and Bottom
Click in the Top, Left, Right, and Bottom fields and enter the new margin values to change them. Append the letters "in" for inches, "mm" for millimeters, or "cm" for centimeters.Header and Footer
Select the desired text in each of the option buttons to customize the header and footer for the document/body pages. The left-most option buttons set the text that is left-justified, while the middle buttons set the text that is centered and the right buttons set the text that is right-justified. Each choice corresponds to the following text:
| Choice | Description |
|---|---|
| Blank | The field should be blank. |
| Title | The field should contain the document title. |
| Chapter Title | The field should contain the current chapter title. |
| Heading | The field should contain the current heading. |
| Logo | The field should contain the logo image. |
| 1,2,3,... | The field should contain the current page number in decimal format (1, 2, 3, ...) |
| i,ii,iii,... | The field should contain the current page number in lowercase roman numerals (i, ii, iii, ...) |
| I,II,III,... | The field should contain the current page number in uppercase roman numerals (I, II, III, ...) |
| a,b,c,... | The field should contain the current page number using lowercase letters. |
| A,B,C,... | The field should contain the current page number using UPPERCASE letters. |
| Chapter Page | The field should contain the current chapter page number. |
| 1/N,2/N,... | The field should contain the current and total number of pages (n/N). |
| 1/C,2/C,... | The field should contain the current and total number of pages in the chapter (n/N). |
| Date | The field should contain the current date (formatted for the current locale). |
| Time | The field should contain the current time (formatted for the current locale). |
| Date + Time | The field should contain the current date and time (formatted for the current locale). |
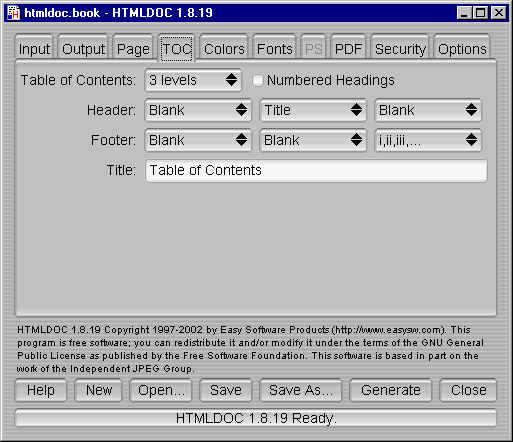
Figure 7-4 - The TOC Tab
The TOC Tab
The TOC tab (Figure 7-4) defines the table-of-contents options.Table of Contents
Select the desired number of levels from the Table of Contents option button.Numbered Headings
Click in the Numbered Headings check box to automatically number the headings in the document.Header and Footer
Select the desired text in each of the option buttons to customize the header and footer for the tables-of-contents pages. The left-most option buttons set the text that is left-justified, while the middle buttons set the text that is centered and the right buttons set the text that is right-justified.Title
Enter the desired title for the table-of-contents in the Title field.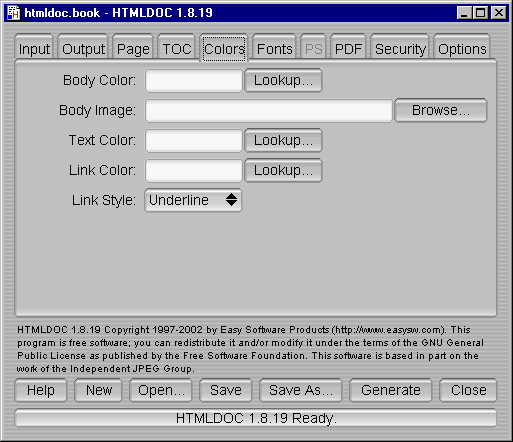
Figure 7-5 - The Colors Tab
The Colors Tab
The colors tab (Figure 7-5) defines the color and image information that is used for the entire document.Body Color
The Body Color field specifies the default background color. It can be a standard HTML color name or a hexadecimal RGB color of the form#RRGGBB. Click on the Lookup... button to
pick the color graphically.
Body Image
The Body Image field specifies the default background image. Click on the Browse... button to pick the background image using the file chooser.Text Color
The Text Color field specifies the default text color. It can be a standard HTML color name or a hexadecimal RGB color of the form#RRGGBB. Click on the Lookup... button to
pick the color graphically.
Link Color
The Link Color field specifies the default link color. It can be a standard HTML color name or a hexadecimal RGB color of the form#RRGGBB. Click on the Lookup... button to
pick the color graphically.
Link Style
The Link Style chooser specifies the default link decoration.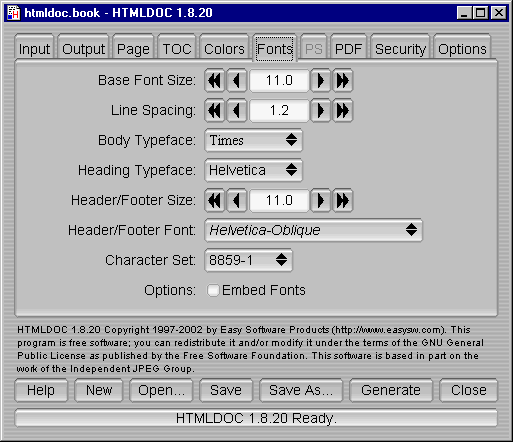
Figure 7-6 - The Fonts Tab
The Fonts Tab
The fonts tab (Figure 7-6) defines the fonts and character set used by the document.Base Font Size
The Base Font Size field specifies the size of normal text in the document in points (1 point = 1/72nd inch). Click on the single arrow buttons to decrease or increase the size by 1/10th point or on the double arrow buttons to decrease or increase the size by whole points.Line Spacing
The Line Spacing field specifies the spacing between lines as a multiple of the base font size. Click on the single arrow buttons to decrease or increase the size by 10ths or on the double arrow buttons to decrease or increase the size by whole numbers.Body Typeface
The Body Typeface option button specifies the typeface to use for normal text. Click on the option button to select a typeface.Heading Typeface
The Heading Typeface option button specifies the typeface to use for headings. Click on the option button to select a typeface.Header/Footer Size
The Header/Footer Size field specifies the size of header and footer text in the document in points (1 point = 1/72nd inch). Click on the single arrow buttons to decrease or increase the size by 1/10th point or on the double arrow buttons to decrease or increase the size by whole points.Header/Footer Font
The Header/Footer Font option button specifies the typeface and style to use for header and footer text. Click on the option button to select a typeface and style.Character Set
The Character Set option button specifies the encoding of characters in the document. Click on the option button to select a character set.Options
The Embed Fonts check box controls whether or not fonts are embedded in PostScript and PDF output.

Figure 7-7 - The PS Tab
The PS Tab
The PS tab (Figure 7-7) contains options specific to PostScript output.PostScript Level
Click on one of the Level radio buttons to select the language level to generate. PostScript Level 1 is compatible with all PostScript printers and will produce the largest output files.PostScript Level 2 is compatible with most PostScript printers and supports printer commands and JPEG image compression.
PostScript Level 3 is compatible with only the newest PostScript printers and supports Flate image compression in addition to the Level 2 features.
Send Printer Commands
The Send Printer Commands check box controls whether or not the output files contain PostScriptsetpagedevice commands
for the page size and duplex settings. Click in the check box to enable
or disable printer commands.
Printer commands are only available with Level 2 and 3 output and may not work with some printers.
Include Xerox Job Comments
The Include Xerox Job Comments check box controls whether or not the output files contain Xerox job comments. Click in the check box to enable or disable the job comments.
Job comments are available with all levels of PostScript output.
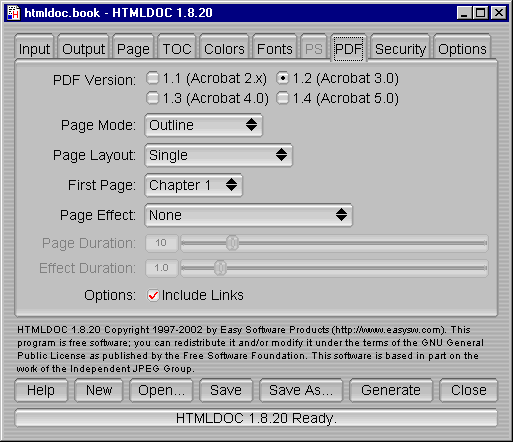
Figure 7-8 - The PDF Tab
The PDF Tab
The PDF tab (Figure 7-8) contains settings specific to PDF output.PDF Version
The PDF Version radio buttons control what version of PDF is generated. PDF 1.3 is the most commonly supported version. Click on the corresponding radio button to set the version.Page Mode
The Page Mode option button controls the initial viewing mode for the document. Click on the option button to set the page mode.The Document page mode displays only the document pages. The Outline page mode displays the table-of-contents outline as well as the document pages. The Full-Screen page mode displays the document pages on the whole screen; this mode is used primarily for presentations.
Page Layout
The Page Layout option button controls the initial layout of document pages on the screen. Click on the option button to set the page layout.The Single page layout displays a single page at a time. The One Column page layout displays a single column of pages at a time. The Two Column Left and Two Column Right page layouts display two columns of pages at a time; the first page is displayed in the left or right column as selected.
First Page
The First Page option button controls the initial page that is displayed. Click on the option button to choose the first page.Page Effect
The Page Effect option button controls the page effect that is displayed in Full-Screen mode. Click on the option button to select a page effect.Page Duration
The Page Duration slider controls the number of seconds that each page will be visible in Full-Screen mode. Drag the slider to adjust the number of seconds.Effect Duration
The Effect Duration slider controls the number of seconds that the page effect will last when changing pages. Drag the slider to adjust the number of seconds.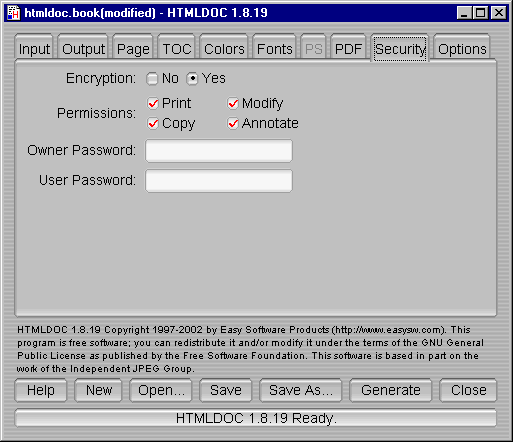
Figure 7-9 - The Security Tab
The Security Tab
The security tab (Figure 7-9) allows you to enable PDF document encryption and security features.
Encryption
The Encryption buttons control whether or not encryption is performed on the PDF file. Encrypted documents can be password protected and also provide user permissions.
Permissions
The Permissions buttons control what operations are allowed by the PDF viewer.
Owner Password
The Owner Password field contains the document owner password, a string that is used by Adobe Acrobat to control who can change document permissions, etc.
If this field is left blank, a random 32-character password is generated so that no one can change the document using the Adobe tools.
Options
The Include Links option controls whether or not the internal links in a document are included in the PDF output. The document outline (shown to the left of the document in Acrobat Reader) is unaffected by this setting.
User Password
The User Password field contains the document user password, a string that is used by Adobe Acrobat to restrict viewing permissions on the file.
If this field is left blank, any user may view the document without entering a password.
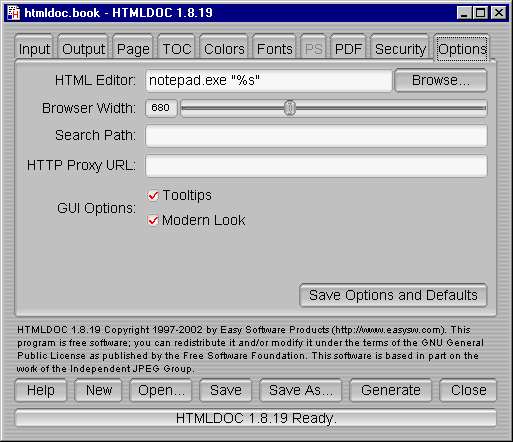
Figure 7-10 - The Options Tab
The Options Tab
The options tab (Figure 7-10) contains the HTML file editor of your choice and allows you to save the settings and options that will be used in new documents.
HTML Editor
The HTML Editor field contains the name of the HTML editor to run when you double-click on an input file or click on the Edit Files... button. Enter the program name in the field or click on the Browse... button to select the editor using the file chooser.
The %s is added automatically to the end of the
command name to insert the name of the file to be edited. If you
are using Netscape Composer to edit your HTML files you should
put "-edit" before the %s to tell Netscape to edit
the file and not display it.
Browser Width
The Browser Width slider specifies the width of the browser in pixels that is used to scale images and other pixel measurements to the printable page width. You can adjust this value to more closely match the formatting on the screen.
The default browser width is 680 pixels which corresponds roughly to a 96 DPI display. The browser width is only used when generating PostScript or PDF files.
Search Path
The Search Path field specifies a search path for files that are loaded by HTMLDOC. It is usually used to get images that use absolute server paths to load.
Directories are separated by the semicolon (;) so that drive letters (and eventually URLs) can be specified.
Proxy URL
The Proxy URL field specifies a URL for a HTTP proxy server.
Tooltips
The Tooltips check button controls the appearance of tooltip windows over GUI controls.
Modern Look
The Modern Look check button controls the appearance of the GUI controls.
Strict HTML
The Strict HTML check button controls strict HTML conformance checking. When checked, HTML elements that are improperly nested and dangling close elements will produce error messages.
Save Options and Defaults
The Save Options and Defaults button saves the HTML editor and all of the document settings on the other tabs for use in new documents. These settings are also used by the command-line version of HTMLDOC.
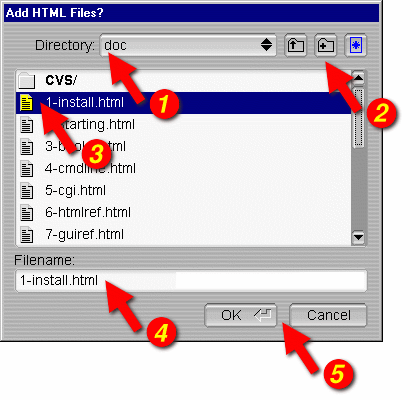
Figure 7-11 - The File Chooser
The File Chooser
The file chooser (Figure 7-11) allows you to select one or more files and create files and directories.
Directory
The Directory option button (1) shows the current directory or folder that is displayed in the file list (3). Click on the option button to navigate to other directories or folders.
Directory Buttons
The directory buttons (2) allow you to go up one level in the directory hierarchy, create a new directory, and change the filename filter settings, respectively.
File List
The file list (3) lists the files and directories in the current directory or folder. Double-click on a file or directory to select that file or directory. Drag the mouse or hold the CTRL key down while clicking to select multiple files.
Filename
The Filename field contains the currently selected filename. Type a name in the field to select a file or directory. As you type, any matching filenames will be highlighted; press the TAB key to accept the matches.
Dialog Buttons
The dialog buttons (5) close the file chooser dialog window. Click on the OK button to accept your selections or the Cancel button to reject your selections and cancel the file operation.