![[Compaq]](../../images/hp.gif)
![[Go to the documentation home page]](../../images/buttons/hp_bn_site_home.gif)
![[How to order documentation]](../../images/buttons/hp_bn_order_docs.gif)
![[Help on this site]](../../images/buttons/hp_bn_site_help.gif)
![[How to contact us]](../../images/buttons/hp_bn_comments.gif)
![[OpenVMS documentation]](../../images/hp_ovmsdoc_sec_head.gif)
| Document revision date: 15 July 2002 | |
|
|
|
|
|
|
| Previous | Contents | Index |
The OpenVMS Mail utility (MAIL) lets you send messages to other users on your system or on any other computer that is connected to your system with Compaq TCP/IP for OpenVMS or a DECnet network. This chapter describes:
For additional information, refer to the following:
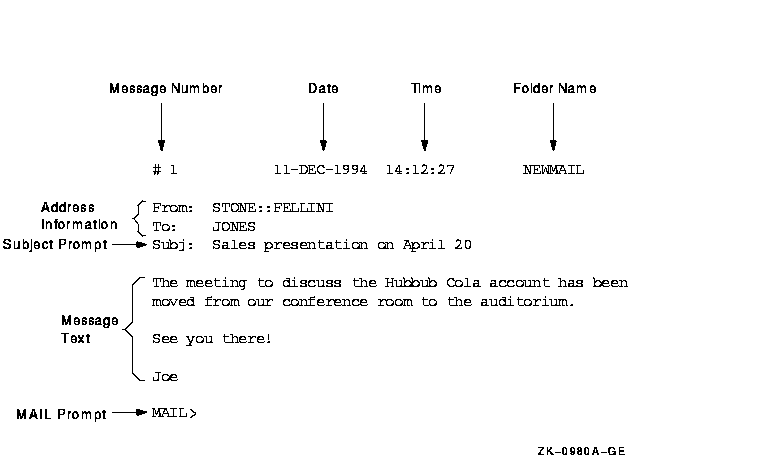
The following figure shows a sample mail message and its components.
The following sections describe how to invoke and exit Mail.
7.1.1 Invoking Mail
To invoke the Mail utility, enter the DCL command MAIL, as follows:
$ MAIL MAIL> |
To exit from Mail, enter the EXIT command at the MAIL> prompt, as follows:
MAIL> EXIT $ |
You can also exit from Mail by pressing Ctrl/Z or by using the QUIT
command.
7.2 Reading Messages
Mail stores the messages you receive in mail files, which have the
default file type .MAI. In this file, by default, Mail provides two
folders that store old and new messages. New messages
are automatically placed in a folder called NEWMAIL; old messages are
placed in a folder called MAIL. After you read a new message, the
message automatically moves from the NEWMAIL folder to the MAIL folder,
unless you enter the FILE, MOVE, or DELETE command. Mail deletes the
NEWMAIL folder after you have read all new mail messages and either
select another folder or exit from Mail.
7.2.1 Reading New Mail
When you are logged in to your account and receive a mail message, Mail notifies you. For example, notification of a message sent by user FELLINI is displayed as follows:
New mail on node DOODAH from STONE::FELLINI (10:02:23) |
To read a new message, invoke Mail and press the Enter key at the MAIL> prompt, as follows:
$ MAIL You have 1 new message. MAIL> |
If you have more than one new message, press Enter at the MAIL> prompt to read the other messages. When you have read all your new messages, Mail issues the message "%MAIL-E-NOMOREMSG, no more messages" and continues to prompt for commands until you exit Mail.
If you receive a mail message while you are in Mail, enter the READ/NEW
command to read the new message.
7.2.2 Reading Old Messages
To reread old mail messages in your default Mail folder, use the following procedure:
| Step | Task |
|---|---|
| 1 |
Enter the SELECT command at the MAIL> prompt. For example:
MAIL> SELECT MAIL Mail places you in the folder named MAIL. |
| 2 |
To read the first message in your default MAIL folder, press Enter at
the MAIL> prompt or enter the READ command.
Mail displays the first message (1) in your default mail file. |
| 3 |
To display the next message, press Enter.
If the message is too long to display on one screen, press Enter to display the next part of the message. To skip the remainder of a message and display the next message, enter the NEXT command. |
To read a particular message in your default MAIL folder, use the following procedure:
| Step | Task |
|---|---|
| 1 |
Enter the DIRECTORY command at the MAIL> prompt.
To select a subset of messages from the list, use the DIRECTORY command qualifiers /FROM or /SUBJECT. |
| 2 |
Enter the number of the message that you want to read at the MAIL>
prompt.
Mail displays the message that you selected. |
In the following example, the DIRECTORY command is used to display old messages and then the message labeled 2 is selected for reading:
MAIL> DIRECTORY
                                                          MAIL
# From              Date              Subject
1 STONE::FELLINI    11-DEC-1999       Sales presentation on May 11
2 DOODAH::JONES     11-DEC-1999       Status
MAIL> 2
|
If you have many messages, you can locate a particular message by using the SEARCH command to find a string in one or more of the messages. To search for a string, specify that string as a parameter to the SEARCH command.
Each time you specify a new string, the SEARCH command starts the search at message number 1. To continue searching the folder for messages that contain the specified string, use the SEARCH command without specifying a parameter. To search for the same string in a different folder, enter the SELECT or SET FOLDER folder-name command and continue using the SEARCH command without specifying a parameter.
In the following example, messages in the current folder are searched for the first message that contains the string appointment:
MAIL> SEARCH "appointment" |
To send a mail message to any user on your system, do the following:
| Step | Task |
|---|---|
| 1 |
Enter SEND at the MAIL> prompt.
Mail prompts you for the name of the user to receive the message. |
| 2 |
Enter the name of the user receiving the message and press Enter.
Mail prompts you for the subject of the message. |
| 3 |
Enter the subject of the message and press Enter. Entering this
information is optional.
Mail prompts you for the text of the message. |
| 4 | Enter the text of a message, or just press Enter. Entering this information is optional. |
| 5 | Press Ctrl/Z to send the message. If you decide not to send the message, press Ctrl/C, which cancels the send operation without exiting from Mail. |
In the following example, a message is sent to a user named THOMPSON:
MAIL> SEND To: THOMPSON Subj: Meeting on April 20 Enter your message below. Press CTRL/Z when complete, or CTRL/C to quit: I have some new ideas about the Hubbub Cola account. Let me know when you are available to talk about them. --Jeff |
The following sections describe how to send mail across the network.
7.4.1 Specifying Your Network Protocol
When you receive a message, Mail interprets the specified address as follows:
However, you can customize your Mail environment to force the system to choose a specific protocol. This option is helpful in cases where a mail address can be interpreted as valid for either the Internet or DECnet protocol.
To specify protocols, you can define the MAIL$INTERNET_MODE logical name as follows:
To modify your Mail environment in any of these ways, Compaq recommends that you define the MAIL$INTERNET_MODE and MAIL$INTERNET_TRANSPORT logical names in your LOGIN.COM file. (See Chapter 11 for complete information about using and defining logical names.)
For example, if your system is set up to use the default (HYBRID), the Mail address smith@pluto is interpreted as a DECnet address because there are no periods in that address. However, if you want Mail to use SMTP instead of DECnet, you can add the following line to your LOGIN.COM file:
$ DEFINE MAIL$INTERNET_MODE SMTP |
When you then specify smith@pluto, Mail interprets this address as an
Internet address and uses the SMTP protocol (for example,
SMTP%"smith@pluto.xyz.dec.com").
7.4.2 Specifying Node Names
If your computer system is part of a network, you can send mail to any other user on the network. If you are sending mail to someone on a different node, enter the user's node name and user name at the To: prompt. If the user name contains special characters or spaces, you must enclose the user name in quotation marks (""). Use the following format:
|
nodename::username |
Mail displays a message if the network connection to the remote node is not available. Wait a while, and then try again to send the message.
For additional information on specifying node names, refer to Section 3.1.6.
In the following example, a message is sent to user HIGGINS on node CHEETA:
MAIL> SEND To: CHEETA::HIGGINS |
You can also use full Internet mail addresses to send mail to users over a network. These addresses are common, especially if you are sending mail outside your organization.
|
username@company.com |
At the To: prompt, enter the full Internet address of the user you want to send mail to. These addresses are seldom case-sensitive.
MAIL> SEND To: J_SMITH@COMPANYNAME.COM, Kate.Muir@school.edu |
You can use a logical name to represent a user's name and node; then you can use the logical name to send mail. Note that Mail ignores any access control information in the node name or logical name.
In the following example, HENRY is used in place of CHEETA::HIGGINS. First, the logical name (HENRY) is defined, then it is used in place of the user name and node:
$ DEFINE HENRY CHEETA::HIGGINS $ MAIL MAIL> SEND To: HENRY |
The following sections describe how to send mail to more than one user.
7.5.1 Using Individual Names
You can send mail to several users at the same time in one of two ways: using individual user names at the To: prompt or using a distribution list. To send the same message to several users on the same node by using their user names, enter the user names at the To: prompt and separate them with commas or spaces.
In the following example, a message is sent to Thompson, Jones, and Barney:
MAIL> SEND To: THOMPSON,JONES,BARNEY Subj: Meeting on January 9 |
A distribution list is a file that contains a list of users and their node names. You must use a text editor to create distribution lists. Distribution lists are not created within the Mail utility.
Your open file quota (a limit associated with your account) determines the number of different nodes to which you can send mail (at one time) and the depth to which you can nest distribution lists. If you exceed the quota, Mail displays an error message. Ask your system manager to increase your quota or send mail in batches to fewer nodes at one time.
By default, the system looks for a distribution list file with the file type .DIS. If the file containing your distribution list has a different file type, specify the file name and file type at the To: prompt. If you invoke Mail while in one directory and the file containing the distribution list is in another, enter the distribution list's full directory name at the To: prompt.
To create a distribution list, use the following procedure:
| Step | Task |
|---|---|
| 1 | Use a text editor to create a distribution list file with the file type .DIS. |
| 2 | Type one user name per line in the file. |
| 3 | To include the names of other distribution lists in the file (to "nest" the lists), specify an at sign (@) followed by the name of the distribution list. |
| 4 | To include comments in the file, enter an exclamation point (!) before the comment. |
The following example shows a distribution list file:
! ALLBUDGET.DIS ! ! Budget Committee Members @BUDGET ! listed in BUDGET.DIS. ! Staff Thompson BRUTUS::JONES PORTIA::BARNEY |
If the file BUDGET.DIS is not in the same directory as the new
distribution list file you are creating (ALLBUDGET.DIS), include the
file specification for BUDGET.DIS in the new distribution file.
Depending on where you create ALLBUDGET.DIS, you might have to specify
the device and directory in which BUDGET.DIS is located. (See
Chapter 3 for more information about file specifications.)
7.5.3 Sending Messages to Distribution Lists
To send mail to several users by using a distribution list, use the following procedure:
| Step | Task |
|---|---|
| 1 | Invoke Mail. |
| 2 | Type SEND at the MAIL> prompt and press Enter. |
| 3 | Type an at sign (@) and the file name of the distribution list at the To: prompt. Press Enter. |
| 4 | Type the subject of the message at the Subj: prompt and press Enter. |
| 5 | Enter the text of the message at the text prompt. |
In the following example, a message is sent to the distribution list ALLBUDGET.DIS:
MAIL> SEND To: @ALLBUDGET Subj: Tomorrow's Meeting Enter your message below. Press CTRL/Z when complete, or CTRL/C to quit: The meeting about the Hubbub Cola account is tomorrow at 2:00. --Jeff |
You can also send a file to a distribution list from DCL level. If you omit the file type .DIS, place quotation marks ("") around the at sign (@) and file name to identify the file as a distribution list. To include a subject, use the /SUBJECT qualifier with the MAIL command.
The following example sends the file MEETING.TXT to the user THOMAS and the distribution list FRIENDS.DIS:
$ MAIL/SUBJECT="update" MEETING THOMAS,"@FRIENDS.DIS" |
The following example sends the file NOTICE.TXT to the distribution list WRITERS.DIS. Here, the /SUBJECT qualifier is not included so the message is sent without a subject notation.
$ MAIL NOTICE "@WRITERS" |
You can send a file to other users from within Mail or from DCL level. Use the following procedure to send a file from within Mail:
| Step | Task |
|---|---|
| 1 | At the MAIL> prompt, enter SEND and the name of the file you want to send. |
| 2 | At the To: prompt, enter the user name of the person you want to receive the file. |
| 3 | At the Subj: prompt, enter the subject of the file. |
| 4 | Press Enter to send the file. To cancel the send operation, press Ctrl/C or Ctrl/Y. Ctrl/C keeps you within Mail; Ctrl/Y returns you to DCL level. |
In the following example, the file MEMO.TXT is sent to user EDGELL:
MAIL> SEND MEMO.TXT To: EDGELL Subj: Another memo |
When sending files though mail, note the following restrictions:
If the file is a compound document structured according to the DIGITAL
Document Interchange Format (DDIF) specification, Mail preserves the
OpenVMS RMS file tags and DDIF semantics, for OpenVMS AXP Version 1.0
or VAX/VMS Version 5.2-2 or later systems only. If you try to send mail
messages containing DDIF files to operating systems other than OpenVMS
or to OpenVMS systems earlier than OpenVMS AXP Version 1.0 or VAX/VMS
Version 5.2-2, Mail returns an error message.
7.6.2 Sending Files from DCL
When you send a file from DCL level, Mail is invoked but you do not enter an interactive session, nor do you see the MAIL> prompt. When the file is sent, you return to DCL level automatically. After you have typed the MAIL command with the appropriate qualifiers, press Enter to send the file or press Ctrl/C to cancel the send operation.
Note the following as well:
In the following example, the file MEMO.TXT is sent to user EDGELL on node CHEETA from the DCL level:
$ MAIL/SUBJECT="Another memo" MEMO.TXT CHEETA::EDGELL |
In the following example, the user is prompted to input the text of the message because the file name specified is SYS$INPUT:
$ MAIL SYS$INPUT: To: ARMSTRONG Enter your message below. Press CTRL/Z when complete, or CTRL/C to quit: The text of the message is here. [Ctrl/Z] $ |
| Previous | Next | Contents | Index |
|
|
| privacy and legal statement | ||
| 6489PRO_012.HTML | ||